|
|


 Arabic
 Bengali
 Chinese
 English
 French
 German
 Hebrew
 Hindi
Hindi Italian
 Japanese
 Korean
 Malay
Malay Polish
 Portuguese
 Spanish
 Turkish
 Ukrainian
 Vietnamese
|
ENCYCLOPEDIA OF RADIO ELECTRONICS AND ELECTRICAL ENGINEERING Programmable thermostat. Encyclopedia of radio electronics and electrical engineering
Encyclopedia of radio electronics and electrical engineering / Power regulators, thermometers, heat stabilizers In spring, autumn (and sometimes in summer), electric heaters have to be used in garden houses. In this case, the heat stabilizer offered here will help the summer resident to save electricity, which will maintain a lower temperature in the room at night, and by morning will bring it to a "comfortable" value. The thermostat (see diagram in Fig. 1) contains a thermistor bridge RK1, R6-R9, a comparator on an operational amplifier DA1 and a triac control circuit VS1, which is somewhat unusual.
The temperature stabilizer uses a power supply with a quenching capacitor C6. The output diagonal of the VD5 rectifier bridge includes series-connected emitting diode U1.1 of the optocoupler U1, the HL1 LED indicating the heater is turned on, and the VD4 zener diode, the voltage from which is supplied to power the remaining elements of the device. When the transistor VT1 is closed, a pulsating current with an amplitude of about 32 mA flows through the emitting diode of the optocoupler. The voltage ripple on the zener diode VD4 is smoothed out by the capacitor C5. The current through the emitting diode reaches its maximum value at the moments when the mains voltage passes through zero, i.e., exactly when it is necessary to turn on the U1 optocoupler and the VS1 triac. The average current value at the output of the bridge is about 22 mA, which is more than enough to power the rest of the thermostat. When the temperature of the thermistor RK1 is below the set voltage at the non-inverting input of the op-amp DA1 is higher than at the inverting one, the voltage at the output of the op-amp is close to the voltage at the positive terminal of the capacitor C5. Zener diode VD3 and transistor VT1 are closed. The entire current of the diode bridge VD5 flows through the emitting diode of the optocoupler, the optocoupler turns on and turns on the triac VS1. The mains voltage is supplied to the heater, the HL1 LED signals this with its glow. Triac VS1 will turn on for the first time at a random time, after which it will turn on at the beginning of each half-cycle, which will ensure a low level of interference. When the temperature of the thermistor rises to the set value, the op-amp will switch and the voltage at its output will become close to the voltage at the negative terminal of the capacitor C5. The zener diode VD3 and the transistor VT1 will open. The entire current of the diode bridge VD5 will go through the transistor VT1 past the emitting diode of the optocoupler U1 and the LED HL1, and most of it will still flow into the zener diode VD4, and the smaller part will flow through the resistor R12 and the zener diode VD3 to the output of the op-amp DA1. Optocoupler U1 and triac VS1 will stop turning on at the beginning of each half cycle, the heater will be disconnected from the network. The balancing temperature of the thermistor bridge RK1, R6-R9, which is supported by the thermostat, depends on the voltage at the output 15 of the DD1 chip. At a high level at this output, the voltage on the engine of the variable resistor R8 is slightly higher than at a low level. The balance of the bridge corresponds to the lower resistance of the thermistor RK1 (its higher temperature). At the moment the thermostat is connected to the network, with open contacts of switch SA1, the pulse generator starts to work on the elements of the DD1 microcircuit with pins 9, 11, 12, resistor R3 and capacitor C2 [1]. The generation frequency is about 20 kHz and, regardless of the initial state of the triggers, after no more than 16384 generator periods (less than 1 s), a high logic level will appear at the output 15 of the DD1 chip. Through the VD1 diode, it will go to the input Z of the generator and prohibit its operation [2]. This mode is the main one for the thermal stabilizer. If we now close the contacts of the SA1 switch, a pulse will go to the input R of the DD1 microcircuit and set the last trigger of the counter of the DD1 microcircuit to zero (all previous triggers are already in it by this moment). Output 15 will go low. The pulse duration is chosen equal to 60 ms, which guarantees the start of the counter only after the end of the bounce of the switch contacts. Connecting the capacitor C3 in parallel with C2 leads to a decrease in the generation frequency by 30 times and the establishment of a pulse period at the input of the counter of the DD000 microcircuit of about 1 s. The presence of a low logic level at the output of 15 DD1 leads to a decrease in the voltage on the engine of the resistor R8 and stabilization of a lower temperature than in the main mode. Approximately 7 hours after closing the contacts of switch SA1, a high logic level will appear at output 15 DD1, the generator will be stopped again and the thermostat will switch to the main mode. To restart the low temperature stabilization, it is necessary to open and close contacts SA1 again. In the main mode of operation, it is better to keep SA1 contacts open. In this case, after a break in the mains voltage supply, the stabilizer immediately switches to the main mode. Resistor R4 and diode VD2 suppress impulse noise of negative polarity at the input Z of the DD1 microcircuit, which occurs at the moment of recharging the capacitor C3. In the absence of these elements, these pulses pass through the diode VD1 to the output 15 of the microcircuit and to the thermistor bridge, disrupting the normal operation of the op-amp DA1. The own protective diode of the DD1 microcircuit, connected in parallel with VD2, has too much resistance. Resistor R10 provides a small hysteresis of the op-amp DA1, which also contributes to its clear operation. Resistor R13 sets the operating mode of the op-amp, and R14 reduces the current through the HL1 LED to an acceptable value. The thermistor bridge is designed according to the recommendations outlined in the article [3]. The device uses a thermistor MMT-4 with a resistance of 15 kOhm. In accordance with the table given in [3], for a temperature range of 15...25 °C, the resistance of the resistor R6 (Rdop) should be 10,3 kOhm, a resistor with a nominal value of 10 kOhm was installed. At a temperature of 15 °C, the resistance of the thermistor is 18,1 kOhm, the transfer coefficient of the divider RK1R6 is Kmin = 10/(10+18,1) = 0,356, and at 25 °C it is 12,5 kOhm and Kmax = 10/(10+12,5 .0,444) = 7, respectively. It is these transfer coefficients that the divider R9-R8 should provide at the extreme positions of the engine of the variable resistor R8. To calculate this divider, you must specify the resistance of one of its resistors, for example R8. It is easy to determine that for R22 \u9d 89 kOhm and the above transfer coefficients, the resistance R7 should be equal to 139 kOhm, RXNUMX - XNUMX kOhm. Resistors of the nearest lower ratings were installed, which with a guarantee provided the necessary regulation interval. To calculate the resistance of the resistor R5, it is necessary to set the change in temperature during the transition from the main mode to the low temperature mode. This value was taken equal to 4 °C. It follows from the above calculation that when the temperature changes by 10 °C, the transfer coefficient of the divider R7-R9 should change by Kmax-Kmin = = 0,444-0,356 = 0,088, respectively, for a temperature change by 4 °C, the transfer coefficient should change by DK = 0,088 /10(4 = 0,0352. A simple but cumbersome derivation leads to the following formula for calculating the resistance R5: R5 = R9(R7+R8)/(R7+R8+R9)((1/DK-1). Substituting the numerical values into the formula, we get R5 = 1,46 MΩ. The above formulas will allow you to calculate the resistance of resistors R5-R9 when using another thermistor or to provide a different temperature range or to change the temperature other than 4 °C. When the resistor R5 is turned on in accordance with the diagram of fig. 1, it affects the stabilized temperature both in the main mode of operation and at a lower temperature (with a decrease in the resistance of the resistor R5, the stabilized temperature levels are almost symmetrically moved apart relative to the one set by the resistor R8). If it is desirable that when the resistor R5 is connected, the temperature in the main mode does not change, you can install a diode in series with it, shown in Fig. 1 with dashed lines. All elements of the temperature stabilizer, except for the triac VS1 and the output sockets X1 and X2, are mounted on a printed circuit board with dimensions of 80 (65 mm (Fig. 2). The board is designed for the installation of MLT resistors (R10 - CMM), capacitors K73-17 (C3 for 63 V , C6 for 400 V), K50-16 (C5), KM-5 and KM-6 (others). Variable resistor R8 - SP3-4aM or SP3-4bM. Diodes VD1, VD2 - any low-power silicon, zener diodes VD3 and VD4 - any small-sized stabilization voltage 3,3 ... 5,6 V and 7,5 ... 8,2 V, respectively. Switch SA1 - P2K with latching in the pressed state.
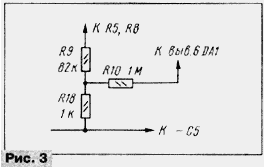
In the absence of resistor R10 of the specified resistance, it is permissible to change the circuit in accordance with Fig. 3.
Transistor VT1 - any low-power silicon pnp structure. Instead of KTs407A diode bridges, any diodes with an operating current of at least 100 mA are suitable; diodes with an operating voltage of at least 6 V are suitable for replacing VD300. It is permissible to use the dinistor optocoupler of the AOU103 series with letter indices B and V, the KU208 triac - V and G. Capacitor C6 can be replaced with any metal film, for example K73-16, with a rated voltage of at least 400 V. LED - any visible glow. You just need to pay attention to its installation: the LED should be as far as possible outside the board, and its lens is directed in the same direction as the axis of the variable resistor. The triac is mounted on a ribbed heat sink 60x50x25 mm in size. In this case, a heater with a power of up to 1 kW can be used. The design of the thermal stabilizer is the same as in [4]. When setting up the device, you should set the stabilization time for the low temperature by selecting the resistor R3 and, if necessary, the capacitor C3. To do this, it is necessary to connect a DC voltmeter to terminal 12 of the DD1 microcircuit and to the negative terminal of the capacitor C5 and, with the contacts of the SA1 switch closed, count the number of pulses in 1 ... 2 minutes. Further, according to the measurement results, find the pulse period and multiply it by 16384 - this will be the operating time of the thermal stabilizer in the low temperature mode. In accordance with the necessary change in this time, the resistance of the resistor R3 is specified. The temperature scale of the variable resistor R8 is calibrated without connecting the heater, changing the temperature in the room. Having set the temperature in the room, for example, 20 ° C and, rotating the variable resistor slider, mark "20" for the position of the handle at which the LED turns on and off. You should also place marks at other points. Graduation is facilitated by the linearity of the scale. The choice of elements of the thermistor bridge in accordance with the above calculation confirmed its sufficiently high accuracy. In the main mode, the stabilization temperature range was 16...27 °С, in the low temperature mode -12...23 °С. However, the device stabilizes by 0,5...0,8 °With a lower temperature than it should be by calculation. The fact is that the thermistor is heated by the passing current. To reduce self-heating, it is desirable to use a thermistor with a large resistance and reduce the supply voltage. In the temperature stabilizer, the supply voltage was chosen as low as possible. With a lower voltage at the output of the first element of the DD1 chip generator (pin 10, see [1]), a “notch” appears and the counter starts to work incorrectly. At the same time, at pins 11 and 12, the rises and falls of the pulses are clear and steep, which once again confirms the undesirability of using the signal from the output of the first generator inverter [1]. Note: Mistakes were found in article [3] - formula (5) should look like this: Radd = (R1R2 + R2R3 - 2R1R3) / (R1 + R3 - 2R2), and the upper formula of the last column of the article is like this: B = ln (R1/ R2) / (1/T1 - 1/T2). Literature
Author: S. Biryukov, Moscow
Machine for thinning flowers in gardens
02.05.2024 Advanced Infrared Microscope
02.05.2024 Air trap for insects
01.05.2024
▪ IGBT modules with a total lead inductance of 15 nH ▪ AI was taught to distinguish between the eyes of the living and the dead ▪ An invisible barrier on the ocean's surface prevents CO2 absorption
▪ site section Tone and volume controls. Article selection ▪ article Negative impact of harmful substances on the environment. Fundamentals of safe life ▪ Where did the word silhouette come from? Detailed answer ▪ shark knot article. Tourist tips
Home page | Library | Articles | Website map | Site Reviews
www.diagram.com.ua |


 Leave your comment on this article: