|
|


 Arabic
 Bengali
 Chinese
 English
 French
 German
 Hebrew
 Hindi
Hindi Italian
 Japanese
 Korean
 Malay
Malay Polish
 Portuguese
 Spanish
 Turkish
 Ukrainian
 Vietnamese
|
ENCYCLOPEDIA OF RADIO ELECTRONICS AND ELECTRICAL ENGINEERING Digital radio control system with frequency coding. Encyclopedia of radio electronics and electrical engineering
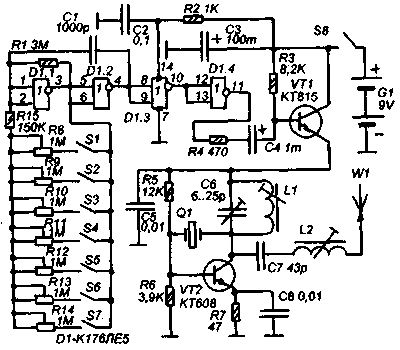
Encyclopedia of radio electronics and electrical engineering / Radio control equipment The most common type of radio control systems for models are systems built on the principle of frequency coding. In such a system, each command corresponds to a strictly defined frequency of the modulating signal. The encoder of such a system is a multivibrator, the frequency of which is changed using several command buttons or using a variable resistor. The decoder usually consists of a set of RC or LC filters (almost like in a color and music installation), which extract command signals and send them to electronic keys that control loads. The system described in this article is built on a similar principle (each command corresponds to a certain modulation frequency), but the role of the decoder in it is performed by a kind of simplified digital frequency meter. The coding system built on this principle is described in detail in L.1. The schematic diagram of the transmitting console is shown in Figure 1. The transmitter itself is built according to a single-stage circuit on a transistor VT2. The oscillatory circuit L1C6 included in its collector circuit is tuned to the carrier frequency. The carrier frequency is determined by the resonant frequency of the Q1 crystal (in this case 27,12 MHz). The resonance frequency Q1 must be equal to the carrier frequency or be half of it, in the first case, the generator on VT2 operates on the fundamental harmonic of the resonator, and in the second on its second harmonic. For example, for a carrier frequency of 27 MHz, you can take a resonator at 27 MHz or at 13,5 MHz.
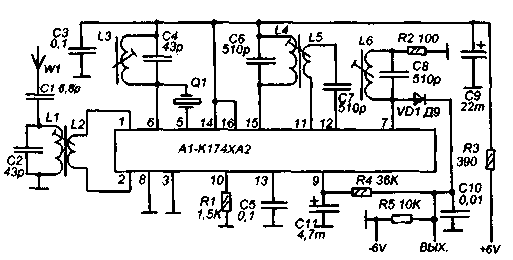
The transmitter is single-stage, the transistor VT2 plays the role of both a master oscillator and a power amplifier. The RF-AC voltage from the collector VT2 is supplied through the decoupling capacitor C7 and the extension matching coil L2 to the antenna W1, the role of which is performed by one "mustache" from the old television telescopic antenna. The length of the "mustache" in the extended state is about 1 meter. The amplitude modulator is made on the transistor VT1. This transistor is included in the open circuit of the transmitter power supply. The bias voltage at its base is set by resistor R3 in such a way that in the absence of an alternating modulating voltage at the base of VT1, it is in an almost open state. In this case, approximately 3/4 of the supply voltage is supplied to the transmitter. When an AC voltage is applied to the base VT1 from the encoder, it starts to open more strongly, then partially close. In this case, the transmitter supply voltage changes accordingly, and, consequently, the power of its radiation. In this way, amplitude modulation of the high-frequency signal entering the antenna is performed. The encoder is made on a D1 chip. It is a multivibrator, the frequency of which depends on the capacitance C1 and the resistance of the resistor connected between the input and output of the element D1.1. With the help of seven tuning resistors R6-R14 and seven buttons S1-S7, you can set seven different frequencies ranging from 500-3000 Hz. These frequencies will encode seven different commands that can be transmitted using the transmitting console. The transmitting panel is powered by a 9V battery of six A332 cells or two "flat" batteries. The receiver consists of a receiving path on a K174XA2 chip and a decoder built according to a simplified frequency counter scheme. The receiving path is entirely borrowed from L2. A schematic diagram of the receiving path is shown in Figure 2. It is built on a multifunctional microcircuit A1 - K174XA2 according to a simplified typical diagram.
The signal from the antenna W1, the role of which is played by a thin steel spoke about 0,5 meters long, enters the input circuit L1C2. The loop is tuned to the transmitter carrier frequency. The selected signal through the coupling coil L2 is fed to the symmetrical input of the URF of the balanced mixer of the A1 microcircuit. The local oscillator is also part of the microcircuit. The local oscillator binding circuit differs from the typical one in the presence of a Q1 quartz resonator in the feedback circuit, which stabilizes the local oscillator frequency. At the output of the local oscillator, the L3C4 circuit is turned on, tuned to the frequency of the local oscillator. In this case, a 26,655 MHz quartz resonator is used in the local oscillator (taking into account the intermediate frequency of 465 kHz and the carrier frequency of 27,12 MHz). But in this circuit, you can also use resonators for other frequencies, taking into account other carrier and intermediate frequencies, for example, at a carrier frequency of 27 MHz (if the resonator in the transmitter is at 13,5 MHz), you can use the resonator in the receiver at 13,2 MHz, then the local oscillator frequency will be equal to 26,4 MHz, and the intermediate frequency will be 600 kHz. But at the same time, it is necessary to rebuild the L4C6 and L6C8 circuits from the 465 kHz IF to the 600 kHz IF. The intermediate frequency signal is extracted at pin 15 A1 and enters the L4C6 circuit, tuned to IF = 465 kHz. There is no piezoceramic filter in this circuit. On the one hand, this adversely affects the selectivity of the path in the adjacent channel, but on the other hand, higher sensitivity is provided due to the absence of losses in the filter, and it is possible to select any IF within 300-1000 kHz, depending on which quartz resonators are available . If necessary, you can always introduce a 465 kHz piezoceramic filter into the circuit, replacing capacitor C7 with it. In any case, the selectivity in the adjacent channel of such a receiving path is much higher than that of conventional super-regenerative receivers used for radio control systems. Through the capacitor C7, the selected IF voltage is supplied, through terminals 11 and 12 A1, to the input of the IF amplifier of the microcircuit. At the output of the IF (pin 7), the pre-detector circuit L6 C8 is turned on, tuned, like L4 C6, to an intermediate frequency (in this case, 465 kHz). The detector is made according to a half-wave circuit based on a VD1 germanium diode. A low-frequency voltage, with an amplitude of about 100 mV, is released on the capacitor C10, and is fed to the output of the radio path. In addition, this voltage is integrated by the SI circuit R4 to obtain a constant AGC voltage, which is applied to pin 9 of the A1 chip. The second AGC circuit (pin 10) of the K174XA2 chip is not used in this circuit for the sake of simplicity. The range of reliable communication between the transmitter and the receiving path is about 300-500 meters in the line of sight. Over water, the communication range is still increasing. In the presence of such powerful interference sources as collector motors connected without LC filters, the line-of-sight range is reduced to 100-200 meters, depending on the level of interference. It is advisable to enclose the radio receiving path board in a brass or tin screen. The supply voltage of the receiving path is 6-9 V. As a power source, you can use a Krona battery or a battery made up of disk batteries or separate galvanic cells of the A316 type. The same battery is used to power the digital part of the decoder. The circuit diagram of the digital decoder is shown in Figure 3.
The AC voltage from the output of the receiving path is fed to the limiting amplifier on the operational amplifier A1. The voltage is converted into arbitrary waveforms, and then fed to the Schmidt trigger on elements 01.3 and D1.4, which give this signal the final form of rectangular MOS logic pulses. The Schmidt trigger is controlled, it functions when a logical zero arrives at pin 9 D1.4 and becomes immune to input pulses when a unit arrives at this pin. Thus, by changing the level at pin 9 D1.4, you can control the passage of pulses to the input of counter D3. Counter D3 is used to count the number of pulses received at the input of the decoder during the measuring period of time. The measuring time interval is set using a multivibrator on D1.1 and D1.2 and a counter D2. Suppose, in the initial state, element D1.4 is open and pulses are being counted by counter D3. At this time, the output of D2 will be a logical zero. The counting input D3 constantly receives pulses from the multivibrator at D1.1 and D1.2. As soon as D2 counts up to 32, a unit appears on its output. This unit is supplied simultaneously to the output D1.4 and output 6 of the register D4. the flow of pulses to the input D3 stops and the code from the outputs of the counter D3 is transferred to the memory of the register D4. This lasts for a half-cycle of pulses at the output of the multivibrator, while the output of D1.1 is logic zero. Then the state of this output changes to one. This leads to the fact that both diodes VD1 and VD2 are closed. At the point of their connection with R8, a single pulse occurs, which sets both counters D2 and D3 to zero. After that, D1.4 opens and a new period of counting input pulses begins. Thus, at each point in time, the D4 register will store the result code of the last measurement of the input frequency. If the frequency does not change, this code, periodically updated, will remain the same. If the frequency changes, then after a time equal to 32 pulse periods at the output of the multivibrator at D1.3 and D1.4, the code stored in the register will also change. The D5 decoder is used to convert this code into a more accessible decimal form. To determine the frequency, only the last three most significant digits of the counter D3 are used, while it turns out that the first seven input pulses are not taken into account in any way. Such a "roughening" of the frequency measurement is done intentionally in order to exclude errors from the temperature detuning of the encoder and decoder multivibrators, as well as from all kinds of interference and interference. The decoder is powered from the same source as the receiving path with a voltage of 6 ... 9V. Inductance L1 serves to reduce interference from actuators. Actuating devices must be controlled by transistor switches designed to supply logic units of MOS logic to their inputs. All parts (except transistor switches) are mounted on three printed circuit boards. On one board, all the details of the transmitting console (except for the antenna, buttons and power source), on the second board - the radio receiving path, and on the third - the decoder. Installation is carried out on single-sided printed circuit boards. The decoder board is made compactly, and due to the impossibility of applying thin tracks, a significant part of the connections on it are made with thin mounting wires. The transmitting console uses trimming resistors of the RP-1-63 type or other similar ones. The buttons are made from an assembly of P2-K switches of seven modules, in which the dependent fixation plate is removed (so that the buttons do not lock in the pressed position). The K176LE5 chip can be replaced with K176LA7, K561LE5, K561LA7. The KT608 transistor can be replaced with KT603, KT630. Transistor KT815 - on KT817, KT801. How a quartz resonator is selected is described above. To wind the coils L1 and L2 of the transmitter, frames with tuning cores from the circuits of the color decoders of 3USST TVs are used, but without screens. Coil L1 contains 12 turns, and L2 - 22 turns, it is wound with PEV 0,31 wire.The contour coils of the receiving path are wound on the same frames, but with screens. Screens are indicated on the wiring diagram by dotted lines. Coils L1 and L3 contain 9 turns each. L2 contains 3 turns wound over L1. Wire - PEV 0,31. Coils L4 and L6 in relation to an intermediate frequency of 465 kHz contain 120 turns of PEV 0,12 wire, wound round to round in two layers. Coil L5 is wound over L4, it contains 10 turns of PEV 0,12. In the decoder, the operational amplifier K554UD2A can be replaced with K554UD2B or K140UD6, K140UD7. Chip K176LE5 can be replaced by K561LE5. K176IE1 counters do not have a direct replacement, but if necessary, each K176IE1 chip can be replaced by K561IE10 by turning on both counters of the K561IE10 chip in series, so that there are outputs with weighting factors of 16 and 32. The K561IR9 register can be replaced by K176IR9, or by changing the wiring to K176IRZ or on the K561IE11 chip, turning it on only in the preset mode, but to write information, it will be necessary to supplement the circuit with an RC circuit that generates a short write pulse at its output 1. The K176ID1 decoder can be replaced with a K561ID1 or a K561KP2 demultiplexer, in the appropriate inclusion. The interference suppression choke L1 is wound on a ferrite ring with a diameter of 17-23 mm, contains 300 turns of PEV 0,12 wire. The setting must be started from the transmitting console (Figure 1). By disconnecting one of the terminals of the resistor R4, select the resistance R3 so that the voltage at the emitter of the transistor VT1 is approximately equal to 3/4 of the supply voltage. Then start setting up the transmitter. Connect a fully extended antenna to it. To control the radiation of the transmitter, it is convenient to use an oscilloscope of the C1-65A type, at the input of which, instead of a cable with probes, connect a bulk coil from a winding wire with a diameter of 0,5-1 mm. The coil should have a diameter of about 50-70 mm, the number of turns 3-5. Connect one end of the coil to the ground terminal of the oscilloscope, and insert the other end into the center hole of its input connector. Place the transmitter together with the antenna at a distance of about 0,5 meters from the oscilloscope coil and "catch" the signal of the transmitter with the oscilloscope. By successively adjusting the coils L1 and L2, as well as the capacitor C6, achieve the appearance on the oscilloscope screen of the correct sinusoidal signal of the fundamental frequency (by mistake, you can tune the transmitter to a harmonic) of the highest amplitude. Then reconnect R4 and check for AM modulation. Press one of the buttons S1-S7 and set the appropriate trimmer to the maximum resistance position. The pulse frequency at pin 10 D1 should be about 500 Hz, set this frequency by selecting the value of C1. Adjust the receiving path according to the generally accepted method (tuning the IF circuits, tuning the input and heterodyne circuits). Adjust the decoder (Figure 3) with the tuned receiving path connected to it and according to the transmitter signal. Turn on the transmitter, it will emit an amplitude modulated signal, which will receive the receiving path. By selecting the value of R1, achieve the appearance of the correct rectangular pulses at the output D1.4 (at zero at pin 9 D1.4). Next, (Figure 1) press the button of the first command S1 and set the slider of the resistor R6 to a position close to the position of maximum resistance and close the button S1 with a jumper. Now (Figure 3) select such a resistance R9, in which there will be one at pin 14 D5. Next, open S1, and sequentially closing the other buttons, adjust their resistors so that the corresponding outputs of the decoder decoder are ones. This completes the setup of the radio control system. Literature 1. Kozhanovsky S D. Frequency coding system, Radio designer 11-99. pp. 28-29.
Author: Karavshi V.; Publication: N. Bolshakov, rf.atnn.ru
A New Way to Control and Manipulate Optical Signals
05.05.2024 Primium Seneca keyboard
05.05.2024 The world's tallest astronomical observatory opened
04.05.2024
▪ SAMSUNG and LG mobile phones will harm mobile operators ▪ Transmitting antennae the size of a fingernail ▪ Samsung Odyssey Neo G 4K monitor
▪ section of the site Winged words, phraseological units. Selection of articles ▪ Herostratus article. Herostratus glory. Popular expression ▪ What do rodents that can't chew eat? Detailed answer ▪ article Weather Records. Sky. Travel Tips ▪ article Combination lock on thyristors. Encyclopedia of radio electronics and electrical engineering ▪ article Power regulator on a triac. Encyclopedia of radio electronics and electrical engineering
Home page | Library | Articles | Website map | Site Reviews
www.diagram.com.ua |


 Leave your comment on this article: