Manual for the repair of speakers 75GDN. Encyclopedia of radio electronics and electrical engineering

Encyclopedia of radio electronics and electrical engineering / Speakers
 Comments on the article
Replacing the foam suspension with a rubber one
Step 1. We examine the speaker from all sides for the presence of any other jambs

Step 2. Unsolder wires carefully
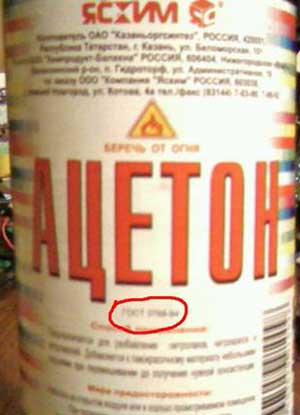
Step 3. At the beginning, the places where the corrugated ring is attached to the basket are wetted with a solvent. I used Yashim's acetone. This acetone turned out to be very good - without any additives. As it turned out, some manufacturers add water for weight, and this is extremely unacceptable in speaker repair.

Step 4. Next, for a long time and carefully we clean off the remnants of foam rubber from the details of the dyne.

Step 5. After many years, the foam rubber has turned into a glue-like consistency, it is necessary to clean off the paper diffuser very carefully, without damaging the base.

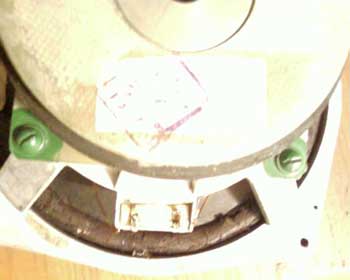
Step 6. Well, here are the parts cleaned and ready for gluing. It is very important to monitor the cleanliness of the gap between the magnet and the core; it is recommended to seal it with electrical tape or, at worst, tape for the duration of the repair.

Step 7. That's the same acetone. Attention! Work with acetone should be done with gloves and in a well-ventilated area! Keep out of the reach of children! Very poisonous!
Step 8. The parts were glued together with glue for a moment, the one in large tubes is a must! Gluing is carried out in the following order. First, glue the rubber suspension to the diffuser. Next, the diffuser is centered in the basket with the help of several pieces of old photo film and glued. Make sure that the conductors protruding from the diffuser coincide with the terminals on the basket.

Step 9. A feature of bonding with a moment: apply a thin layer of moment on the surfaces to be glued, having previously degreased it, you can use the same solvent, leave for a minute and press hard. It is the strength, not the duration, of the pressure that matters. In our case, I turned the speaker over onto the laminate and stepped on it with my weight. If your weight is not enough, you can ask a fat friend to help you.

Step 10. We leave to dry for a day.
Step 11. Now we need to check the dyne for manufacturing defects. We give a signal in the form of a sinusoid with a simple program like radiosvalka.narod.ru/soft/fg1.zip

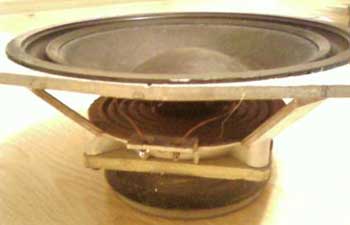
Step 12. We put the din in its native place and enjoy the sound. This handsome man is still in 35AS-16 "Orbita"
For any questions, please contact cerber-666@yandex.ru
Author: Astashkin R.M., Saransk; Publication: cxem.net
 See other articles Section Speakers.
Read and write useful comments on this article.
<< Back
 Latest news of science and technology, new electronics:
Artificial leather for touch emulation
15.04.2024
In a modern technology world where distance is becoming increasingly commonplace, maintaining connection and a sense of closeness is important. Recent developments in artificial skin by German scientists from Saarland University represent a new era in virtual interactions. German researchers from Saarland University have developed ultra-thin films that can transmit the sensation of touch over a distance. This cutting-edge technology provides new opportunities for virtual communication, especially for those who find themselves far from their loved ones. The ultra-thin films developed by the researchers, just 50 micrometers thick, can be integrated into textiles and worn like a second skin. These films act as sensors that recognize tactile signals from mom or dad, and as actuators that transmit these movements to the baby. Parents' touch to the fabric activates sensors that react to pressure and deform the ultra-thin film. This ... >>
Petgugu Global cat litter
15.04.2024
Taking care of pets can often be a challenge, especially when it comes to keeping your home clean. A new interesting solution from the Petgugu Global startup has been presented, which will make life easier for cat owners and help them keep their home perfectly clean and tidy. Startup Petgugu Global has unveiled a unique cat toilet that can automatically flush feces, keeping your home clean and fresh. This innovative device is equipped with various smart sensors that monitor your pet's toilet activity and activate to automatically clean after use. The device connects to the sewer system and ensures efficient waste removal without the need for intervention from the owner. Additionally, the toilet has a large flushable storage capacity, making it ideal for multi-cat households. The Petgugu cat litter bowl is designed for use with water-soluble litters and offers a range of additional ... >>
The attractiveness of caring men
14.04.2024
The stereotype that women prefer "bad boys" has long been widespread. However, recent research conducted by British scientists from Monash University offers a new perspective on this issue. They looked at how women responded to men's emotional responsibility and willingness to help others. The study's findings could change our understanding of what makes men attractive to women. A study conducted by scientists from Monash University leads to new findings about men's attractiveness to women. In the experiment, women were shown photographs of men with brief stories about their behavior in various situations, including their reaction to an encounter with a homeless person. Some of the men ignored the homeless man, while others helped him, such as buying him food. A study found that men who showed empathy and kindness were more attractive to women compared to men who showed empathy and kindness. ... >>
| Random news from the Archive Synchrotron in a package
13.04.2010
Physicists working at the synchrotron at Stanford University (USA) have long noticed that on sunny days, which are many in California even in winter, the accelerator beam loses its stability.
It turned out that the Sun heats up the asphalt over the ring tunnel of the accelerator and the tunnel is a little "twisted". To disrupt the operation of the synchrotron, it is enough for the deformation to reach one micron per meter of tunnel length.
To avoid interference, the asphalt over the tunnel and the first floors of the laboratory building were covered with a 2009 mm thick aluminized polyester film in the summer of 0,05, which was supposed to reflect the sun's rays. The coverage area is about 2000 square meters.
|
Other interesting news:
▪ Hemoglobin found in human skin
▪ Microbes are in the clouds
▪ Graphene film will reliably protect against corrosion
▪ INA260 - digital current, voltage and power meter with built-in shunt
▪ Lack of sleep makes us eat too much
News feed of science and technology, new electronics
 Interesting materials of the Free Technical Library:
▪ site section Voltage converters, rectifiers, inverters. Article selection
▪ article Where is went. Popular expression
▪ article Why do Chinese people burn painted paper money at funerals? Detailed answer
▪ article Adjuster of mounted gas-balloon equipment of vehicles. Standard instruction on labor protection
▪ article 60 Hz from a clock resonator. Encyclopedia of radio electronics and electrical engineering
▪ article Cigarettes from nowhere. Focus Secret
Leave your comment on this article:
 All languages of this page
Home page | Library | Articles | Website map | Site Reviews

www.diagram.com.ua
2000-2024


 Arabic
 Bengali
 Chinese
 English
 French
 German
 Hebrew
 Hindi
Hindi Italian
 Japanese
 Korean
 Malay
Malay Polish
 Portuguese
 Spanish
 Turkish
 Ukrainian
 Vietnamese