|
|


 Arabic
 Bengali
 Chinese
 English
 French
 German
 Hebrew
 Hindi
Hindi Italian
 Japanese
 Korean
 Malay
Malay Polish
 Portuguese
 Spanish
 Turkish
 Ukrainian
 Vietnamese
|
ENCYCLOPEDIA OF RADIO ELECTRONICS AND ELECTRICAL ENGINEERING Front acoustics: podiums under 6x9. Encyclopedia of radio electronics and electrical engineering
Encyclopedia of radio electronics and electrical engineering / Speakers After changing the radio to a more decent (read: powerful), the lack of midbass and mid frequencies in front began to be acutely felt. The 10 cm Sonys in the front doors were clearly not designed for the power of the radio. This was the last straw that made me take up the production of podiums and install normal acoustics in the front doors. As it were chosen three-lane "pancakes" Bazooka EL690 size 6x9''. I immediately refused three-component acoustics because of the high cost, and the tweeters were already in the front pillars, it was a pity to throw them away. A detailed description of the manufacture of podiums for midbass in the doors is described by ch0zen at ch.telemost.ru/podiums/podiums1.htm, but I will describe my own version. So, the formation of the sound stage was supposed to be carried out using the following scheme: three-way acoustics with the tweeter turned off at the bottom of the front door and high-frequency emitters located in the body pillars directly at the front panel. I really didn’t want to disfigure the inner metal wall of the door, so the location of the speaker and its orientation were chosen so that the magnet was above (or slightly inside) the standard speaker hole There is). I did not pursue the clarity of the scene, believing that its partial 'blur' is quite acceptable in a car. And yet, after assembling the whole system, it turned out that I almost made no mistake with the corners :-) What did it take to work: cardboard for making mock-ups (several boxes from motherboards),
The technology for building podiums is not original: a power frame is made of 10 mm plywood in the form of a base adjacent to the door trim and an oval on which the speaker will 'sit'. To fit the base to the relief of the skin, pieces of 3 mm plywood are used (a place near the pocket). The oval is fixed on the base with the help of 3 racks (the fourth is not needed, the base itself acts instead), which are fixed with countersunk screws. Be careful when choosing a place for racks! The screw that secures the stand neatly fell under the place for attaching the speaker. Next, mounting foam is sprayed onto the frame, aged for about a day and processed with a knife and coarse-grained sandpaper until the desired shape is given.
The next step is to remove the surface for gluing with fiberglass. All pits and other errors are carefully covered with putty. After drying, the excess and irregularities are processed with a grinder. I want to pay attention to the strict observance of the hardener-putty ratio, with an excess of the first, the hardened mass is very difficult to process. Next up is fiberglass. It is necessary to anneal it on a fire or a blowtorch before starting work so that there is not even a hint of paraffin left. The thickness of the fiberglass is not critical, thinner (0.25 mm or less) fits better, but repeats irregularities to a greater extent and requires more layers for rigidity. Having prepared a mixture of epoxy and hardener (20:1 ratio) and diluted to the desired consistency with a solvent, first soaked the fiberglass, then applied a thin layer of the mixture on the podiums and, laying the fiberglass, carefully smoothed it so that there were no bubbles, wrinkles, etc. .P. Trimmed off the excess with scissors. With a thickness of 0.25 mm, I put 2 layers. All work was done with bare hands, so the hands were still in the remnants of the epoxy for another week after the end of the work :-) A solvent was used to wash hands and containers from the mixture. After a day, everything dried up, with a knife with a serrated edge, I cut a hole for the speaker and checked how the podium lays on the door trim. All the inaccuracies that appeared were eliminated with a grinder.
The next step was to cover the podiums with artificial leather. Shoemaking, as, indeed, everything described earlier, was mastered for the first time, so there were some small mistakes. The skin should be stretched so that wrinkles do not appear at the corners. In this case, one large fold is divided into many small ones, which are carefully pulled out onto the inside of the "blank", where they are fixed with carnations. To be honest, it was not possible to cover it completely without folds, I made them in the lower part, hidden from the eyes. The skin located on the oval of the speaker was glued with "Moment" so that when cutting out the oval, it would not part. For reliability, I also grabbed 4 carnations, although this is superfluous.
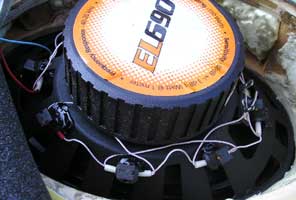
I performed the internal lighting of the speakers as follows: using hot glue around the entire perimeter of the back side of the speaker, I fixed 8 bulbs in cartridges removed from the old instrument cluster, connected them in parallel and brought them out with a separate connector for connection.
I cut out an oval for the speaker in the door trim, applied a layer of sealant along the inner perimeter of the podium base and, together with the speaker, screwed it with screws to the door trim. It turned out that the speaker magnet practically does not stick out of the skin, so I did not mock the metal part of the door. Particular attention was paid to the pocket, which had to be cut. To attach it to the door trim, one regular place was used, and the second had to be done by myself in the form of three pieces of plastic glued with dichloroethane, glued inside the pocket. As a result, the pocket holds up as before. It's time for soundproofing. Elements were cut out of 3 mm plywood, repeating the holes in the doors, glued to the sealant. On the reverse side of the skin I put a sheet of 8 mm foam rubber, securing it with regular Christmas tree clips.
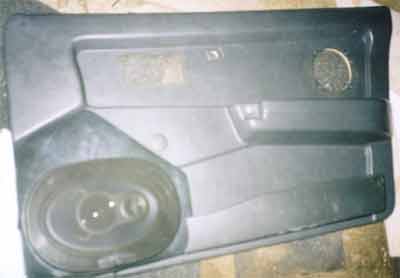
He extended new wires for the speakers, a wire for backlighting the speaker and a door handle. I connected everything through the "father-mother" connectors and put the casing in place, closing the holes from the old speakers with decorative inserts. They are sold only as a set, so the rear doors had to be "ennobled". It took me about three weeks to do everything, however, everything was done in someone else's garage and I had to work 2-2.5 hours a day. The result is in the photo.
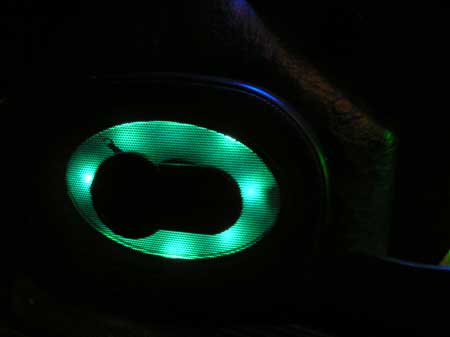
At night, this creation looks quite beautiful:
There are still disadvantages. Since the speaker hole was not cut into the metal part of the door, distortion is felt at volumes above average. Apparently, the volume of air pumped by the speaker does not have time to freely pass into the cavity of the door, creating additional resistance to the movement of the diffuser. So, as practice has shown, it was not possible to make a full-fledged midbass without interfering with the design of the door. Perhaps later I will correct this shortcoming. Another is the strong vibration of all four doors at a decent volume, creating a very loud metal clatter outside. But inside this is not audible. Soundproofing the doors would be nice... Publication: cxem.net
Artificial leather for touch emulation
15.04.2024 Petgugu Global cat litter
15.04.2024 The attractiveness of caring men
14.04.2024
▪ Converting carbon dioxide to alcohol
▪ section of the site Audio and video surveillance. Selection of articles ▪ article Beyond the Kudykiny Mountains. Popular expression ▪ article Who is David Livingston? Detailed answer ▪ article Working with a pyrotechnic instrument. Standard instruction on labor protection ▪ article Vacuum cleaners. Encyclopedia of radio electronics and electrical engineering
Home page | Library | Articles | Website map | Site Reviews
www.diagram.com.ua |


 Leave your comment on this article: