|
|


 Arabic
 Bengali
 Chinese
 English
 French
 German
 Hebrew
 Hindi
Hindi Italian
 Japanese
 Korean
 Malay
Malay Polish
 Portuguese
 Spanish
 Turkish
 Ukrainian
 Vietnamese
|
ENCYCLOPEDIA OF RADIO ELECTRONICS AND ELECTRICAL ENGINEERING Installation of frontal car acoustics. Encyclopedia of radio electronics and electrical engineering
Encyclopedia of radio electronics and electrical engineering / Speakers Usually, the positions initially reserved in the vehicle interior for the placement of front acoustics leave much to be desired, and what else. On the assembly line, speakers with a tenacity worthy of a better use are set either too low, or too far back from the listener, or whatever. The signal is emitted in the direction of the legs, lower back, or whatever is lower, but not in the right place. As a result, there is no need to talk about any adequate sound stage, but there are plenty of standing waves, phase breaks and other negative phenomena that in no way contribute to comfortable sound perception. Automakers can be understood: they are in the first and second places in design and cost reduction, and the sound ... Well, probably somewhere in the sixth or seventh place. We have to correct the situation.
Recently, outside the Russian borders, the installation of front drivers in a kick panel has become increasingly popular. The first, as usual, were the Americans, who mastered the under-torpedo areas of the cabin five years ago. Then their European allies pulled up. You don't have to look far for evidence.
So at the last exhibition of mobile electronics in the German city of Sinzheim, where a group of our installers went on an introductory tour last year, there were a dime a dozen such acoustic solutions. Moreover, the installers all testify as one: mid-basses and tweeters are at the feet, and the stage, as expected, is right in front of your eyes. In other words, kick panels are a promising thing, although the appropriate skills are required when working with them.
First of all, the client should be warned: a certain space, which is reserved for the lower limbs in the car, may have to be sacrificed. Let him decide that he is more "warmed up" by sound or space. But in any case, when designing podiums, space must be saved, because if every time the driver (passenger) gets on (disembarked) the speaker is kicked, it is unlikely that anyone will like it (first of all, of course, dynamics).
Further. Podiums can be made by yourself and can be purchased for a certain amount of money. In some American companies (particularly Q-Logic) this business is put on stream, and if you have access to them, then you will probably be helped in FCC for an appropriate reward (on your part). We felt sorry for the money, so we ran into a very respected installation center during a short business trip to the States and asked to see the whole process from start to finish. You could say we went back to the roots. Americans are polite people and did not resist for a long time. The demonstration took place in an eight-year-old Mitsubishi Eclipse square, in which a pair of 4-inch MB Quart QM 100.03 KX coaxial speakers were to be inscribed. In general, we pass the floor to the authors. Family Nest
The first and very important step is to determine the best position in terms of signal emission and listener comfort to install the drivers. You can use ordinary plasticine for these purposes, fixing the speaker with it in place of the future podium. Then we connect the speaker to the head unit and listen (whoever has a spectrum analyzer also does not hurt), changing the angle of inclination. Thus, it is possible to determine the optimal direction of radiation, and in principle to decide whether it is worth using kick panels for acoustics in this car or getting by with front doors or something else. After the position of the loudspeakers is verified, the measurements necessary for the design of the podiums are made with millimeter accuracy.
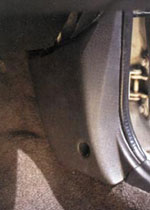
Most machines (produced abroad, of course) are already initially equipped with plastic lining in the area of the kick panels. Therefore, the installer has two options: use the original skin or make a fiberglass duplicate. The second is preferable, since the native parts of the car are preserved in case of its possible sale and dismantling of the system.
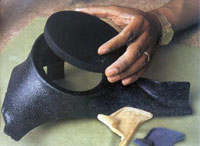
The originals can be used as a template for duplicates in the following way. First, the standard skin is covered with a layer of lubricant, so that later you can easily separate the template from the duplicate. Large pieces of fiberglass cloth (of sufficient width and length to completely cover the surface of the original skins) are cut and impregnated with a mixture of resin and hardener. Then the form is wrapped in resin-impregnated fiberglass with the repetition of all its contours. After the resin hardens, absolutely exact duplicates of regular kick panels are obtained. The form is easily separated from the fiberglass, and after a little processing with a file and sandpaper, the platform for the podium is ready.
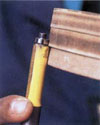
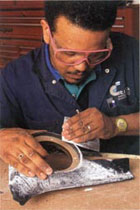
Banding Further stages, in principle, do not depend on whether regular skins or their duplicates are used. The main tool in the manufacture of rings is a grinder (the Americans call it "router"). You can also use a special saw. Having decided on the diameter of the speakers, we cut out two rings for each driver from 0,5-inch MDF (Medium Density Fiberboard): shielding and for attaching protective metal grilles. Grill rings need to be about 3 mm smaller in diameter so that they can fit inside the structure being created. For these purposes, use a 1/8-inch cutter.
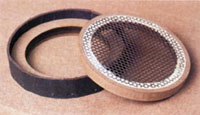
In turn, a 3/8-inch cutter is used to remove the top layer of the inner radius of the MDF ring along the diameter of the metal protective grille. The latter is then attached to the ring with a sealant. After the sealant has hardened, the edges of the gratings are sanded. Another 1/8-inch cutter will be needed to cut a groove on the underside of the ring for later attaching the decorative fabric covering the metal grilles.
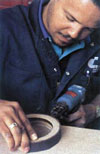
Screening For further design of podiums for speakers, waterproof hardboard plates are used, the width exactly matching the total width of two MDF rings (in our case, 1 inch). The plates are fixed with small nails around the entire circumference of the screen ring using a pneumatic or electric "gun". Sheathed rings are glued on "legs" from the same hardboard with carpentry glue (it is better not to spare glue) to previously made kick-panels. Here the main thing is to "get" into those measurements that were obtained at the preliminary stage, both in terms of radiation directivity and the dimensions of the basket and the magnet of the speakers. Therefore, at this stage, it is better to check once again how the resulting structures correspond to them. In other words, carry out intermediate tests by placing "semi-finished podiums" with speakers in the car. In addition, it's time to think about how the finished podiums, along with the speakers, will be mounted in the car. For example, you can use standard plastic latches that attach the original skins and which, for reliability, should be glued with epoxy. But this must be done already at this stage, while the mounting holes are available.
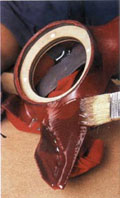
Now we proceed to tightening the kick panels themselves, complete with both rings. A suitable material here is radio fabric, since it is elastic enough to follow the most bizarre contours of the catwalks. The fabric is evenly treated with adhesive spray and also stretched evenly on the kick panels. The structure is then coated (brushed) with two coats of polyester resin mixed with a hardener.
When the resin hardens, holes are cut out for the speakers, opening access to the inside of the podiums. The inner walls of the structure are plentifully processed in several stages with the same resin to make the podiums more durable and get rid of possible and unwanted overtones. Naturally, each portion of the resin must be allowed to harden before pouring the next one. The outer surfaces of the podiums are treated with putty, and then sanded to an almost mirror finish. Decoration
Further design of the podiums may be different. You can simply paint them, or you can tighten them in vinyl, leather or some other material at the discretion of the installer and the client. Upon completion of the upholstery (or painting), the podium is almost ready; all that remains is to cover the grilles with a decorative acoustically transparent fabric. To do this, two pieces of a slightly larger size than the grills themselves are cut out, stretched over the rings and wrapped around the edges so that the material covers the groove cut on the bottom surface. Now the fabric needs to be fixed. No problem. We take a 16-gauge wire of the desired length and insert it into this very groove on top of the material. The advantages of such a solution are that later it will be possible to easily replace the fabric if it becomes unusable (dirty, torn), which is by no means uncommon in the places where the lower extremities are located. Here we are almost done. Speakers are inserted into podiums, connected to a source or amplifier, covered with grills, and the whole structure is mounted in a car. The difference, how it was, and what happened, you can see in the pictures. In our opinion, it turned out quite well. Author: N. Zubkov; Publication: 12voltsmagazine.com
Artificial leather for touch emulation
15.04.2024 Petgugu Global cat litter
15.04.2024 The attractiveness of caring men
14.04.2024
▪ Omnidirectional speaker system Archt One ▪ The most powerful supercomputer center ▪ Alternate Reality for Scouts ▪ Pedometer of the XNUMXst century
▪ site section Regulators of current, voltage, power. Article selection ▪ article by John Maxwell Coetzee. Famous aphorisms ▪ article Which animal has the most unusual pupil shape? Detailed answer ▪ article feller of trees. Standard instruction on labor protection ▪ article Primary clock. Encyclopedia of radio electronics and electrical engineering
Home page | Library | Articles | Website map | Site Reviews
www.diagram.com.ua |


 Leave your comment on this article: