|
|


 Arabic
 Bengali
 Chinese
 English
 French
 German
 Hebrew
 Hindi
Hindi Italian
 Japanese
 Korean
 Malay
Malay Polish
 Portuguese
 Spanish
 Turkish
 Ukrainian
 Vietnamese
|
DIRECTORY
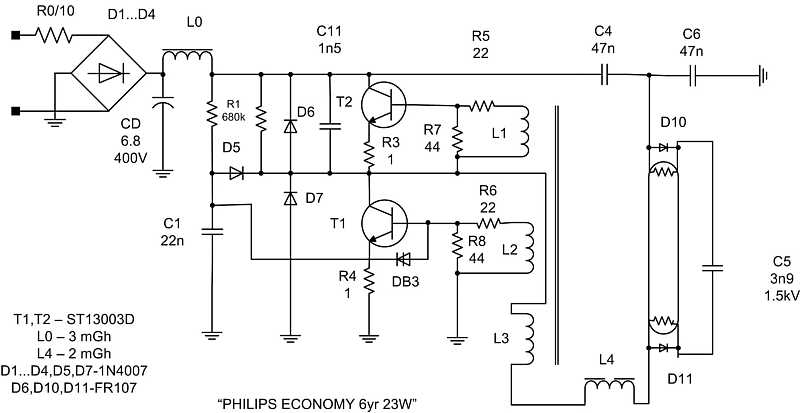
Repair of energy-saving lamps PHILIPS 6yr ECONOMY. HAM Tips
Energy-saving fluorescent lamps with a screw base, suitable for replacing conventional incandescent lamps, appeared on our market only a few years ago, but have already become popular and found their customers. The undoubted advantages of these lamps are efficiency and durability, however, "nothing lasts forever under the moon" - failures happen. This article discusses the most common causes of failures and methods for their elimination using the example of a PHILIPS 6yr 23W ECONOMY fluorescent lamp.
ATTENTION! All elements of the lamp are under life-threatening high voltage! Troubleshooting work must be carried out taking all necessary safety measures! If your qualifications are insufficient to perform such work, it is better to refrain from attempting repairs! The case is assembled with latches and glued around the perimeter, the case is disassembled using a non-sharp flat screwdriver, gradually depressing the latches around the perimeter and at the same time trying not to break the bottom glass with the base too much - it is very thin, and, of course, not to break the lamp bulb. As you can see in the photo, an electronic unit is mounted in the lamp base, which is connected by four wires to the lamp bulb by wrapping. Disconnect the cylinder, unsolder the wires from the base to the board - the block is in your hands. General view of the block
The lamp is neatly assembled, the printed circuit board is fixed on the half with the balloon. The construction of the circuit is traditional for such products. Unlike the extremely simplified lamp circuits of Southeast manufacturers (Falcon, Magic Shark, Vito, etc.), there is a start circuit on the DB3 dinistor, a protective resistor R0 and an interference suppression choke L0; the magnetic circuit (in the photo it is red) is isolated from the windings L1, L2, L3. By the way, the lamps of the popular TM "MAXUS", the domestic LumMax, are assembled according to the same full-fledged scheme. I will list major faults, which I encountered when repairing two dozen lamps of this type. 1. The lamp does not light up, the capacitor CD is swollen and leaking - the lamp was exposed to increased mains voltage. Replace CD, ring all semiconductors. 2. Only the area near the filaments lights up in the lamp - the reason is the same, but capacitor C5 is broken, replace it. You can set 3,3 nF at 2 kV. A possible reason may also be a partial depressurization of the cylinder or a decrease in emissions during long-term operation - we send the lamp to the trash can. 3. The lamp does not shine. One of the glows burned out in the bulb of the lamp (instead of about 10 ohms, a break is called) - Check the serviceability of C5. Solder the D10 or D11 diode corresponding to the broken glow, instead of it, solder a 10 Ohm 0,25 W resistor - the lamp will work steadily (if it is fresh, with good emission). The disadvantage is a dark area near the broken thread, but 90% of the surface of the lamp bulb still glows brightly. 4. The lamp does not shine. When dialing, all semiconductors are in good order, the capacitors have not lost their capacitance, the inductor windings are intact and have no short circuits, the filaments are in good order. Replace dinistor. 5. The lamp does not shine. When dialing, it is clear that many semiconductors are broken, resistors R0, R4 ... R8 burned out. Well, what can I say ... Check what is left, replace the broken one ... Such repairs are economically unprofitable, the cost of parts will be equal to the cost of the lamp - here the field of activity is only for a real radio amateur. The general recommendation is to check ALL parts of the unit, no matter how insignificant the detected malfunction may seem. This approach allows you to save parts that burn out within a few milliseconds after switching on if you missed something. It is safest to make the first switch-on by switching on a conventional 40 W incandescent lamp in series with the repaired lamp. After the repair, securely glue and fasten the halves of the lamp base with adhesive tape - you don’t want it to “disassemble” when unscrewing it :-). Author: Tishchenko I.V., Kharkov
Artificial leather for touch emulation
15.04.2024 Petgugu Global cat litter
15.04.2024 The attractiveness of caring men
14.04.2024
▪ Biochar will improve the environment ▪ Instead of drilling teeth - remineralization with electricity ▪ Orbital ring around the earth
▪ section of the site Electrician in the house. Article selection ▪ White Crow article. Popular expression ▪ article What is the name of the capital of Thailand? Detailed answer ▪ article Repairman of mechanical assembly works. Standard instruction on labor protection
Comments on the article: Gennady The article helped me a lot, thanks. Valery And why is it necessary to solder the diode when the filament breaks? Alexander Thank you! Your advice helped me a lot. Vladislav Nikolaevich I set out to measure - the opening voltage of the dinistor is about 33 volts, the time is 1,7 -2,0 milliseconds. It was measured on the terminals of the dinistor with the AKIP-4113/1 device, in the "once" sweep mode. Thanks to all. Sincerely, Polovin V.N., Sochi. a guest Until I find a complete answer about the repair. Anatoly If the emission of the lamp is lost, but the electronics are in good condition, I disconnect the lamp itself from the circuit, connect a direct cylindrical fluorescent lamp of 8 W manufactured by Philips (price 40 rubles) to it, and mount it in a closed lamp. Everything is cheaper than buying a new one. Peter Thanks for the advice. Although I myself realized that everything can be restored and repaired more than a dozen lamps, I put an end to flasks with a burnt thread. Now the percentage of recoverability will increase!
Home page | Library | Articles | Website map | Site Reviews
www.diagram.com.ua |


 See other articles Section