|
|


 Arabic
 Bengali
 Chinese
 English
 French
 German
 Hebrew
 Hindi
Hindi Italian
 Japanese
 Korean
 Malay
Malay Polish
 Portuguese
 Spanish
 Turkish
 Ukrainian
 Vietnamese
|
BUILDER, HOUSEHOLDER
Well device. Tips for the home master
Directory / Builder, home master We warn you right away: with all the outward simplicity, building a good well is not an easy task. And although in principle it is within the power of anyone who knows how to work with a shovel and saw, the construction of such a reservoir will require both time and skill from you. However ... our ancestors built wells for centuries, and we will not be afraid of this work either. Structurally, dug, or mine, wells and tubular wells, obtained by drilling wells, are distinguished. Both of them, with the right device, serve for a long time. But which one to give preference to? It depends on the depth of underground waters: perched water - up to 4 m; soil - up to 10 m; ground - up to 40 m and artesian - more than 40 m.
The most suitable aquifers for our purposes are located at a depth of 10-20 m and most often pass in the thickness of gravel-sand rocks, have a temperature of + 7 ° to + 12 ° and sometimes even a small pressure. Without dowsers In the old days, such an unusual method was used to find water underground - with the help of a vine branch; craftsmen still use it today. But there are many signs that allow you to do without dowsers. If in the driest summer time among the withered vegetation you see a green clearing, there is probably water somewhere under it. Reeds, sedge and other moisture-loving plants "signal" the same. After sunset, mosquitoes and midges crowd over aquifers. And in areas where there are no rivers, lakes, ponds, swamps, the thickest fog appears in the evening where the water is hiding. You can search for it even in winter: thawed patches or ice on the snow cover give out a source hidden underground.
mine wells the most simple, and therefore there are hundreds of thousands of them in the country. They are of two types: key and prefabricated. At the first, the walls of the log house are made waterproof, and the groundwater entering there through the bottom-spring is preserved in its original purity. In the latter, on the contrary, it seeps through vertically and horizontally located holes in the walls. The depth of shaft wells usually does not exceed 10-30 m, less often it is necessary to dig them at 40-50 m. In all cases, 10 m is the minimum depth, only in this case they will be able to provide drinking water. Usually, a log house is buried in aquifers by 1-2 m, but if moisture is intensively consumed, and the aquifer is poor, it is better not to deepen the log house, but to expand it at the bottom - this will increase the flow rate of the source
To keep the reservoir always clean, a layer of gravel or gravel 20-30 cm thick is poured onto the bottom. Building material for wells - wood, stone, concrete, brick (selected), ceramic segments; their shape can be square, hexagonal, round. The dimensions of the shaft depend on its depth and can range from 0,8X0,8 to 1,5X1,5 m, round - the same diameter. If the soil is not loose, the shaft is dug 20-30 cm larger than the outer dimensions of the log house, so that the protrusions on the walls do not interfere with its settlement. well log house The choice of wood is the initial and important part of the preparatory work. Oak blocks are well preserved in water, but spoil the taste of water with tannins, especially at first. Therefore, before laying the lower part of the log house, the prepared crowns are melted in running water for two to three months.
Well masters believe, however, that it is better to use dry seasoned wood of alder, willow, birch for the lower crowns, although they are less resistant, and oak planks are placed one or two crowns above the water level. In the course and pine, fir and aspen are of little use - they give the water an unpleasant aftertaste. Logs must be dry, free of rot, fungus, woodworm beetles. Under these conditions, an oak log house serves 20-25 years, a pine log house - 20, a willow log house - 5-8 years. Spruce is not recommended. The frame is prepared from logs 18-22 cm thick; thicker ones are cut along. Its assembly from plates is even more preferable: for smooth
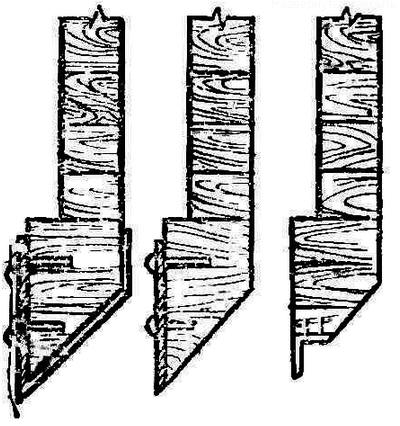
interior walls are easier to maintain. The blanks of crowns from logs must be hewn, planed with a planer from the future inner side, and cleaned from the bark and removed irregularities from the outer side - this will facilitate the descent of the cage into the mine. The crowns should be tightly adjacent to each other, so the wood is used dry: when moistened, it swells and compacts. Between themselves, the crowns are connected by rectangular or round spikes - two at the top and two at the bottom. The method of connection is "in the corner", and more often - "in the paw". Logs or plates with such a bundle must be of the same diameter or width, for this they are leveled. The ends of the logs are hewn to a length of one to one and a half diameters for four edges, giving the ends the shape of a square, the same for all blanks. This will facilitate further calculations. It can be seen from the figure that from the end the paw has six units in one direction, and four in the other. On the inside, its dimensions are reduced and equal to four and two units. This shape provides a strong corner connection.
The square end on the vertical side of the hewn ends is divided into eight equal parts. Through the division points, lines are drawn parallel to the hewn sides, and the resulting ribs are marked with the letters AB, VG, DE and ZhZ. From above and below, on the rib AB, 2/8 parts are laid (two divisions each), on the VG rib - 1/8 parts each (one division each), on the DE rib - 3/8 each (three divisions each) and on the ZhZ rib - 2/8 (two divisions each). Then they connect the marked points with straight lines and get the edges of the paw, equal in AB - 4/8 parts (four divisions), in VG - 6/8 parts (six divisions), in DE - 2/8 parts (two divisions) and in ZhZ - 4/8 parts (four divisions). If you carefully cut off the excess wood, we get a paw of the required shape. For markup, it is best to make a template. The grooves are marked and selected as usual. During the rough assembly, the crowns must be marked. It will be easier to lower the log house if one or two lower crowns are made a little wider than the accepted dimensions (using thicker logs or plates) and reinforced with cutting knives made of thick sheet, strip or angle steel. This will ensure that the unevenness of the soil on the walls of the mine is cut. The log house should fall strictly vertically. For quicksand soils, a log house is built expanded from below - like a bell or a tent. It enters the soil more easily, since loose rock falling from the walls will not clog the mine. Sometimes, before planting the log house, guides are arranged so that when it is lowered, it does not warp. To do this, thick boards or hewn poles (the so-called sled) are attached to the walls of the shaft with long nails, and a frame of logs is laid on the ground, pressed against the log rails and fixed with stakes in the corners. shallow wells When the aquifer occurs at a depth of no more than 6 m and with a not very intense influx of water, it is possible to dig a mine immediately to the full depth and, if necessary, temporarily strengthen its walls so that the soil does not collapse. The bottom of the shaft is leveled, beds (two logs or bars) are laid on it, and a floor is laid on them from boards with gaps for the passage of water. Then, starting from the floor, the log crowns are laid. In this case, it is permissible to use oak.
The bottom of the well can also be formed with a layer of gravel or crushed stone. Building up a log house from above Even for deep wells, it is not easy to dig a shaft completely, or at least bring it to a depth of 7-8 m. The operation has to be divided into several stages. If the soil crumbles, the walls are temporarily reinforced with boards, the bottom is carefully leveled. The first crown is lowered into the shaft, the second is placed on it, then the third, and so on according to the marks, until the frame rises three to five crowns above ground level. When laying the crowns, they are fitted by hitting the wooden lining with a wooden hammer-barsik weighing at least 5 kg. So that the structure does not loosen when moving, thick boards are nailed to the inside of the log house in the center of each side (with a step of three crowns). Supporting the lower crowns alternately with one or two logs and knocking out wedges, under the middle of each wall, soil is selected to a depth of 20-30 cm. Then the soil is undermined in the corners. The excavation must be carried out so that a hole forms in the center - the soil squeezed out by the walls will slide here, water will flow. Now the wedges and linings are taken out one by one - the log house will lower smoothly and evenly. So they put the crowns on the entire depth of the well. As the log house lowers, the soil is lifted from the bottom in a bucket or tub. To facilitate work on the shaft, strong racks with a crossbar are placed, a block is hung on it, a gate or a crane is arranged; using them, the assistant raises the earth. At the same time, the person working below must, for safety, stand in one of the corners on the side opposite from the load.
If the log house is jammed, besiege it with a snow leopard - hit the lining of a thick board several times. Sometimes, however, this does not help. In this case, take four logs, three to four meters each. They are laid crosswise on the log house and firmly fixed with staples. Thick boards are laid on the logs, nailed, and soil, stones, bricks are piled on top, bringing the mass to several tons. After settling, the load is removed and work continues. Crown under the crown Not often, but it happens that you have to build up a log house from below. This method is less convenient, inefficient and more laborious. And yet they sometimes have to use. To bring the crowns from below, they undermine the soil on one side and insert the prepared log into the resulting space. It is pressed as tightly as possible to the previously installed lower crown with the help of a lining and wedges. On the opposite side, the second one is laid in the same way, and then the other two. In the same sequence, using linings and wedges, the entire frame is installed. A structure that is firmly planted in the mine can suddenly drop, so several crowns are made of logs 60-70 cm longer than the nominal ones. They are installed like this. On opposite sides of each log, oblong pits are dug in the soil of the mine - "mortgages", or "furnaces". Their length should be at least 40 cm. Protruding ends are inserted into these niches, and large stones or wooden chocks with one hewn side are placed under them. Wedges are driven in between the seal and the end, fitting the log to the lower crown. Laying is carried out alternately from opposite sides. The protruding ends - they are called fingers - will play the role of a brake. In dense soils, "mortgages" are placed after 2-3 m, and in weak soils - after 3-XNUMX crowns. It is necessary to recall that in dense soil the log house descends evenly and quickly enough. Wells in quicksand Quicksand is a very fine sand saturated with water. It is almost impossible to dig wells in it without an outflow (pumping out) of water. It is necessary to arrange temporary enclosing walls. To do this, take thick pine boards, always grooved; their ends are pointed on one side. They are hammered into the ground from the tragus with a wooden mallet - a woman, they work together or three. There should be a space of 25-30 cm between the walls of the log house and the shaft. Having passed the soil to an accessible depth, one board is installed vertically so that it can slide between the mounting posts. The second board is attached to the clogged one, tied so that it does not leave, and they are also clogged. In this sequence, all walls are formed. Then the soil is taken out again, not forgetting to put spacers between the walls every 1,5-2 m. They deepen to the aquifer and only after that they begin to assemble the log house. The crowns should be systematically upset with a snow leopard and fastened with boards on nails from the inside. Wells are also arranged in loose soils. Tongue boards are removed using jacks or levers. Well decoration Regardless of which soil is chosen from the shaft, the space between it and the walls of the log house must be filled with dry clay, especially the last 1,5 m to ground level. Clay is also laid around the well within a radius of 1,5-2 m. This is a hydraulic lock: it is necessary to protect the reservoir from ingress of groundwater. On carefully compacted clay, flagstone, brick can be laid, or the surface can be poured with concrete or asphalt. The log head should rise 0,9-1 m above ground level. It is tightly upholstered on the outside with boards so that dust does not penetrate through the cracks. In areas with very frosty winters, the head sheathing is made double, with an indent from the log house by 10-20 cm. Sawdust, shavings, or a mixture of them are poured into the resulting "damage"; slag, moss and other heat-insulating materials can be used. This will keep the water from freezing. The log head is closed with a hinged lid or a valve moving in the grooves of the guide bars.
A canopy (umbrella) is arranged over the well. Its design, size, shape are dictated by your capabilities. Water is raised by pumps, gates, cranes, and even manually, lowering and raising the bucket along the block on a strong rope or chain. Well hygiene Mine wells are recommended to be cleaned at least once a year: remove slime and mud from the walls. From time to time, do not forget to scoop out silt or sand, but at the same time, the bottom should not be deepened. Before descending into the well, it is necessary to check it for gas contamination by lowering lit paper or a candle into the shaft to the very bottom. If they go out, then carbon dioxide has accumulated there. It is removed by repeatedly lowering and taking out an empty bucket - thereby the gas is "scooped out" due to a kind of ventilation. You can tie a bunch of straw to a rope, set it on fire and lower it to the very water. Only after re-checking for gas contamination can you go down. It is better to work with two or even three. One is tied with a strong rope at the waist, while the others are insured. Drinking water from wells should be clean and transparent. Have no smell or any taste. Therefore, they should be arranged on the highest place of the estate, away from the utility block. These sanitary requirements are strictly mandatory. Before you start building a well, you need to determine if there is water underground. After that, prepare all the materials and tools and only then get to work. It should be warned that water from any built-in well must be checked without fail at the sanitary and epidemiological station. Raw water must not be consumed before control: in extreme cases, it must be boiled well. If you use a ladder, then it must be cleaned and washed, and the ends that go into the water should be built up with freshly planed bars. The one who will clean up should wear rubber boots, well washed and scalded with boiling water. They should be put on at the very well, standing on a clean bed of straw or a freshly planed board. From top to bottom, first the walls of the mine are put in order, and then the bottom part, replacing gravel or crushed stone with new ones, previously cleaned and washed. A repaired, cleaned or new well is disinfected with chlorinated water, that is, with a 3% chlorinated compound. It is prepared as follows: 300 g of bleach is poured with a small amount of water and rubbed with a rolling pin. The resulting liquid slurry is poured into a container with water with a volume of 10 liters, mixed thoroughly and settled for several hours. The upper, transparent part of the resulting concentrated solution is poured into a tightly closed glass container and stored in the dark. For 1 m3 of water in the well, one bucket of a 3% composition is required. The walls of the well are swept over and wiped with a clean rag (rag) or brush. Then the fallen debris, all the accumulated water and settled sludge are selected, after which the walls are abundantly covered with a disinfectant composition with an airbrush, sprayer or brush. Depending on the amount of fresh water entering the well, a composition is added to it at the rate of 10 liters per 1 m3 of water. Everything is mixed with a clean pole, the log house is closed on top with a wooden lid or covered with a thick cloth and left for 10-12 hours, and preferably for a day. Then the water entering the well is pumped out until the smell of chlorine and its taste disappear. It is useful to repeat the operation a day after the first treatment. This provides more reliable disinfection. Author: A.Shepelev
▪ Country furniture from water pipes ▪ Water supply and sewerage for a country house
Machine for thinning flowers in gardens
02.05.2024 Advanced Infrared Microscope
02.05.2024 Air trap for insects
01.05.2024
▪ Electric cars in driving schools ▪ Corn that does not require cooking ▪ Cinnamon reduces the harm from fatty foods ▪ Bamboo is the best plant for air purification
▪ section of the site Note to the student. Article selection ▪ article Where it is good, there is the fatherland. Popular expression ▪ article What is a stalactite? Detailed answer ▪ article Melissa Lemon. Legends, cultivation, methods of application
Home page | Library | Articles | Website map | Site Reviews
www.diagram.com.ua |


 See other articles Section