|
|


 Arabic
 Bengali
 Chinese
 English
 French
 German
 Hebrew
 Hindi
Hindi Italian
 Japanese
 Korean
 Malay
Malay Polish
 Portuguese
 Spanish
 Turkish
 Ukrainian
 Vietnamese
|
BUILDER, HOUSEHOLDER
House Teremok. Tips for the home master
Directory / Builder, home master Houses of this design are popular with amateur gardeners: they are simple and affordable to build; the set of materials needed for each of them is quite cheap; in addition, such a two-story cottage has a very original and attractive appearance. Garden house "Teremok" consists of two rooms and a kitchen; in addition, there is a veranda, loggia, pantry. It is built from non-deficient building materials. The windows in the rooms are wide, let in a lot of light and give a good view of the garden.
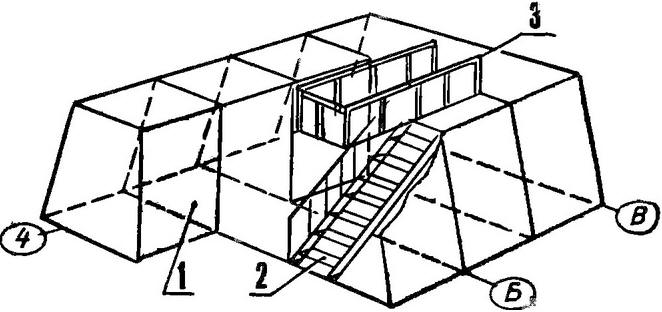
The first floor is occupied by a room of 15 m2, a kitchen of 4 m2 and a staircase to the attic of 12 m2; there is also a small pantry (2 m2), formed by the wall of the hallway and the slope of the roof. The entrance to it can be made both from the hallway itself, and from the outside, from the veranda. Foundation. Its design depends on the terrain and soil properties. At "Teremok" the foundation is made of a columnar type. For its manufacture, a wide variety of materials can be used: wooden burnt or tarred pillars, brick, concrete, rubble stone, metal pipes, asbestos-cement pipes with filler, etc. In our version, old sewer pipes Ø 100 mm and 1200-1500 mm long were used. The site selected for the foundation is marked out according to Figure 1. In the places marked for the supports, wells are drilled to a depth of 700-800 mm (a hand drill Ø 100 mm can be bought at hardware stores). Pegs are driven in around the perimeter of the foundation, and a cord is pulled at a level of 300 mm from the ground (if the site is on a slope, then it should be counted from the highest place). Pipes are lowered into the prepared holes and leveled in a horizontal plane with crushed stone. After alignment of all pipes, concrete is prepared and poured into them by 300-400 mm (3-4 shovels of concrete in each pipe) to increase the area of support. In our case, pipes Ø 100 mm were used as load-bearing beams, which are attached to the pillars with XNUMX mm annealed steel wire.
If the foundation is made of concrete pillows, then red brick columns are laid out on them, and on top - waterproofing from two layers of roofing material, on which antiseptic load-bearing runs 150 mm high are placed - here the frame of the house will lie. The frame is made of bars with a section of 150x50 and a length of up to 4,5 m. Seven frames are assembled from them, which make up the supporting frame of the house. In the three frames that form the facades, the bars are strengthened to which the window and door blocks are attached. The remaining four have exactly the same design. Each frame is assembled on the ground according to a template. The next operation is the assembly of the house. Having prepared the material for the lathing of the side walls and choosing calm weather (which is important), the first frame is installed on the supporting girders in a vertical position and temporarily fixed with the help of props. Then similarly set the rest at the same distance from each other; they are leveled and fastened together with a ridge board. The next operation is the lathing of the dacha frame. For the crate, you can use unedged boards that are nailed to the frame bars. The boards are nailed with an indent from each other of 200-300 mm, which does not affect the strength of the structure and is convenient when working, since the crate will act as a ladder. Sheathing boards are released beyond the extreme frames by at least 300 mm. Then, bars of the same thickness are nailed to the overhangs of the crate, which serve to fasten the decorative cladding; it will close the battens from the bottom (visible) side of the board. The cladding must be made from fitted seamed boards or slats.
After that, you can start covering the roof. Roof. The roof and walls of the cottage in our case are covered with slate, but a wide variety of roofing materials can be used: black or galvanized steel sheets, tiles, tes, etc. Slate has a number of advantages - it is durable, cheap, does not heat up too much in the sun, it can be freely purchased. Each slope of the roof of the house is covered with slate in one row. To prevent snow from blowing into the junction of the roof with the wall in winter, we cover the upper part of the house with plastic wrap for greenhouses. The film can be fixed with ordinary pushpins. Slate is laid on top of the film. Slate is fastened with special nails with large caps (slate nails), if there are none, then you can use ordinary ones, with washers and rubber gaskets. Walls. Their lining with slate can be done in two ways - apart, when the longitudinal edges are in different places, or with the edges aligned along the entire length. The last coating is considered more beautiful. When covering staggered, the sheets are placed in the following sequence. At a distance of 60-70 mm below the laid crate, a board is fixed strictly horizontally, allowing the first row to be laid. The sheets are laid with an overlap on one wave and then fastened with slate nails, having previously drilled holes in the slate for them. The rest of the rows are laid in the same way. It is necessary to calculate the layout of the roof, in this case the joint gap will be minimal. A coating with a combination of longitudinal edges requires mandatory preparation of sheets, which consists in cutting corners. Depending on the overlap of the sheets, the dimensions of the cut corners are also determined. A specific example of laying with the alignment of the longitudinal edges is shown in the figure. Prepared sheets are laid in the following sequence. A sheet marked with the number 1 is placed exactly along the cord and nailed on the left side; then sheets marked with the number 2 are sequentially laid on it. These sheets must overlap the edge of the sheet lying below with all their cut corners. Next, the second row is laid, starting from sheet 3, etc. Preparation and layout of corrugated asbestos-cement coating sheets (A - preparation of sheets with cut corners, B - laying order):
Windows and doors. After the house is covered, proceed to hanging and fitting windows and doors. They can be ordered in a carpentry workshop according to the sketches prepared by you or, if you have skills in carpentry work, you can make them yourself. The dimensions of windows and doors are shown in the drawings. The floor is made of chipboard (chipboard) of the first grade. For this, a black floor is prefabricated from boards of equal thickness, which is attached to the bases of the frames. Black floor boards are laid with a gap of 100-150 mm. Then chipboard boards (previously oiled) are laid on it and fastened to the subfloor with nails. You can make the floor from grooved boards or floor boards. A tessel floor can be covered with fibreboard fibreboard, which gives it solidity after painting. Staircase to the attic. Next, we proceed to the manufacture of stairs. The ladder rests on the floor beam of the fourth frame. In the floor beam of the third frame, a part of the beam is cut to the width of the stairs and two beams of the same section are nailed between the middle beams of the second and fourth frames; to them we also attach the cut ends of the beam of the third frame, forming a hatch on the second floor. The floor of the top is made in the same way as the floor of the first floor. On the loggia, the floor is made of tess. It must be done with a slight slope outward - to drain rainwater. On top of the boards, in our case, the loggia was covered with galvanized roofing iron. The edges of the roofing iron are bent by 50 mm and nailed to the walls of the loggia. Now you need to make its fence. It can be either wood or metal. After that, the side walls and the ceiling of the loggia are sewn up with fitted boards. The ceiling of the first and second floors is made of plywood or fiberboard sheets. Ceiling sheets are cut so that their joints fall on the frame beams. Finishing. Partitions are made of chipboard of the second grade. At the joints of the sheets, bars with a section of 50X50 mm were placed. Partitions can also be made from boards, but this is more laborious. Wall upholstery. Various materials can be used here: chipboard, fiberboard, plywood, boards, dry plaster, etc. Trimmings of these materials are also suitable, but in this case it will be necessary to additionally install 50X50 mm bars and attach trimmings of facing material to them. Before painting, the walls are pre-spackled. If it is supposed to use wallpaper, then all surfaces are first pasted over with paper. The floor and ceiling around the perimeter are upholstered with skirting boards, and doors and windows with trim. Interior decoration and painting can be done to any taste. But if the floor is made of chipboard or upholstered with fiberboard, then it is better to use oil paint for painting, having previously oiled the floor sheets well. The veranda can be both stationary and in the form of a lifting platform. The latter is made in the form of a trapezoid, repeating the outlines of the facade up to the level of the second floor. Fastening to the wall of the house is hinged, on large hinges. The railing and ladder in this case are removable. Authors: A. and V. Gryaznov, M. Korobkov, I. Blatov
Machine for thinning flowers in gardens
02.05.2024 Advanced Infrared Microscope
02.05.2024 Air trap for insects
01.05.2024
▪ New exotic state of matter discovered ▪ Transcend SuperMLC technology ▪ Compact 36V DC-DC power modules LMZM33602/3
▪ section of the Electrician website. PUE. Article selection ▪ article Let a hundred flowers bloom. Popular expression ▪ article What is prohibited for Disney Park staff to decorate their appearance? Detailed answer ▪ article Aerosleigh Triumph. Personal transport ▪ article Jug of the alchemist. Focus Secret
Home page | Library | Articles | Website map | Site Reviews
www.diagram.com.ua |


 See other articles Section