|
|


 Arabic
 Bengali
 Chinese
 English
 French
 German
 Hebrew
 Hindi
Hindi Italian
 Japanese
 Korean
 Malay
Malay Polish
 Portuguese
 Spanish
 Turkish
 Ukrainian
 Vietnamese
|
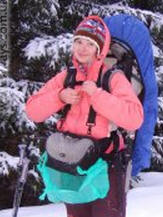
BOOKS AND ARTICLES Photo and video shooting on a hike
This article is for those who go hiking and, instead of looking at beautiful views, will try to capture them. Our opus is dedicated to novice photographers and cameramen, while the rest can simply compare the tips with their own rich experience. Tip number 1. Take light and inexpensive photo and video equipment
No matter how cool a photographer you are, the technique should be taken as light as possible. Let's say, if there is a choice between a heavy, but cool DSLR and a light, but not pulling on the camera soap dish, it is better to take a soap dish. At least on the first trip. This advice is based on the experience of hundreds of people who have already been on a hike with cameras and camcorders. Yes, serious technique will give more significant results, but it’s damn hard to drag it out of habit. On your first trip, getting used to the initial load is quite difficult - even if there are only 10-15 kilograms behind your back. In the truest sense of the word, you have equipment "on your neck" that, when not in business, begins to get on your nerves terribly. Not only that, you should take care of it so that God forbid it doesn’t get scratched, fall out or get wet ... Take a lighter camera or camcorder with you on your first trip - and cheaper. For example, when one unfortunate photographer once left a camera in a black case on a burnt log, and then stuck an ax right there, forgetting about photographic equipment, he did not have a heart break. On the contrary, there was a desire to finally buy a new camera. Tip #2: Don't use a tripod
The reason here is about the same: weight savings. Tripods weigh a lot, and as the size increases, so does the weight of the backpack. You can, however, ask the team to help and distribute the food and equipment issued personally to the photographer for everyone else. But, most likely, there are not so many who want to take your weight. Then you still have to carry both a tripod and group equipment, and not everyone can do this ... To "immobilize" the camera in conditions without a tripod on a hike, there are a lot of items. You can put the camera on a stone, a stump, a rock, in the end, on a backpack - there is always a flat place for shooting, oddly enough. Unlike a camera, a camcorder looks much more convenient on a tripod: there is somehow no time to shoot from a backpack. I want to get a tripod. But here another problem appears: it takes too much time.
Even if a tripod is attached to the backpack from the outside, at a minimum, to install it, you need to remove the backpack, detach the tripod from it, set it on an uneven surface, attach the camcorder and set it to shooting mode. If you get the hang of it, it takes a good couple of minutes. During this time, the group with which you are walking, exactly manages to go around a corner, and does not fall into the camera lens. Or, at best, you are doomed to shoot the departing backs of friends over and over again, who, even after each shooting, are forced to wait, "well, when will he come up." In order to shoot adequately and not delay anyone, it is enough to learn how to competently shoot "hand-held", or, again, use the surrounding landscape. Or immediately ask for travel, where no one is in a hurry. Tip #3: Take care of your equipment Now that we know that for competent photo and video shooting you need to be a muscular jock, able to carry all the equipment on yourself, it's time to take care of photo and video equipment.
On a hike, people often find themselves in those conditions under which, to put it mildly, they don’t want to shoot in the city. This may be a normal drizzle or fog, in which the group moves along the route, slightly wet. Rain on the move is practically not felt - but not for the equipment you carry. Water can accidentally leak into a backpack - and goodbye, memories of a trip in digital (or film) form. Before leaving, it is highly advisable to take care of some kind of waterproof case, from which you can get the camera only for shooting. If you are really afraid for your unit, the tourist idea has also provided for this: you can tailor a non-removable cover from improvised waterproof materials (bags, for example), in which holes for the lens and a pair of buttons are cut out. As a result, it will be possible to shoot in the rain, if carefully, of course. Tip #4: Take care of your batteries Accumulators and batteries need to be protected even more than the technology itself. They tend to be discharged from very humid or cold air. In general, to be honest, they are discharged from any temperature, except for room temperature, and any humidity from 75%. Therefore, a special approach is needed here. Lazy people just wear equipment with batteries in a case under their outerwear. In order to get a photo or video camera, it is enough to unbutton the jacket, take out the cover - and go. More "advanced" operators have gone further: they carry batteries separately from the camera itself. Carrying takes place in a pocket located under outerwear. Sometimes a special cover is sewn for this case. When carried this way, the camera does not fog up due to a sudden change in temperature, and the batteries are always warm. The disadvantage of this approach is that sometimes it takes too much time to install the batteries and then remove them from the camera. But it's worth it: A "photography veteran" can get through a week-long winter hike with just one set of batteries. And for inexperienced "fighters", the batteries in the hot Crimean summer campaign run out approximately on the third day, although they worked in the city for months. Tip #5: Stock up on batteries This advice comes from the previous phrase: there are always not enough batteries. In order to have enough, do not be too lazy to take more than one pair of batteries on a hike. Their weight is not so big, but there will be a lot of benefits. Believe me, if the batteries are discharged when you go out to some indescribable place, this is extremely disappointing. And a couple more tips for successful photography No need to place the photographed object in the center of the frame. For some reason, this results in bad pictures. Try to place the main character of the photo closer to its edges.
Do not place the horizon line in the center of the photo. It focuses attention. If both the earth and the sky are beautiful, it is better to take two shots, where there is more of either earth or sky, and not save space on the card.
Don't fill up the horizon. If this is not a specially conceived frame, nothing good will come of it. The easiest way to navigate is by the square that appears when focusing on the photo - try to somehow align the horizon with its horizontal sides.
Avoid cropping human legs. It is in portraits that half-busts look attractive, but in a photograph there will not really be either a person or a landscape.
When photographing people, pay attention that there are no objects behind them that fall into the photo. Most often, such photographers succeed with people with branch horns (behind a tree) or Siamese twins (behind a person), but these are just the most popular examples.
Hold off on the flash. Or turn it off completely. Flash photos come out flat and flat. Moreover, the flash will never reach the evening mountains, no matter how powerful it may be.
Try not to ask your friends to take a picture of you in front of every interesting object.. Usually these are the leanest photos on the card from the "Me and the mountains" series, which are bleak for everyone but you to look at. It's better to let someone take a picture of you by chance - if the photographer's hands grow from where they should, such a photo will overshadow all artificially conceived ones.
Take pictures of people. In a hike, not only the views of the mountains are important, but also the company itself. For some reason, the first dinner or, say, an early watch on a foggy morning is much better remembered than numerous views. And it will be very pleasant to sit and remember a warm company after a while.
Publication: 7ways.com.ua
▪ Pinnacle Studio. User's manual ▪ How to make a home video so that it will be interesting to watch later ▪ VirtualDub filter descriptions
Artificial leather for touch emulation
15.04.2024 Petgugu Global cat litter
15.04.2024 The attractiveness of caring men
14.04.2024
▪ Drivers for switching white LEDs EL7513 ▪ Cheap ICs - Signal Generators ▪ Smartphones charge faster and understand voice ▪ Samsung fuel cells for players
▪ section of the site Electricity for beginners. Article selection ▪ article Go left. Popular expression ▪ article What is dodecaphony in music? Detailed answer ▪ article Leeuwenhoek's microscopes. Children's Science Lab ▪ article Three experiments with coins. physical experiment
Home page | Library | Articles | Website map | Site Reviews
www.diagram.com.ua |


 See other articles Section