
|
|
BOOKS AND ARTICLES Virtual Dub. Quick Guide and Helpful Tips
Introduction VirtualDub should be familiar to anyone with any serious involvement in digital video. The fact is that with its help you can perform many different tasks from completely different areas - many do not even suspect how wide the range of its capabilities is. So, let's try to figure out how VirtualDub (often affectionately called simply "Oak") can be useful. Typical tasks successfully solved with the help of "Oak" include:
An important plus is that VirtualDub takes only 1-2 megabytes on the disk, does not require installation, is distributed freely (the current version can be downloaded from http://virtualdub.sourceforge.net). By the way, the last circumstance led to the fact that in addition to VirtualDub itself, there are a number of its modifications (VirtualDubMod, VirtualDub-MPEG2, etc.), which differ in additional features. Work architecture Before proceeding to a detailed story about the possibilities of VirtualDub, it is necessary to make some important remarks about the general architecture of the program and the supported formats. VirtualDub is aimed primarily at working with AVI files. More precisely, as follows: at the output we get an AVI file (although it is possible to work as a so-called frameserver (frameserver), similar to the AviSynth utility; the VirtualDubMod modification can additionally save to Matroska (MKV) and OGM containers), and AVI, MPG, AVS and some other file types. At the same time, from general considerations, it is clear that AVI at the input and output is a certain selected situation (indeed, in this case, processing can be performed without recoding - more on that below). AVI files, as you probably know, usually contain one video stream and 0, 1 or more audio streams. At the same time, the file extension itself says almost nothing about its contents: an AVI file is just a container that can store data with various compression formats. The ability to work with them is determined by the presence of the appropriate codecs (separately for video and sound). Windows has two different video subsystems - the older Video for Windows (VfW) and the more modern DirectShow (DS). Both of them provide a unified interface for working with any compression formats - a program that works with a video file does not have to know exactly how it is encoded - it is enough that the corresponding decoding module is registered in the system. VirtualDub and many other video editors use the VfW interface, while most players use DirectShow technology. What does this mean in practice? It may turn out that a file that is perfectly played by the player cannot be opened by VirtualDub, because. the system has only a DS decoder of this format, but no VfW codec (in Video for Windows, the compressor and decompressor almost always go together and are called the word codec, while in DirectShow there is often only a decoder). For example, earlier one could often encounter a situation when video from a miniDV digital camera on a "clean" system was played using the DS decoder from Microsoft, but did not open in oak - it was required to install a VfW codec, for example, from MainConcept or Canopus. (Recent versions of VirtualDub have a built-in decoder (but not an encoder!) for the DV format, as well as the MJPG format often used in analog video capture hardware). We also note that in the opposite case, when there is only a VfW codec for the compression format, then it will automatically be played in the DirectShow subsystem. Finally, we mention that you can "make friends" oak with DirectShow - see the section on VirtualDubMod at the end of the article. So, usually work in VirtualDub is built as follows: a video file or several files are opened, joined one after another, some actions are performed with them, the result is saved to another AVI file. The original files are not changed under any circumstances. It's time to turn to the interface of the program. Interface
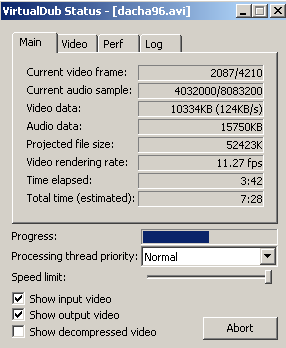
The main part of the program window is occupied by two windows displaying the input and output (after applying filters) video streams. (Because filters can change the size of the image, in general, both windows are not the same size; in addition, you can manually set the scale to something other than 100%). Below them is a scroll bar with signed frame numbers. Unlike real editing software, VirtualDub does not have a multitrack mode, nor a timeline in the usual sense - only one scrollbar. Moreover, if you delete any piece, then it disappears from circulation without a trace (however, there is always the Undo button and the Edit / Revert all edits command, which resets all operations with the scrollbar). If you have docked several clips to each other, the bar will display their total duration. Of course, by moving the marker along the scroll bar, we achieve the display of the desired frame in both windows. The frame number and the time that corresponds to it are shown just below, along with information about the frame type (in square brackets). For AVI files, K denotes a key frame (Keyframe), empty - a delta frame, D - a dropped frame (Dropped frame, in a normal situation there should not be such). For Mpeg files historical designations are different: I - key frame, P - delta frame, B - bidirectional delta frame. In Avi files, keyframes are often several hundred frames apart, so displaying an arbitrary frame will require decompressing all delta frames from the previous keyframe, which can be quite slow. For rewinding in a file, in addition to moving the marker with the mouse, there are cursor keys with various modifiers (see the Go menu), of which the most useful is pressing Shift, which allows you to move only through keyframes (also when moving the mouse). Such a movement is not very accurate, but it is fast - only one frame is required to be decoded, and not the whole chain. We also note that Home and End do not lead to moving to the beginning and end of the clip (Ctrl + left / right are used for this), but mark the beginning and end of the fragment for processing. Then you can either delete the marked fragment with the Del button (you can do something more constructive, for example, using Ctrl + C-Ctrl + V to copy and paste it to another place on the Oak scroll bar, but not into another application), or when saving the file, only the selected area will be processed. After you have opened the necessary files, cut out unnecessary pieces, set up filters and other processing parameters (see below), select File / Save as AVI and start the processing process, during which a progress indicator with additional information is displayed, and in The windows display frames of the original and processed video (not all in a row, but once per second, and only in Full processing mode).
When saving a file, two different options are possible: if all processing is reduced to cutting pieces or merging files, or to replacing the sound, and the source file (files) were in AVI format, then you can and should use the mode without transcoding (Direct Stream Copy in the Video menu). In this case, compressed video frames are directly transferred from the input to the output stream (of course, without decoding and displaying on the screen), respectively, the quality and size of the file does not change. In all other cases, you need to set the Full Processing Mode and, accordingly, set the codec for compression (menu Video - Compression) and configure its parameters (via the dialog called by the Configure button; settings on the general codec selection screen - Quality and target data rate - in most often not used in modern conditions).
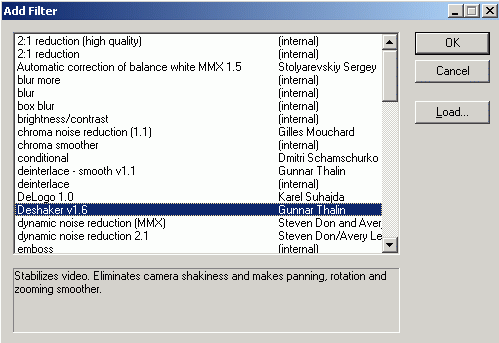
There are two more intermediate modes: Fast recompress makes sense to use when transcoding from one compression format to another without applying filters in VirtualDub. In particular, for compressing video served through the AviSynth script. In this case, nothing will be displayed on the screen when saving. The Normal recompress mode makes almost no sense to use. There are similar modes for sound, only there are only two options - direct copying and full processing (including specifying compression and applying sound filters). Another useful feature is the ability to display video data obtained after decompressing a compressed video stream (Display decompressed output) in the output window. In this way, you can evaluate the quality of compression and, if it is not enough, interrupt processing without waiting for the completion of the entire process. Although this option slows down the work and is not always applicable. You can also admire the work of filters without saving the file (Preview mode): in this case, all frames are displayed on the screen, and if the processing speed is not high enough, then the display speed will be correspondingly lower than normal, and the sound will be interrupted. Almost the same result (playing the output stream) is achieved by pressing the button Video processing capabilities Let's move on to the description of what, in fact, you can do with the video. As already mentioned, in addition to the ability to cut-glue files without transcoding (which we will analyze in more detail in the first example), VirtualDub is famous for its filters. There are three dozen built-in filters and the ability to connect external plugins, which are written quite a lot by different people. Sometimes there are no analogues comparable in quality to other programs. (For the sake of fairness, it must be said that in recent years the focus of filter writers has shifted towards creating plug-ins for AviSynth, a utility that has a similar architecture, but a completely different interface). Filters can be added in any number and order via the Video - Filters menu:
Next to each filter, the frame size before and after its application (including cropping - Cropping) is displayed, as well as some of its parameters. A detailed description of the filters and recommendations for their use are beyond the scope of this article - and there are so many possibilities that you need to understand each case separately. Here we will only give general recommendations. Filters can be roughly divided into several thematic groups:
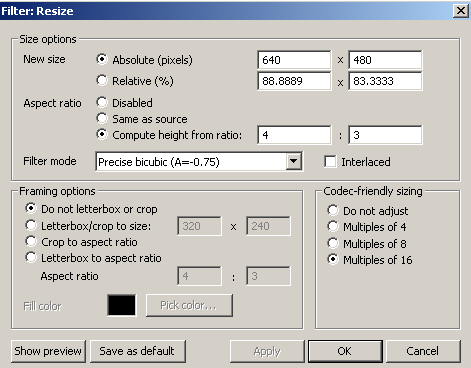
The filter operation can be limited to a certain range of frames (the Blend button and the View/Curve editor command). We will not dwell on this feature (its description can be found in the help), but consider in more detail one of the most frequently used functions - scaling (resize) and cropping (crop). In recent versions, this essentially simple filter has gained an alarming amount of customization:
In fact, there is nothing complicated. Keep in mind that the AVI format does not provide for storing information about the aspect ratio of the frame (Aspect ratio), it is assumed that it is equal to the ratio of width and height in pixels (ie "square pixel"). On the other hand, in some cases this is not the case: the most typical example is the DV format, with a frame size of 720x576 (i.e. 5:4) and frame proportions when properly displayed 4:3 for normal and 16:9 for widescreen. (Therefore, a DV file opened in oak will be vertically stretched a little if you do not change the display settings, although conventional players will display it correctly). At the same time, in DivX/Xvid files, the pixel is usually square, ie. when scaling DV, you need to switch the Aspect ratio item from Same as source to Compute height from ratio and set it to 4:3 or 16:9. Well, the general rule for all codecs is that it is desirable to have a width and height that is a multiple of 2, 4, 8, and preferably 16 (the Codec-friendly sizing section serves for this). As for cropping the edges, there is no special filter for this - but there is a Cropping button that allows you to set cropping before applying the specified filter. In particular, it can be a Null transform dummy filter, the only meaning of which is in combination with Cropping. Trimming, of course, is also better in multiples of 2 or 4. Some comments will also be given to work with interlaced (interlaced) video. As you know, in most camcorders this mode is the main (often the only) option, and it goes well with viewing on CRT TVs. If you're going to make a DVD from your video, it's also best to leave the image interlaced - when played back on a computer or LCD/Plasma TV, the appropriate deinterlacing methods will automatically be adopted. On the other hand, if you need, for example, to encode video in any of the MPEG-4 variants (DivX, Xvid, ...), for example, for posting on the Internet, then it would be reasonable to apply deinterlacing and then reduce the frame size (as in the screenshot above, where the denoising stage and a slight trimming of the edges are also added). As a deinterlacing method, you should not choose the built-in Deinterlace filter in the Blend fields mode - contrary to the inscription best next to it, nothing good will usually come of it, there will be double contours. It is better to use third-party plug-ins, although here, too, the most modern and high-quality developments exist only in the version for AviSynth. And never change the frame size in an interlaced video for no reason! Typical tasks Now let's describe some typical scenarios in which VirtualDub is used to solve specific problems. Example #1: First, let's deal with linear editing, i.e. sharp-adhesive and permutation of pieces. As already mentioned, this operation can be carried out without recoding if the source video was in the AVI container. Several files are added using the File/Append AVI segment command, and if they are numbered in order, then several can be loaded at once (Autodetect additional segments by filename checkbox). At the same time, the video and audio compression formats must be strictly the same (up to some parameters hidden from the user: for example, it may happen that a DV file from a camera, processed in Dub and compressed again in DV, cannot be joined to the same file, but received directly from the camera.. On the other hand, files compressed in DivX in the same way, but with different bitrates, can be easily glued together). By the way, many (but not all "hidden") file parameters can be found with the File/File information command, although the separate GSpot utility is more universal: http://headbands.com/gspot. We figured out the "gluing", now let's turn to "cutting", i.e. removing unnecessary fragments (for example, advertisements from a TV show recording), and at the same time rearranging fragments in places (through a clipboard type mechanism - Ctrl + X, Ctrl + C, Ctrl + V, only within one program). Here the situation differs depending on whether the file is compressed by an interframe (eg DivX/Xvid, VP6, Indeo) or frame by frame (MJPG, DV, HuffYUV, etc.) codec. If in the second case, you can safely cut out any piece, because each frame is encoded independently of the others, the situation is more complicated in the first one. Indeed, in order to decode a certain frame, you need to find the nearest key frame in front of it and go through the entire chain from it to the desired frame. For example, consider this selection:
If we delete the selected piece, then nothing terrible will happen - the beginning of the fragment following the cut piece falls on the key frame, and the video sequence can be unpacked normally.
And if, on the contrary, we want to leave only this fragment, then the resulting video sequence would begin with a delta frame, before which there is not a single key, which is unacceptable. Therefore, in the Direct Stream Copy mode, such trimming will lead to the fact that the output file will start not from the 3rd frame, but from the 1st one (the key closest to it). Similarly, when trying to remove the following fragment:
we will get a video sequence with frames from 1 to 4 and from 11 (not 13) to 15. Hence the conclusion - in order not to make a mistake in slicing, do it by key frames. Namely, if you delete a fragment, then it must end on a key frame, and if you leave it, then, on the contrary, it must begin. This is where the ability to move only through keyframes while holding down Shift comes in handy. By the way, the mark of the end of the selection refers to the previous frame (that is, everything is selected up to the current one, not including it), so you need to put the end just on the key frame itself. But what if you need more precise positioning for cutting / gluing? In the latest versions of Oak, a very useful Smart Render checkbox has appeared, active in Full processing mode. Its action is as follows: if the section can be processed in the Diect stream copy mode, then this happens, otherwise the codec specified in the settings is launched (it must be the same with which the source file is compressed) and with its help the fragment is encoded up to the next key frame (naturally, it will start from the newly made key frame), and on it it switches back to Direct stream copy mode.
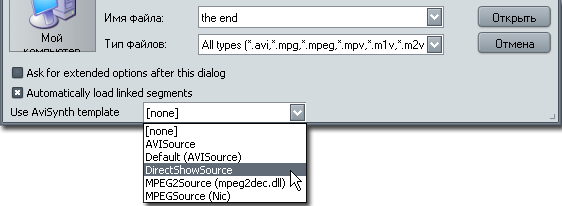
That is, only those sections that are necessary are recoded. If you make all the codec settings correctly so that they match the source file (and it’s better to set the bitrate a little more so that there are no sharp drops in quality at the border of the fragments, and, of course, set the single-pass compression mode), then this method allows you to perform accurate frame-by-frame editing without unnecessary transcoding, which is certainly very useful. In addition, there is a Video/Select range command, the result of which is that the area before the first and after the last specified frame is deleted. A related task - to split a long file into pieces, for example, 700 megabytes each, for writing to a CD, is more conveniently solved using VirtualDubMod, in which, next to the frame number, the "distance" from the beginning of the file in megabytes is additionally displayed. We emphasize that cutting MPEG files in this way will not work, for this it is convenient to use the MPEG Video Wizard: http://womble.com. Example #2: Let's say you've edited your movie in an editing program like Pinnacle Studio or Adobe Premiere. Then you need to save it somehow, and often you need to have it in several versions: for example, if the format of the original shooting was miniDV, then it is reasonable to export the finished film from the editing to DV AVI and then throw it back onto tape (if the camera allows it ); you almost certainly need to make a DVD; maybe you want to post a movie on the Internet (even if you are going to use a service like YouTube, which itself compresses the video into its own format, and of rather meager quality, uploading the original DV AVI to the server can still be too long and unproductive). In the latter case, it makes sense to load the finished DV AVI into oak, add deinterlacing and size reduction filters if necessary, and save to something like DivX, preferably in two passes. Of course, you can do this directly from the editing program, but in this case, all editing effects and transitions will be calculated twice, and we already have a DV-AVI file prepared for recording on a camera. Example #3: Let's say you're filming in low light and want to clean up video noise, or you want to get rid of camera shake when shooting handheld. In these cases, it makes sense to do selective filtering only for those episodes that need it (in DVD cameras, each episode is recorded in a separate file; when capturing video from miniDV, they also usually include splitting into scenes with recording each scene in a separate file ). It is advisable to carry out processing before loading the fragment into the editing program - in this case, you can select and adjust the necessary filters separately for each fragment. However, another move can be applied (only possible in the case of AVI files from a miniDV camera): mount the entire movie with the source files, and before the final export, determine the fragments that require processing, pass them through VirtualDub, move the source file to the archive folder, and on its place is to place the processed file under the same name. Then restart the installation program and export with new files. You can process video both with the filters of VirtualDub itself, and through AviSynth, which is described in the corresponding article. In the latter case, however, it is still desirable to load the AVS script into oak and save it as a regular AVI file (for example, with the same DV codec) - not all editing programs work with AVS scripts, and it is more convenient to work with a finished file than with " "heavyweight" (in terms of processing time) script. Video stabilization using VirtualDub and AviSynth filters will be covered in a separate article. Example #4: You need to take a screenshot of a video in order to see it for quality or defects. You should not do this from the player, because. it can make any modifications to the image (for example, forced deinterlacing or brightness correction). At the same time, VirtualDub will open the file "as is", provided, of course, that it is supported by it. By the way, about formats: by default, except for AVI, VirtualDub can open mpeg-1 files. With the help of plugins from fccHandler "a (http://fcchandler.home.comcast.net/~fcchandler/) you can teach him to open MPEG-2 (by the way, you can open and glue several VOB files in a row at a time) and WMV / ASF ; there are also plug-ins for working with MOV and FLV containers, and the VirtualDubMod modification can work with MKV files. You can try to open other formats using AviSynth (see below). Well, the actual saving of screenshots is done by the File / Export / Image sequence command (you need select a section for export - if you need one frame, then place it under the cursor and press Home, right arrow, End). VirtualDubMod and AviSynth A few words about an important development branch of "oak" - VirtualDubMod. It is a standalone program based on the VirtualDub source code and many useful additions. It makes sense to place it in the same directory as VirtualDub itself in order to use a common set of plugins. (In principle, you can generally replace the oak itself with it, except that the latest version of DubMod "and is based on version 1.5.10 from 2005, i.e. it lacks the features added to Dub recently - however, there are not so many of them ).The interface of VirtualDubMod is similar to VirtualDub, one significant difference is that the Audio menu has been replaced with Streams, which reflects the focus on working with multiple audio streams.The second useful innovation is closer integration with AviSynth.We will benefit from one of its properties - the ability work with the DirectShow subsystem along with VideoForWindows In short, AviSynth is a scripting language and a program for interpreting it, and its interface with other programs is very simple - you write a text file with a script, and then open it in (almost) any video processing program, encoder or player like a regular video file and work in the same way as with a video file on a hard disk.The video sequence and sound are generated by the commands written in the script. For our purposes, it is enough just to install AviSynth, and then when opening a video file in VirtualDubMod, the Use AviSynth template option will be available:
This means that an intermediate AviSynth script will be automatically created to open the file, containing the appropriate opening command (in this case, DirectShowSource), and VirtualDubMod will load it. Thus, you can try to work with almost any type of files that are played by players - RealVideo, QuickTime (MOV), MPEG2-TS (it usually contains video from HDV and AVCHD format camcorders), MP4 (also a common option in cameras and combined cameras) . It should be noted that this method, firstly, does not always work, and secondly, it is not as reliable as opening with "native" means (in particular, file positioning may not work correctly, etc.). Therefore, whenever possible, it is better to use built-in or specialized tools (MPEG2-PS, in particular, DVD files (VOB), open directly in VDMod, and there is a special MP4Cam4AVI program to convert MP2 files to AVI). Let's also note that VirtualDubMod has a special Script Editor (in the Tools menu) designed for operational control and configuration of AviSynth script parameters. Just change the text of the script, and then press F5 or F7 to see the result of the script in the VirtualDub window. Let us emphasize that regular VirtualDub also perfectly opens AVS scripts, it's just that integration with AviSynth is more convenient in VDMod. It must be remembered that an AviSynth script opened in any program appears as an uncompressed file, so copying without recompression is impossible in this case. (If you do not need to use additional VirtualDub filters, then it is better to select Fast Recompress mode, rather than Full processing mode)." In short, VirtualDub (as well as VirtualDubMod and AviSynth) should be in the arsenal of anyone who works with digital video at a slightly higher level. Learn and apply! The article did not cover all the features of VirtualDub, so read Help. A detailed description of menu items can be found on specialized resources (however, for rather old versions of Oak). The network also has Russian-language builds of VirtualDub, though, most likely, not the latest versions. Useful tips for working with VirtualDub Tip 01 - Save your video processing settings. VirtualDub allows you to completely save the video processing settings ("File" menu - "Save/Load Processing Settings..."). At the same time, everything is saved: settings and the sequence of applied filters, cut fragments, codec settings, etc. It is very useful if you often have to process the same type of video files, or simply, you often have to apply the same sequence of filters... Tip 02 - Hotkeys for moving through the video. It is very convenient to use the following hot keys when moving through the video: [Shift] + arrows [<] and [>] - previous and next key frame (for moving through video compressed in MPEG4). [Alt] + arrows [<] and [>] - 50 frames backward and forward, respectively (for moving through video compressed in MJPEG, Nuffyuv, ... because here each frame is a key). Tip 03 - Comfortable MPEG4 encoding in two passes. When all the VirtualDub settings and compression codecs are set, and it's time to make the first compression pass in MPEG4, it's more convenient to do the following: (I specify) the first pass is selected in the DivX codec settings. Save, menu "File" - "Save as AVI ...", set the name and location of the AVI file, and also check the box next to "Don" t run this job now ...". Now click the "Save" button.
We go into the settings of the DivX codec, select the second pass. Let me remind you that nothing else can be changed! Again, the "File" menu - "Save as AVI ...", set the name and location of the AVI file (the name is different), and also check the box next to "Don" t run this job now ...". Click the "Save" button ". Now, menu "File" - "Job control...". In the window that opens, we see two tasks assigned by us (the first and second passes), click "Start".
Upon completion of the first compression pass, VirtualDub will immediately begin the second pass. Agree, it's very convenient... Author: Dmitry Kornev; Publication: pctuner.ru
▪ How to take pictures correctly
Artificial leather for touch emulation
15.04.2024 Petgugu Global cat litter
15.04.2024 The attractiveness of caring men
14.04.2024
▪ Microphones for karaoke TeslaMic ▪ Ecological packaging from tomato leaves ▪ New Intel Pentium 4 processor
▪ section of the site Videotechnique. Article selection ▪ article Kunkator. Popular expression ▪ article Work on string casting typesetting machines. Standard instruction on labor protection ▪ article Car radio watchman. Encyclopedia of radio electronics and electrical engineering ▪ article Testing food products for acidity. Chemical experience
Home page | Library | Articles | Website map | Site Reviews www.diagram.com.ua |


 Arabic
 Bengali
 Chinese
 English
 French
 German
 Hebrew
 Hindi
Hindi Italian
 Japanese
 Korean
 Malay
Malay Polish
 Portuguese
 Spanish
 Turkish
 Ukrainian
 Vietnamese



 in the lower left corner, and the button
  , respectively, plays only the input stream.




 See other articles Section