|
|


 Arabic
 Bengali
 Chinese
 English
 French
 German
 Hebrew
 Hindi
Hindi Italian
 Japanese
 Korean
 Malay
Malay Polish
 Portuguese
 Spanish
 Turkish
 Ukrainian
 Vietnamese
|
ENCYCLOPEDIA OF RADIO ELECTRONICS AND ELECTRICAL ENGINEERING Optical phone. Encyclopedia of radio electronics and electrical engineering
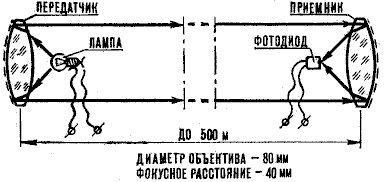
Encyclopedia of radio electronics and electrical engineering / Telephony To build an optical communication line, no special permission is required; it can be successfully used in hard-to-reach areas, at sports competitions, and on hiking trips. The communication line operates on the principle of an optical telephone, the communication range is up to 500 meters (Fig. 1).
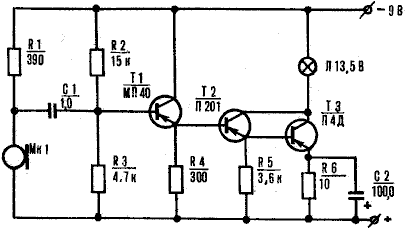
The information carrier in it is not radio waves, but a beam of light. In order to “fill” the beam with the necessary messages, it needs to be modulated. It's done like this. The electrical signal from the microphone is fed to a low-frequency amplifier, where a flashlight bulb is turned on instead of a loudspeaker. The current flowing through the light bulb changes depending on the transmitted signal, which means the brightness of the light bulb changes. The light flux turns out to be modulated by audio frequency voltage. The beam directed towards the receiving device must be well focused so that it is less scattered. At the receiver, the signal is demodulated, that is, decrypted. The beam passes through the lens onto a photosensitive element, where it is converted into electrical vibrations of sound frequency, which are then amplified and reproduced through headphones. For a one-way conversation within the line of sight, it is enough to have one light transmitter and one light receiver. For two-way communication you will need two identical sets of transceivers. The optical telephone transmitter (Fig. 2) is powered by a Mk1 carbon microphone. The audio frequency voltage of the microphone passes through the isolation capacitor C1 to the input of the three-stage amplifier.
The amplifier transistors are connected according to a compound transistor circuit. Such a low-frequency amplifier provides a significant current signal amplification, which is extremely important for powering the incandescent light bulb L1, which is the radiating element of the transmitting device. The voltage supplied to the lamp, in the absence of an input signal, should be 4-4,5 V, its value is set by resistors R2 and R6. The transmitter parts, except for the microphone and the light bulb, are mounted on a board made of foil getinax or PCB. You can also use a ready-made circuit board with petals or brass supports rigidly attached to it. The Mk1 microphone is connected to the amplifier with a shielded wire. Transistor T1 type MP40 or MP41-MP42. Its static current gain can be in the range of 50-60. Transistor T2 type P201-P203 with any letter index and gain of at least 50. Finally, any transistor TXNUMX can be used a powerful semiconductor device, for example from the P215-P217 series. It is important that its gain is at least 20. The transmitter uses a carbon microphone type MK-10 or MK-59. The receiver circuit (Fig. 4) is very simple. It is a five-stage low-frequency amplifier using low-power transistors T1-T5, the input of which is a photodiode D1, and the output is a telephone Tf1. Adjustment of the volume of the received signal is not provided only because the signal level does not exceed the permissible value for this amplifier. However, if there is a need to install such a regulator, then you can replace the constant resistor R12 in the collector circuit of transistor T4 with a variable one, to the middle terminal of which you must first connect capacitor C6.
The receiver parts, as well as the transmitter parts, are mounted on a board made of insulating material. The dimensions of the board are determined by the dimensions of the parts. Photodiode D1 is connected to the amplifier by a flexible shielded wire. Transistor T 1 is low-power, high-frequency type P402-P403, and transistors T2-T5 are type PSh or MP39-MP42 with any letter index. The current gain of transistors can be in the range of 50-60. The Tf1 telephone is electromagnetic, type K-47 or any other, having a coil resistance of 60-130 Ohms. Photodiode D1 type FD-1. It can be replaced with a homemade one made from two low-power transistors MP39-MP42. Mechanical alteration of one of the transistors comes down to carefully removing (cutting off) the upper part of the device body. The resulting transistor is connected to the second (serial) transistor as follows. The transistor collectors are connected through a resistor with a resistance of 4,7 kOhm to the negative terminal of the power source, and then connected to resistor R1 and capacitor C 1. The base of the phototransistor is connected through a resistor with a resistance of 75 kOhm to the positive terminal of the power source, to which the emitter of the additional transistor is also connected. Finally, the emitter of the phototransistor is connected to the base of the second transistor. The power sources for the receiving and transmitting devices are sets consisting of two 3336L batteries connected in series. Now about light-emitting and light-receiving devices. For the scheme shown in Fig. 1 to work well, you need to install spherical mirrors along with the lenses. But there is an easier installation option. It will require two flat-convex collecting lenses with a diameter of 30-40 mm and a focal length of 70-80 mm. Light emitters and light receivers have exactly the same design, which is a cylindrical body - a cardboard tube with a lens on the outside. Deep in the body of the transmitting device, at the focus of the lens, there is an incandescent light bulb, and in the receiver body there is a photodiode or other light-sensitive element. On the back side of the light emitter body there is a spherical disk made of cardboard, covered with aluminum foil. In the light receiver, the bottom of the tube is covered with dark paint. Setting up an optical system involves finding the correct position (at the focal point of the lens) of the lamp or photodiode. Each optical communication line device must be equipped with a viewfinder (you can use a simple frame viewfinder from a camera). A viewfinder is necessary to combine the optical systems of the transmitting and receiving devices. Before setting up the transmitter, you need to disconnect the microphone from the amplifier and use resistors R2 and R6 to set the optimal brightness of light bulb L1. Then connect a radio, electrophone or tape recorder to the amplifier input. If you gradually increase the volume, the brightness of the light bulb will change. After such a test, the microphone is again connected to the transmitter, a few words are spoken into it, thus making sure that the brightness of the beam also changes. Check the operation of the receiving device like this. First, the photodiode is illuminated with light from a light bulb connected to an alternating current network. A characteristic noise should be heard in the earphone. If you cross a beam of light with your hand, you should hear a slight tapping sound - this means that the photodiode or homemade phototransistor is working normally. Then the photosensitive device is installed so that the signal is maximum.
After checking the operation of the device at close range (5-8 m), you need to test it in “field” conditions. The success of communication largely depends on the correct configuration of optical systems. Publication: cxem.net
Artificial leather for touch emulation
15.04.2024 Petgugu Global cat litter
15.04.2024 The attractiveness of caring men
14.04.2024
▪ Integral four-channel ULF Toshiba TCB701FNG ▪ Taiwanese manufacturers are dropping OLED
▪ Modeling section of the site. Selection of articles ▪ article Principles of rational nature management. Fundamentals of safe life ▪ article Is the whale the only marine mammal? Detailed answer ▪ article Island of Martinique. Nature miracle ▪ article Biogas on the farm. Encyclopedia of radio electronics and electrical engineering
Home page | Library | Articles | Website map | Site Reviews
www.diagram.com.ua |


 Leave your comment on this article: