|
|


 Arabic
 Bengali
 Chinese
 English
 French
 German
 Hebrew
 Hindi
Hindi Italian
 Japanese
 Korean
 Malay
Malay Polish
 Portuguese
 Spanish
 Turkish
 Ukrainian
 Vietnamese
|
ENCYCLOPEDIA OF RADIO ELECTRONICS AND ELECTRICAL ENGINEERING PCB laminator. Encyclopedia of radio electronics and electrical engineering
Encyclopedia of radio electronics and electrical engineering / Ham Radio Technologies Many radio amateurs have long been using the technology of thermal transfer of a pattern of printed conductors printed on paper by a laser printer to the foil of a future board blank using a conventional iron. Unfortunately, using such a tool, it is very difficult to achieve optimal pressing of the paper to the board blank and ideally withstand the temperature required to transfer the melted toner to the foil. The process, as a rule, has to be repeated many times, empirically achieving an acceptable quality of the pattern on the foil. Today, many radio amateurs have laser printers that are not completely serviceable or obsolete and have not been used for their intended purpose for a long time. Such an apparatus can successfully serve as the basis for the manufacture of a laminator that provides reliable and high-quality image transfer. The author came up with the idea to make a home-made laminator for thermal transfer of a pattern from paper to a foil dielectric board while repairing another laser printer, in which the “stove” for fixing the toner on paper turned out to be very similar to that required for such a device. It remained to modify it a little mechanically, to develop and manufacture the electronic part of the laminator. The prototype of the laminator control unit was a universal microcontroller module [1], but a microcontroller with a smaller number of pins was used, and the graphic LCD was replaced by a character one. The interface unit of the control unit with a stepper motor that moves a package from a board blank and a sheet of paper with a pattern of printed conductors superimposed on it is made on a pair of specialized L297 and L298N microcircuits. A triac switch for the "stove" heater was also made.
The diagram of the control node is shown in fig. 1. It uses a PIC16F876A-I/SP (DD1) microcontroller running at a clock frequency of 20MHz, stabilized by a ZQ1 quartz resonator. If necessary, connect the WM-C5M LCD to the X0801 connector (one line of eight characters). The pin numbers of this connector match the pin numbers of the indicated indicator. In the laminator, the LCD is used only as a technological one. In the process of selecting the optimal lamination mode, it shows the temperature of the "stove" and the number of board passes through it. The LCD is not required for normal operation of the instrument and may not be connected. Shift register DD2 converts the serial LCD control code generated by the microcontroller into the parallel one necessary for the operation of the latter. The optimal contrast of the image on the LCD screen is set with a trimmer resistor R17. Transistor VT1, according to the signals of the microcontroller, turns on and off the backlight of the indicator screen. During the operation of the laminator, the microcontroller receives signals from two sensors. One of them - optocoupler U1 with an open optical channel - signals the presence of a board in the "stove". The readings of the other - the temperature sensor DS18B20 (BK1) - are needed to control the heating and cooling processes of the "stove". Buttons SB1 - SB5 are designed to control the laminator. Transistor VT2, according to the signals of the microcontroller, turns on and off the fan connected to the X7 connector (computer with dimensions 80x80x20 mm). The two-color LED HL1 with a green glow indicates that the laminator is on and in standby mode. Its color turns red during the heating of the "stove", as well as when a package of a sheet of paper with a pattern of printed conductors and a board blank is in the sensitive zone of optocoupler U1.
To download the program to the DD1 microcontroller already installed on the board, the programmer is connected to the X4 connector according to the diagram shown in Fig. 2, while the LCD should be disconnected from connector X5. Upon completion of programming, for normal operation of the control unit, the programmer is turned off, and contacts 1, 2 and 8, 9 of connector X4 are connected by jumpers S1 and S2 (see Fig. 1).
A drawing of the printed circuit board of the control unit is shown in fig. 3, its dimensions are 90x79 mm. Optocoupler U1 and temperature sensor VK1 are placed on a separate board with dimensions of 80x20 mm (Fig. 4) in such a way that they enter the holes in the upper part of the "stove" case. The optocoupler with an open optical channel KTIR0621DS (Fig. 5) designed to work on interrupting the light flux was redesigned to work "on reflection". To do this, it is cut into two parts (with an emitting diode and with a phototransistor), which are mounted on the board so that their emitting and radiation-sensitive holes are directed towards the package passing next to the sensor. For the best sensitivity to the rays reflected from it, the angle between the emitter and the photodetector must be selected. Since the maximum temperature that the DS18B20 sensor can measure does not exceed 127 ° C, and the "stove" heats up much more, it must be located at some distance from the heated parts.
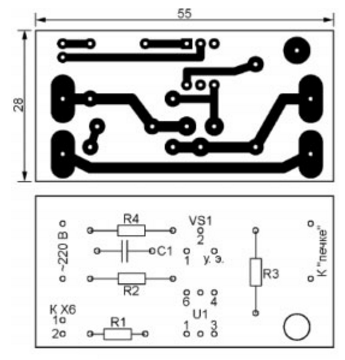
The control unit generates a signal on and off the laminator "stove" heater on connector X6. However, this signal is low-power, so a powerful halogen lamp serving as a heating element of the "stove" is connected to connector X6 through a triac switch. It is assembled according to the usual scheme (Fig. 6) on the optocoupler MOC3063 (U1), which provides galvanic isolation of the control circuit and turn on the load at zero instantaneous voltage in the network, and a powerful triac BT139-800 (VS1).
The switch circuit board is shown in fig. 7.
Connector X3 of the control unit is connected with a flat cable to connector X1 of the interface unit with a stepper motor. The scheme of this block is shown in fig. 8.
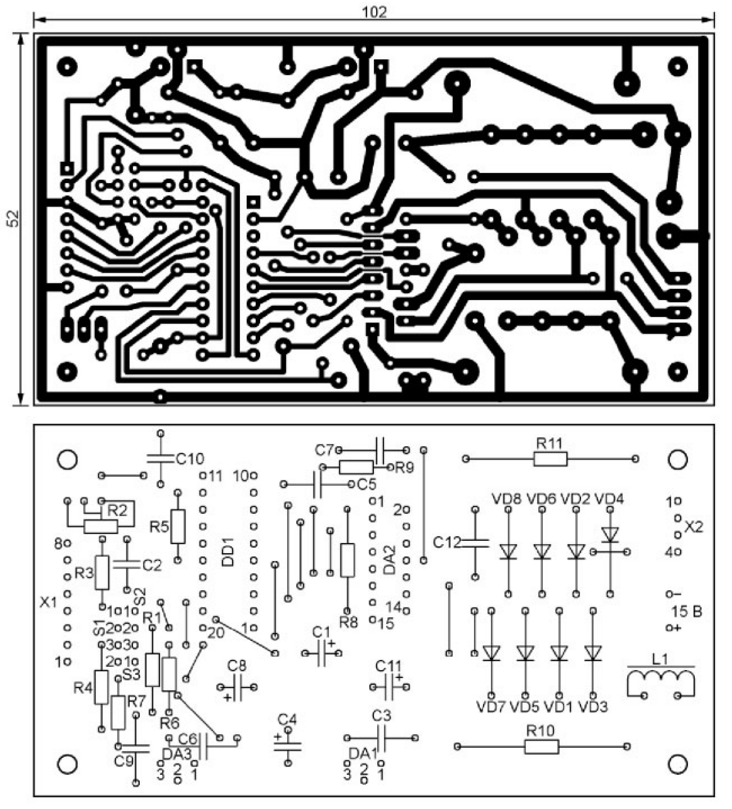
The stepper motor M2 connected to its X1 connector is a two-phase bipolar laser printer XEROX PHASER 3121. To convert logical control signals into current pulses in the motor windings, a common set of specialized chips L297 (DD1) and L298N (DA2) is used. This simplified the design of the block and reduced the number of components in it. From the control unit, the Reset (setting to the initial state) and Enable (enable the engine operation) signals are sent to the X1 connector, and for each Step pulse, the engine performs one step in the direction indicated by the Dir signal. The dD1 microcircuit generates current on and off signals in the motor windings in the required order. They are brought to the level required for its operation by the DA2 chip. Diodes VD1-VD8 eliminate self-induction voltage surges on the motor windings during their switching. Powerful resistors R1 and R15 connected to pins 2 and 10 of the DA11 chip are current sensors in the windings. They enable the DD1 chip to measure the current flowing through these windings, and use PWM to control its value. The trimmer resistor R2 regulates the reference voltage Uref supplied to the dD1 microcircuit, which sets the level at which the current is cut off in the motor windings. Resistor R5 and capacitor C2 are the frequency-setting elements of the internal clock generator of the DD1 microcircuit. Removable jumpers S1-S3 set the operating modes of the unit. Jumper S1 is set to position 1-2 if stepper motor M1 is bipolar, or to position 2-3 if it is unipolar. With jumper S2 in position 1-2, the motor operates in full steps, and in position 2-3 - half steps. Jumper S3 is required if the output of the Enable signal supplied to the block is made according to the scheme with a common collector (drain). A detailed description of the operation of the L297, L298 chipset can be found in [2]. The interface unit also contains integral stabilizers DA1 and DA3, which provide stabilized voltage of 5 V and 12 V not only to this unit and the M1 stepper motor, but also to the control unit, as well as the fan installed in the laminator case. The voltage source of 15 V to power the laminator is a switching power supply from a laptop, designed for a load current of 4 A. A drawing of the printed circuit board of the interface unit is shown in fig. 9.
In all nodes of the device, fixed resistors MLT, S2-33, oxide capacitors K50-35 or imported are used, the remaining capacitors are K73-17. The DA2 microcircuit of the interface unit is equipped with a heat sink made of a piece of aluminum corner 20x25 mm with a shelf thickness of 3 mm and a length of 55 mm. In the corner shelf, not adjacent to the microcircuit, 12 holes with a diameter of 4 mm were drilled to improve air circulation. Integrated stabilizers DA1 and DA3 are mounted on the same, but without additional holes, heat sink. The stepper motor drive removed from the XEROX PHASER 3121 laser printer has been redesigned. Its base is cut to 120x70 mm, the axes of some gears are carefully pressed out, holes 2,5 mm in diameter and 10 mm deep are drilled into them, in which an M3 thread is cut for mounting on the base at new pre-calculated points. To reduce the rotation speed of the "stove", two more gears have been added. The resulting drive is shown in Fig. 10. Its design may be different, it all depends on the availability of parts to refine the existing drive.
For the laminator, a case from an HP photosmart 7260 inkjet printer was used. All unnecessary partitions were removed from its lower half and a base measuring 300x130 mm from a 3 mm thick duralumin sheet was installed. The "stove" removed from the XEROX PHASER 3121 laser printer, and its drive with an engine interface unit, as well as a power supply from a laptop, are fixed on the base. All unnecessary details were removed from the "stove": a plastic flag that blocked the optocoupler (paper presence sensor), and some others. The sensor board is fixed with a screw in the upper part of the "stove", and the sensors go into the holes available there. The control node board is located on the left side of the case. It is located so that the buttons installed on it can be controlled using the old keys provided in the used case. The assembled laminator without the top hinged cover is shown in fig. 11. A fan is attached to this cover. A round hole is made in it to take in outside air.
The first time the control unit is turned on, the EEPROM of the DD1 microcontroller is checked for the absence of information. If the non-volatile memory is empty (filled with 0FFH codes), then it is overwritten from programs memory, the default values of the necessary parameters. If there is already information in the EEPROM, then it does not change at the initialization stage and is used by the program in further work. During operation, the values of the parameters stored in the EEPROM can be adjusted by selecting the desired lamination mode. The corrected values are stored in EEPROM by pressing the SB4 button. During the initialization of the microcontroller, the red crystal of the HL1 LED is turned on. At the end of it, it turns off, and the green crystal turns on - the laminator is ready for use. The lamination process is started by pressing the SB5 button. In this case, the "stove" begins to rotate backwards and its heater is turned on. The warm-up process is signaled by the red glow of the LED. Having warmed up enough, the "stove" begins to rotate forward, the green crystal of the LED turns on again. Now it is possible to submit a package of foil fiberglass and a sheet of paper superimposed on it with a pattern of future printed conductors. I am printing this drawing on 230 weight inkjet photo paper. When the package enters the sensitive zone of the optocoupler-sensor of its presence in the "stove", the red crystal of the LED turns on, and the microcontroller program waits for the package to leave the sensitive zone, after which the color of the LED turns green. Since the optical sensor is located at some distance from the middle of the "stove", the stepper motor takes a specified number of additional steps to complete the passage of the package through it. By default - 1100, but when repeating the design, the "stove" and its drive may be different, so this number will have to be chosen experimentally. Then the direction of movement of the package is reversed, and it passes through the "stove" in the opposite direction until it enters and then exits the sensor's coverage area. By default, five passes of the package through the "oven" are set, in my version this provides very good adhesion of the toner to the foil. The number of passes can be increased by pressing the SB2 button or reduced by pressing the SB3 button. If you press and hold one of these buttons for more than 3 seconds, it will change the number of additional steps. Return to the mode of changing the number of passes will occur when you press any other button. When the last pass is completed, the "stove" will be turned off, the package is removed from it, the fan is turned on to cool the "stove". The package can be left in the laminator to cool down as well. Having determined from the readings of the BK1 temperature sensor that the "stove" has cooled down sufficiently, the microcontroller program will turn off the fan, the "stove" rotation drive and turn on the green LED crystal. As a rule, paper is easily separated from the cooled board blank without soaking, after which you can immediately proceed to foil etching. Conductors with a width of 0,3 mm or more (I have not tried less) are very good. To interrupt the started lamination process before it is automatically completed, press the SB1 button. In this case, the heater will be turned off, the fan will be turned on, and the "stove" will rotate back, bringing the package out. This mode is turned off automatically according to the readings of the BK1 temperature sensor or manually by pressing the SB1 button. Setting up the device begins with adjusting the LCD contrast with resistor R17 on the control board and setting the rated current of the stepper motor with a trimming resistor R2 on the board of the interface unit with a stepper motor. In my version, the voltage coming from the engine of this resistor to pin 15 of the L298N chip is 1 V. The angle between the optical axes of the emitting diode and the photodiode of the optocoupler with an open channel U1 (see Fig. 1 and Fig. 4) is selected according to the minimum reading of the voltmeter connected between terminals 2 and 3 of connector X1 of the control unit with sensors connected to this unit and inserted into " oven" sheet of white paper. After the laminator is assembled and running, it is determined by trial and error the number of additional steps of the engine necessary for the board to be made to go through the entire "oven", but not fall out of it, and the number of passes of the board through the "oven", providing the best adhesion of the toner to the foil . PCB files in Sprint Layout format and laminator microcontroller program can be downloaded from ftp://ftp.radio.ru/pub/2013/10/laminator.zip. Literature
Author: V. Kiba
Artificial leather for touch emulation
15.04.2024 Petgugu Global cat litter
15.04.2024 The attractiveness of caring men
14.04.2024
▪ The danger of chocolate disappearing ▪ New waste disposal technology on the International Space Station
▪ section of the site Aphorisms of famous people. Article selection ▪ Article Family law. Lecture notes ▪ article Where and under what conditions can I buy a license to shoot horned hares? Detailed answer ▪ article Director of the restaurant. Job description ▪ article Low power chargers. Encyclopedia of radio electronics and electrical engineering
Home page | Library | Articles | Website map | Site Reviews
www.diagram.com.ua |


 Leave your comment on this article: