|
|


 Arabic
 Bengali
 Chinese
 English
 French
 German
 Hebrew
 Hindi
Hindi Italian
 Japanese
 Korean
 Malay
Malay Polish
 Portuguese
 Spanish
 Turkish
 Ukrainian
 Vietnamese
|
ENCYCLOPEDIA OF RADIO ELECTRONICS AND ELECTRICAL ENGINEERING UW3DI transceiver upgrade. Encyclopedia of radio electronics and electrical engineering
Encyclopedia of radio electronics and electrical engineering / Civil radio communications The direct conversion transceiver described in [1] made it possible at one time to begin intensive development of the 160 m range. It did not go unnoticed by foreign radio amateurs either - several adapted versions appeared in the radio magazines of the former socialist countries (unfortunately, in some cases without reference to the author) . For several years, I have been trying to modernize and rebuild this transceiver to other ranges. I hope the experience will be useful for beginners, for those who will assemble this simple but high-quality device. One of the upgrade options was given in [2]. There is no need to manufacture a printed circuit board for the transceiver with the dimensions given in [1]. As experience shows, all parts fit perfectly on a board 1,5 times smaller. A drawing of such a board is given in [3]. In this book, it is given without errors (in [1] the polarity of the mixer diodes on the board is incorrectly indicated). As experience shows, the UHF used in the transceiver, as well as the sensitivity adjustment, are not entirely successful for working on other (except 160 m) bands. UHF has a very low dynamic range, is prone to excitation, it is better to use UHF instead, shown in Fig. 1.
This amplifier has much better dynamics and greater gain, which is especially noticeable in the HF ranges. Coils L1 and L2 are at a distance of 8 - 16mm from each other. Transistors VT1 and VT2 should preferably be selected with the same parameters. When setting up UHF, it is necessary to set half the supply voltage at the VT1 drain (this can be achieved by selecting R3), as well as connecting the VT2 gate to one of the ends of R3. Resistor R2 regulates the sensitivity of the transceiver. UHF fits well on the printed tracks in place of the old UHF. The transceiver should be assembled only in a single-band version. To do this, of course, all the circuits of the transceiver must be tuned to the appropriate frequencies. Capacitor C29 (all designations are indicated in accordance with [1] and [3]) is calculated for any range very simply. Its capacitance at any frequency should be equal to the resistance R15, which is taken equal to 600-500 ohms in the calculation. It is also easy to make the transition to the upper sideband - you only need to swap C42 and C43 on the board. In this regard, I want to remind you once again that for the satisfactory operation of the phase shifter, it is desirable that R24, R25, C42, C43 match their nominal values as best as possible. If, when working on 160 and 80 meters, it is still quite possible to achieve good results using the transceiver's VFO, then when switching to higher frequency ranges, this VFO does not provide the required frequency stability. In this case, it is necessary to assemble the GPA on a separate board and always with buffer decoupling and frequency multiplication. The master oscillator should operate at a frequency 2 to 3 times lower than the signal frequency. The output of the GPA should provide approximately 0,2 -0,5 V at a load of 680-300 ohms. Transistor VT4 must be entered into amplifying mode by setting a bias for it. Then, from the GPA, through a variable resistor (Fig. 2), a signal is sent to the VT4 base through C35, having previously increased its capacitance to 0,05 μF.
By adjusting the variable resistor, the maximum sensitivity of the transceiver is achieved with a minimum noise level. It should be noted that if germanium diodes are still working on 160 m and 80 m, then for the HF bands starting from 40 m it is better to use only silicon diodes. KD514 work very well. You must decide whether you will be using the transceiver for CW or SSB. A well-adjusted phase shift provides suppression of the second sideband ns more than 20 dB. If you use this device only to work on QRP, this is quite enough. But if you plan to attach a “box with a lamp” to the transceiver in the future, it is better to immediately refuse to work on SSB. A simple LC filter does not provide the necessary filtering for high frequencies that are not suppressed by the phase shifter. If you are still making a transceiver for SSB operation, you can very easily adjust the phase shifter by two methods that give approximately the same results - "by ear" and using an oscilloscope. Tuning "by ear" consists in supplying an AM signal from the GSS or tuning in to an AM station operating in the MW band. Then, with the help of R 16, R 17, maximum suppression of the LM signal is achieved. Then they tune into a sufficiently powerful CW station or give a modulated signal from the GSS. With the help of R15, maximum suppression of the unwanted sideband is achieved. In the presence of a calibrated attenuator on the GSS, it is useful to check the degree of suppression of unnecessary lateral - it should be no worse than 20 dB. Otherwise, you need to slightly change C29, or the value of the capacitor, or - one of the phase shifter resistors. Setting up is easier with an oscilloscope. The oscilloscope controls the IF voltage on the 1,5 C24 circuit, turn on the transceiver for transmission, and use R16 and R17 to achieve maximum carrier suppression. Then, an IF voltage from the LLF is applied to the ULF input or to the LC filter. Using R15, the waveform shown in Fig. 3 is achieved.
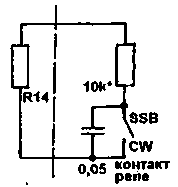
The smaller the "A" value, the better the suppression of the second sideband. At two frequencies - approximately around 900 Hz and 1800 Hz - there are points of maximum suppression. Here the output signal is the cleanest. When adjusting with an oscilloscope, you can also use balancing resistors to suppress an unnecessary sideband. When working on SSB, especially on the HF bands, problems may arise with setting up an emitter follower on V12, V13, which is prone to self-excitation. It is eliminated in the usual way - by selecting a tap from L5 C24 and shunting the circuit with resistor R7. When working on a transistor RA, the excitation voltage for it is removed from the additional winding on L5, containing approximately 1/4 of its turns. In this case, the resistor R7 is sometimes unnecessary. When working on a tube RA, you can use (with a certain degree of experience) a 6E5P lamp - the output power of the transceiver increases. When working on the HF bands, the output power of the transceiver when using its RA is greatly reduced. In this case, a one- or two-transistor amplifier must be placed behind the emitter follower in front of the lamp. You can also use a lamp RA, the circuit of which is given in [3] on page 196, while introducing a lamp and a transistor into the linear mode. If the transceiver will operate in CW mode, in no case should CW be generated using a tone generator. The result will be disastrous. CW can be formed only by unbalance of the mixer. To do this, it is necessary to apply minus TX through a 5,1-6,8 kΩ resistor to the cathode of the VD11 or VD14 diode. It is also necessary to make a frequency shift - this can be done using the circuit shown in Fig. 4.
When working on the NBP, when transmitting, “-TX” is served to it, when receiving - “0”. When working on the WBP - on the contrary. With the help of capacitors C1 ... C3, it is necessary to set the frequency offset to 800 - 1000 Hz in the entire range of the transceiver. It should be noted that the CW excitation voltage has a higher level than when the transceiver is operating in SSB mode, which reduces the likelihood of excitation of the emitter follower. However, if you are going to operate both CW and SSB, then you need to turn down the gain of the emitter follower. The easiest way to do this is to connect another resistance of about 14 kΩ in parallel with R10 and, therefore, reduce the gain of the emitter follower (Fig. 5).
You can also change the offset on the output lamp. When operating the transceiver only in CW, in place of the IF for SSB, you can assemble a tone generator used to control the keying. Manipulation with CW must be performed only on the output stages of the PA, whether they are transistor or tube. And of course, if you are using not a tube stage with a P-loop, which can match different types of antennas, but a transistor output stage, it is better to switch the antenna from reception to transmission using a relay. The relay can also be used small-sized - such as RES10, RES9, provided that the output power does not exceed 5 W. Literature 1. "Radio", No. 10-11, 1982
Author: I. Grigorov (RK3ZK), Belgorod; Publication: N. Bolshakov, rf.atnn.ru
Machine for thinning flowers in gardens
02.05.2024 Advanced Infrared Microscope
02.05.2024 Air trap for insects
01.05.2024
▪ Electric bike with autopilot ▪ Prototype smart glasses with autofocus ▪ Gigabyte GSmart series of smartphones ▪ Mitsubishi Automotive Projection Systems
▪ section of the site Medicine. Selection of articles ▪ article by Henry Wadsworth Longfellow. Famous aphorisms ▪ article What is the smallest bird in Britain? Detailed answer ▪ article Inspector-disinfector. Standard instruction on labor protection ▪ article RCL Wide Range Meter. Encyclopedia of radio electronics and electrical engineering ▪ article Replacing a card with wet fingers. Focus Secret
Home page | Library | Articles | Website map | Site Reviews
www.diagram.com.ua |


 Leave your comment on this article: