|
|


 Arabic
 Bengali
 Chinese
 English
 French
 German
 Hebrew
 Hindi
Hindi Italian
 Japanese
 Korean
 Malay
Malay Polish
 Portuguese
 Spanish
 Turkish
 Ukrainian
 Vietnamese
|
ENCYCLOPEDIA OF RADIO ELECTRONICS AND ELECTRICAL ENGINEERING Restoration of audio recordings from magnetic tape and gramophone records. Encyclopedia of radio electronics and electrical engineering
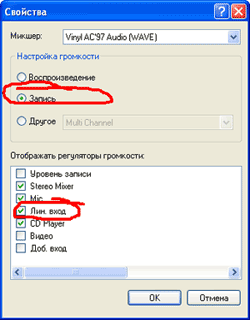
Encyclopedia of radio electronics and electrical engineering / Audio equipment Dubbing from magnetic tape (vinyl) In order to be able to perform any actions with the audio material (cleaning, correction, etc.), it must be rewritten from the original media (coil, record, microphone). The method of recording from a CD is not covered in this article. I recommend capturing audio using the WaveLab program from Steinberg, steinberg.net (you can use any other program). The corresponding switching of the output circuits of the signal source device with the linear (or other available) input of the computer's audio card is preliminarily performed. Note: it is better to carry out switching when the equipment is turned off, because there is a high probability of failure of the final stages of the computer's sound card. Further, in the Windows mixer, you must specify the line input as the device - signal source (in this case).
The WaveLab program is launched by a shortcut located in the "Start" menu or on the "Desktop". Immediately after the first launch of the program, it is necessary to specify the driver used by the system in the program settings as the hardware for playback and recording. Otherwise, problems may occur during recording or playback.
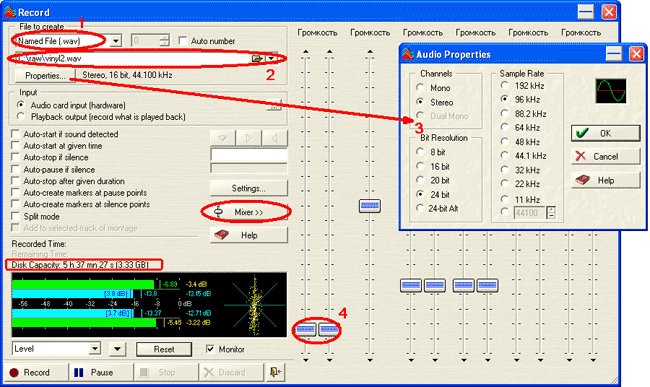
Then you can proceed directly to the recording. The recording function in the WaveLab program is activated by pressing the red dot button. The registration form will open.
Some default settings need to be changed:
Note: You can roughly estimate how much audio material with the current settings can still be recorded on the HDD using the "Disc Capacity" field.
Note: if the mixer is not visible, it can be opened with the "Mixer >>" button. Note: to separately adjust the level of the left and right channels, you must move the corresponding slider by holding down the "Ctrl" key on the keyboard. After all the settings are made, you can proceed directly to the recording (buttons "Record" and "Pause"). Note: in order to subsequently be able to carry out noise correction, it is necessary to capture 2-5 seconds of the phonogram in the absence of a useful signal (the rustle of the vinyl mass or the rustle of the tape). The entire side of the roll (or record) is written in one step, in one file. After the recording is completed, a window with the recorded file will open:
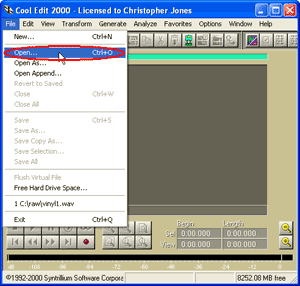
The resulting file, as well as the WaveLab program, can be closed (or write a few more files - to do this, immediately go to step 4). Removing background noise Some restorers do not recommend removing the rustle of the mass, arguing that the soundtrack acquires a "synthetic" character. To clean or not is up to you, but if necessary, it is done as follows. I'm using CoolEdit2000 from Syntrillium, syntrillium.com, you can use the SoundForge plugin, mediasoftware.sonypictures.com/downloa, it doesn't change the way it works. We launch the program with a shortcut, then you need to open the recorded file to be denoised:
It is necessary to visually determine the joints of individual tracks (indicated in yellow). The first junction, from where the "cast" of the noise will be taken, is indicated by red arrows.
Below is an enlarged snippet. Note: you can change the scale using the mouse wheel or the buttons with magnifying glass images in the program window. It is necessary to select (with the left mouse button) a section, lasting 1-4 seconds, containing nothing but noise.
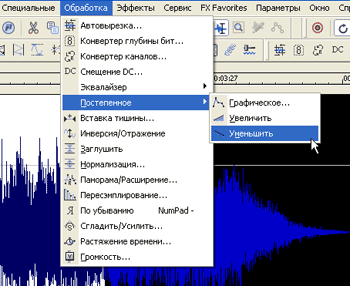
Next, to load the profile into the noise reduction buffer, select "Transform" -> "Noise Reduction" -> "Noise Reduction…" and set the options in accordance with the following figure and in the order indicated (you can experiment with the options in order to obtain the optimal one for a particular phonogram result).
After closing the noise suppressor window, it is necessary to select the entire soundtrack (the button with the image of a magnifying glass on the background of the sheet and double-click in the area of the soundtrack). Next, the "Noise Reduction" window opens again with the profile already loaded and the settings set, and the noise reduction process is started (by pressing the "OK" button), the duration of which depends on the computing power of the computer.
Note: the optimal parameters are best selected on short fragments, by ear and by the spectrum analyzer, evaluating the quality obtained. The result can be saved by replacing the original file or writing to a new one. The first method is used when there is not enough disk space - it does not allow you to "roll back" if a marriage is suddenly detected in the processed file.
Dividing a recorded track into separate tracks The resulting track, which contains several separate works, must be divided into parts. The easiest way to do this is in the SoundForge 8.0 audio editor, mediasoftware.sonypictures.com/download. Run the program with a shortcut, open an editable file:
Immediately after the first launch of SoundForge, you must specify the type of audio device:
Track junctions are visually defined:
The junction is scaled (with the mouse wheel) to the required level. Next, in the position indicated by the red arrow, you need to insert a marker. To do this, right-click in the area highlighted in green:
Marker "01" appeared, which can be moved closer to the beginning of the next track:
Next, you can shorten an overly long pause between tracks (delete - with the "Delete" key):
Then, at the end of the track, you can smoothly reset the signal level ("Fade" effect). To do this, the desired area is selected (the length is selected based on the soundtrack) and the effect itself is applied:
Note: The length of the adjustment area can be changed by dragging the edge of the selection. The beginning of the track is processed in a similar way, however, the length of the corrected area in this case is much smaller:
Note: Leveling up and down with these options is linear. If you want to get a non-linear (parabolic, etc.) "Fade", use the item "Graphic ...". The remaining joints are ruled in a similar way. The result of the above actions will be the processed joints (the beginning of the first and the end of the last tracks are adjusted similarly) of the tracks and the family of markers separating them.
Sometimes it becomes necessary to bring the levels of individual tracks to a single value, which is especially true for tracks recorded from different sources. To do this, you need to select one track (just double-click between the markers) and apply the "Normalize ..." filter. Settings are selected experimentally.
Immediately after normalizing one track, it can be inserted into a separate file. First, the already selected fragment (if slicing occurs after normalization all tracks, then the track must be selected again) is copied to the clipboard:
The copied chunk is then pasted into the new document as follows:
The result is a separate file containing only one track:
Note: You can switch between the newly created file and the original file using the Window menu:
All the remaining tracks are treated in a similar way, and it is desirable to cut in the same sequence as in the original. This will avoid confusion with numbering, because SoundForge automatically numbers newly created files. To save the "cut" tracks, select the "Save all ..." item and specify the destination folder
The result is a set of numbered uncompressed files.
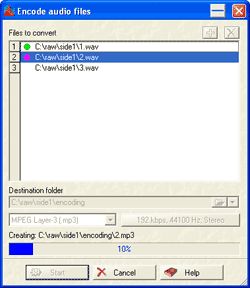
Convert to mp3 format Since an uncompressed wav file takes up a lot of space, it can be compressed, naturally at the expense of losing some information, into mp3 format. There are many other compressed audio formats, but mp3 is the most common. Batch conversion (that is, we will compress several files at once) is carried out using the WaveLab program already known to us, in which it is necessary to activate the "Batch file encoding ..." option:
After setting all the settings, the window will look like this:
After clicking on the "Start" button, the encoding process will start. The processed file is marked with a green mark, the processed file is marked with a red one.
After the end of the encoding process, compressed mp3 files will appear in the folder that was specified in the settings.
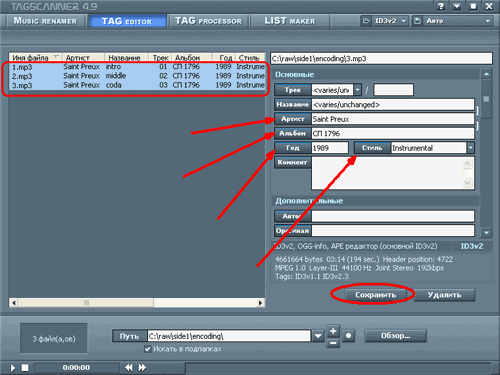
Editing information in an mp3 tag The next step is to add information about its title, author, album, etc. to the compressed audio files. To facilitate this task, we will use the TagScaner program, xdev.narod.ru (you can use any analogue). The program is launched by a shortcut located in the "Start" menu or on the "Desktop". Immediately after starting the program, you must specify the folder where the mp3 files are located.
The following figure shows that the mp3 tag does not contain any information, so it needs to be filled in. The file whose information is being edited is highlighted. After making all the necessary corrections, the information is appended to the existing mp3 file by pressing the "Save" button, while the next track is automatically opened for editing.
To add the same information to all tracks (album name, year, style, artist), you can select all tracks in the left part of the window and enter information in the field of interest. At the same time, the label means that this field of different tracks contains different information from each other and that it will be saved. Confirmation of the changes made is carried out by pressing the "Save" button.
Next, you should change the structure of the name of the mp3 file. Any information from the tag (author, title, album, track number) can be used as title elements. The name structure is specified in the "Template" field (in this case, the entry "%1 - %2" means "Artist_name - Track_name.mp3"). To preview the received names, you can use the "Test ..." button.
If you are satisfied with the renaming results, you can rename the edited files with the "New names" button.
As a result of the above actions, you should get a group of named compressed mp3 files with additional information added to the tag.
Recording on CD Once you have enough mp3 files, you can burn them to a CD. Consider the recording technology using the NeroBurningROM program. The program starts with a shortcut. After starting, the user will be asked about the nature of the newly created project. For a disc that is being burned as a whole and that you plan to use with IBM-compatible computers and mp3 players, you can select the disc type "CD-ROM(ISO)", "No multisession" (this option will save about 15 MB).
Files sorted by albums, artist, years are dragged into the project window. The volume occupied by files on a CD can be approximately estimated by the scale at the bottom of the project window - a standard 700 MB disk corresponds to a blue and yellow scale (up to the red zone).
After the mp3 disc is formed, it must be burned. Before starting the burning process (for the convenience of subsequent identification of the disc in the collection), you can give it a name that matches the content (for example, the author), as well as set the recording parameters. For better compatibility with hardware mp3 players and older computers, the recording speed is set to no higher than 24 (optimally 16), and the disc burning method is "Disc-at-once". You also need to activate the buffer buffer protection function of the recorder ("BURN-Proof" or similar).
Author: Alex K; Publication: cxem.net
Machine for thinning flowers in gardens
02.05.2024 Advanced Infrared Microscope
02.05.2024 Air trap for insects
01.05.2024
▪ The weakening of the immunity of astronauts will be predicted ▪ Images are projected onto clean air
▪ website section LEDs. Article selection ▪ article by Haruki Murakami. Famous aphorisms ▪ article What is FIFA? Detailed answer ▪ article Upholsterer. Standard instruction on labor protection ▪ article Coordinating device. Encyclopedia of radio electronics and electrical engineering ▪ article Hanging on the head. physical experiment
Home page | Library | Articles | Website map | Site Reviews
www.diagram.com.ua |


 Leave your comment on this article: