|
|


 Arabic
 Bengali
 Chinese
 English
 French
 German
 Hebrew
 Hindi
Hindi Italian
 Japanese
 Korean
 Malay
Malay Polish
 Portuguese
 Spanish
 Turkish
 Ukrainian
 Vietnamese
|
ENCYCLOPEDIA OF RADIO ELECTRONICS AND ELECTRICAL ENGINEERING Car subwoofer. Part 1
Encyclopedia of radio electronics and electrical engineering / Speakers Small subwoofer Klaus liked small two-seat cars from childhood. With a three-digit model number, preferably starting with nine. Well, not from the nine so from the eight. But Klaus had no less passion for the 21213th Vase, that is, Niva. And he found the best of both worlds, a double Niva. The acquisition took place by removing the back bench. Historically, I wanted to put "front bass" under the seats. Pretty boxes (plywood and carbon fiber) were born for the heads of Infifnity Beta 8. The sound, in principle, was satisfactory and even loud. However (since the box was attached to the seat), the drum hit went directly to the glands of the seat, to the spine and other vital organs. I realized that this is not good. By the way, at the time of the decision, a nice raised floor box for an amplifier and other junk was already ready (just between the back bench and the back door) - nivovods, maybe someone needs it? one fan two pieces. On it (on the left) was a changer, which is still looking for a place. The equalizer in the photo has already been removed, and so it was to the left of the amplifier. The box, modestly referred to as Klausbubuka, was originally designed on a grand scale. Bubuka, replacing the back stool, lies on the steps of the floor between the sides. More precisely, in the thrust - the outer panel of the box (127 cm) and the box itself (exactly 100 cm) - between the arches. The space between the right side wall of the box and the board is occupied by a capacitor and a power distributor. For the entire amplifying economy is attached to the bubuk. With such a width, the depth is determined solely by the landing minimum of the speaker. No matter how twisted it turned out (before filling with foam) 75 liters. Sabu (Focal 33S) - 50 is enough. Well, okay, we need to - reduce it. How to fix a bubuk is described below, this question should always be thought out BEFORE, not after! Of the tools, a cordless drill-screwdriver is fundamentally necessary (there are a lot of self-tapping screws!) And a jigsaw. A circular saw for cutting long straight lines is desirable. A grinder is probably not needed. Carpet will hide all the roughness. To clean the joints, the 40th skin is enough. From materials - foam (macroflex), silicone (seams to caulk), glue (based on PVA, thicker. It is also "liquid nails"). Self-tapping screws from 35 to 90 mm long. Mounting ears - depends on the machine. At the base - 4 frames made of plywood 20 mm and bars 30 * 40 mm. The same bars reinforced all the joints of the panels. Let's start sampling...
We fix the frames vertically using the back wall as a template. I used thick PVA wood glue.
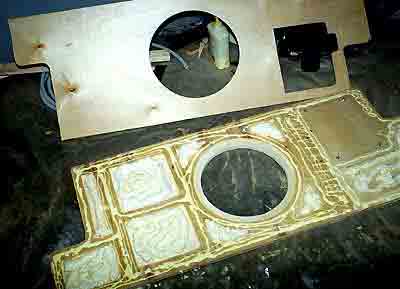
Two large planes - front and back - are composite: plywood-macroflex-plywood. In the photo - three plywood parts of the muzzle.
Base (lying on the floor) - 18 mm plywood. On it - 18 mm plywood frame with large cutouts. All this is covered with a 10 mm outer plywood sheet (worth it). Cavities must be filled with foam. By the way, if you read that you can’t just cut a hole for a speaker with a jigsaw, you need a special compass - don’t believe it. It's the pro-carpenters who are catching up with the fog. Everything is beautifully cut by hand. And sanded with 40 gauge sandpaper. We fasten the bottom layer and the frame to each other, soak it with water (so that the foam grabs), fill the voids from the heart with mounting foam, coat the PVA joints, let it stand for fifteen minutes so that the foam comes up (as the dough fits)
... and clamp with improvised means!
just do not run the wheel directly on the subject of creativity, but lay it with a thick board or plywood. Otherwise, the object will go like a screw. Then the structure is assembled together (on PVA and screws, and when it dries, we coat the joints with silicone, it took two bottles).
Pay attention to the thickness of the muzzle! 45 mm, and in the head flange area - all 60 (10 + 18 = 28 - actually under the speaker, 18 + 10 = 28 - overhang above the landing plane). Here - the same in the panorama.
Asymmetric ears on the sides are a consequence of the fact that on the left in the opening between the box and the arch there is a trunk handle and a "box for small things", and you need to somehow get to them. The speaker wires are brought out through the rear wall, they go outside in the immediate vicinity of the amplifier connectors. Since the box was originally oversized, I took and filled all the joints with the same mounting foam. After the foam swelled for about 15 minutes, I took pieces of polyethylene foam and spread the foam with these pieces. Klaus' secret - foam does not stick to PPE! we have - smooth, without excess bubbles of the edge.
Here is the finished view (front wall) before pasting with carpet. The equalizer on the front panel allows (folding the right seat) to make adjustments from the driver's seat. In the photo, it is beveled, so it seems that it sticks out, in fact, the overlay frame completely hides it. Similarly (on the top panel) a distributor with fuses is mounted. Since the standard 12" frames do not fit on a 13" Focal sub, I used a 12" frame (brrrr ... pioneer) through that same overhead frame as an adapter.
Fasteners - to the standard nuts of the body. In the photo: A - 2 corners with 4 holes for the M8 screw - standard fastening of the rear bench. B - 2 T-shaped brackets with a hole for the M11 screw - standard fastening of the seat belt to the wing arch. Attention! these nuts in the arches are a VAZ innovation, at least on the Niva of '97 (Red Piglet) they were not! By the way, who suggested such a strange caliber (M11) to the Togliatti wise men?
I got the Phoenix Gold capacitor without any fasteners. For him, I had to make a mounting sleeve from epoxy and three old winter socks.
Pasting with Carpet is a routine matter. By the way, if possible, I glued it not directly on plywood, but between the carpet and plywood - another layer of 5mm polyethylene foam. To be quieter. On the photo-pasting a rectangular slot for the fuse box. I placed it within reach from the driver's seat (hey, where are the three points?). In order not to suffer with stretching the carpet, I just used a suitable plug and you're done.
Rear view assembled. Light - a false panel covering the hacky wiring. The capacitor is hidden under it in the upper left corner. It remains to make fiberglass casing over the crossover and power wires (where there are tricky cutouts), repeating the erotic contours of PPI.
Together with Genn (Gennady But), this monster was put in its rightful place. Now Klaus is wondering where to turn M11 bolts of non-standard length for those very fasteners ... but where all this disgrace happened ...
... that's all, perhaps. Do you have THIS between the seats??
Publication: klausmobile.narod.ru
Artificial leather for touch emulation
15.04.2024 Petgugu Global cat litter
15.04.2024 The attractiveness of caring men
14.04.2024
▪ Reflective paint cools sun-heated surfaces ▪ New type of atomically thin carbon material discovered ▪ CC1310F128 transceiver with 16 uA consumption ▪ American scientists have developed a new filter
▪ section of the site for the radio amateur-designer. Article selection ▪ article Marriage and family, culture of relations between the sexes. Basics of safe life ▪ article How many tools does a mosquito use in one bite? Detailed answer ▪ article Spring primrose. Legends, cultivation, methods of application ▪ article 144 MHz radio station. Encyclopedia of radio electronics and electrical engineering
Home page | Library | Articles | Website map | Site Reviews
www.diagram.com.ua |


 Leave your comment on this article: