
Encyclopedia of radio electronics and electrical engineering / radio reception
 Comments on the article
Amateur radio design is a rather specific hobby, because it is much easier for a radio amateur to solder a complex circuit than to make a simple mechanical device. A good example is the design of a radio receiver. The whole circuit can be very well assembled and debugged, but the scale-vernier device spoils everything. Some pulleys, rollers, springs are required. And there is nowhere to take them. You have to select something, grind something, file it, use parts from a children's designer, a broken alarm clock, etc. The result is a clumsy and extremely short-lived design that creaks and seizes all the time. In addition, it takes several times more time than assembly, installation and adjustment of the circuit itself. Of course, one can say that it is necessary to master "parallel specialties", but we are "electronics engineers", not "mechanics". Therefore, it is easier for us to assemble an electronic circuit than a mechanical vernier.
Using multi-turn variable resistors (such as those used in fixed-tuning units of Soviet color TVs) and bar display chips like LM3914, you can make a good electronic-mechanical vernier-scale device for a homemade radio receiver, which will be reliable, modern and very simple (from the point of view of a radio amateur , Certainly).
A schematic diagram of such a device is shown in Figure 1.

Fig. 1
Microcircuit A1 is switched on in the indication mode with an intermittent luminous dot (pin 9 is not connected anywhere). If pin 9 is connected to pin 3 (to + power), then the indication will be a luminous column, it may be beautiful, but not economically viable, because several LEDs will be constantly on. and in one of the extreme positions of the scale, in general, all ten. The current consumption, in this case, will be too high for battery power. And so, with a luminous dot, only one LED is constantly on and the additional current is the same as from the LED indicator for fine tuning or power on.
The mechanical part turns out to be very simple - you just need to choose a suitable handle and attach it to the small disk end handle of a multi-turn variable resistor. The scale consists of a line of LEDs located along the edge of the printed circuit board to the left of the variable tuning resistor.
The layout of the printed circuit board and its wiring diagram is shown in Figure 2.
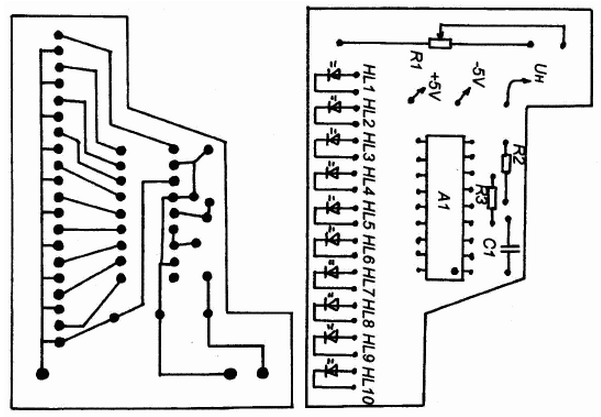
Fig. 2
The printed circuit board is mounted on the front panel of the radio receiver. The board is located perpendicular to the panel and up printed tracks. In the frontmost panel there should be a rectangular transparent window measuring approximately 55x5 mm. The easiest way to digitize the scale is this: you need to prepare a drawing of the scale on a personal computer. The easiest way to do this is in a Word text editor of any version (the editor has a page layout with rulers in millimeters horizontally and vertically). Then purchase a transparent film of the Transparencies type, and print the prepared scale pattern on it using a laser printer. Then cut out the scale pattern and stick it on the inside of the transparent window with adhesive tape.
Of course, you can make a scale and engraving filled with black paint, or using a photo method. It all depends on the specific "technological" capabilities. However, now, the option with a laser printer is the most affordable.
The variable resistor R1 is a tuning organ; it is a multi-turn variable resistor of the SP3-36 type. AL307 LEDs can be replaced with any other small-sized LEDs.
From the engine of the variable resistor R1, the voltage is supplied to the receiver varicap.
Establishing the circuit consists in selecting the value of the resistor R2 in such a way that when the knob of the resistor R1 is rotated from one limit position to another, all the LEDs turn on and off in turn. Moreover, in the extreme positions of R1, the extreme LEDs were on.
The scale can be powered by voltage from 4 to 15V. In such a power supply circuit as in Figure 1, it is desirable to power the scale from a stabilized source. Or you need to apply voltage to the resistor R1 from a stabilized source (for example, from a zener diode), and power the A1 chip itself and the LEDs from an unstabilized source.
Author: A.Ivanov
 See other articles Section radio reception.
Read and write useful comments on this article.
<< Back
<< Back
 Latest news of science and technology, new electronics:
Artificial leather for touch emulation
15.04.2024
In a modern technology world where distance is becoming increasingly commonplace, maintaining connection and a sense of closeness is important. Recent developments in artificial skin by German scientists from Saarland University represent a new era in virtual interactions. German researchers from Saarland University have developed ultra-thin films that can transmit the sensation of touch over a distance. This cutting-edge technology provides new opportunities for virtual communication, especially for those who find themselves far from their loved ones. The ultra-thin films developed by the researchers, just 50 micrometers thick, can be integrated into textiles and worn like a second skin. These films act as sensors that recognize tactile signals from mom or dad, and as actuators that transmit these movements to the baby. Parents' touch to the fabric activates sensors that react to pressure and deform the ultra-thin film. This ... >>
Petgugu Global cat litter
15.04.2024
Taking care of pets can often be a challenge, especially when it comes to keeping your home clean. A new interesting solution from the Petgugu Global startup has been presented, which will make life easier for cat owners and help them keep their home perfectly clean and tidy. Startup Petgugu Global has unveiled a unique cat toilet that can automatically flush feces, keeping your home clean and fresh. This innovative device is equipped with various smart sensors that monitor your pet's toilet activity and activate to automatically clean after use. The device connects to the sewer system and ensures efficient waste removal without the need for intervention from the owner. Additionally, the toilet has a large flushable storage capacity, making it ideal for multi-cat households. The Petgugu cat litter bowl is designed for use with water-soluble litters and offers a range of additional ... >>
The attractiveness of caring men
14.04.2024
The stereotype that women prefer "bad boys" has long been widespread. However, recent research conducted by British scientists from Monash University offers a new perspective on this issue. They looked at how women responded to men's emotional responsibility and willingness to help others. The study's findings could change our understanding of what makes men attractive to women. A study conducted by scientists from Monash University leads to new findings about men's attractiveness to women. In the experiment, women were shown photographs of men with brief stories about their behavior in various situations, including their reaction to an encounter with a homeless person. Some of the men ignored the homeless man, while others helped him, such as buying him food. A study found that men who showed empathy and kindness were more attractive to women compared to men who showed empathy and kindness. ... >>
| Random news from the Archive Qualcomm MDM9207-1 and MDM9206 LTE Modems for IoT
29.10.2015
With the growing interest in the Internet of Things (IoT), there is a growing need for cost-effective and reliable means of connecting to the global network, designed to be integrated into a variety of IoT devices. Qualcomm has introduced suitable LTE modems for this role, which are designated MDM9207-1 and MDM9206.
The MDM9207-1 modem is designed specifically for IoT applications such as smart meters, security and accounting devices, vending machines, wearable electronic devices and industrial automation. According to the manufacturer, in these cases, you need a reliable and energy-efficient connection to cloud services. The modem supports LTE Category 1, providing download speeds up to 10 Mbps and upload speeds up to 5 Mbps. It supports LTE FDD, LTE TDD, DC-HSPA, GSM and TD-SCDMA standards.
The modem has an ARM Cortex-A7 processor running at 1,2 GHz. Among the advantages of the MDM9207-1, we can highlight the support for voice communication using Circuit Switched Fall Back (CSFB) and VoLTE, as well as support for GPS, Beidou, Glonass and Galileo satellite navigation systems. According to the manufacturer, the Power Save Mode (PSM) allows designs with the MDM9207-1 to operate for more than 10 years without replacing the power supply. The modem application development environment is Linux.
The modem is produced using 28-nanometer technology. Its appearance in serial products is expected in the first half of 2016.
As for the MDM9206 modem, it will allow manufacturers to endow their devices with low-cost network connectivity with low bandwidth, as it will comply with the Cat-M (eMTC) and NB-IOT specifications. The manufacturer promises to tell more about MDM9206 when the 3GPP Rel.13 standard is adopted, which will include these specifications.
|
Other interesting news:
▪ Dogs also cry for joy
▪ Sony is phasing out CD and DVD drives
▪ The SportsArt G260 rowing machine generates electricity
▪ Ultrasound against cancer cells
▪ AMD Embedded 4K GPU
News feed of science and technology, new electronics
 Interesting materials of the Free Technical Library:
▪ section of the site Lecture notes, cheat sheets. Selection of articles
▪ article by Aristippus of Cyrene. Famous aphorisms
▪ article When and how did aspirin appear? Detailed answer
▪ article Stockrose vulgaris. Legends, cultivation, methods of application
▪ article Microwave oven radiation indicator. Encyclopedia of radio electronics and electrical engineering
▪ article On the supply of heating elements with direct current. Encyclopedia of radio electronics and electrical engineering
Leave your comment on this article:
 All languages of this page
Home page | Library | Articles | Website map | Site Reviews

www.diagram.com.ua
2000-2024


 Arabic
 Bengali
 Chinese
 English
 French
 German
 Hebrew
 Hindi
Hindi Italian
 Japanese
 Korean
 Malay
Malay Polish
 Portuguese
 Spanish
 Turkish
 Ukrainian
 Vietnamese