|
|


 Arabic
 Bengali
 Chinese
 English
 French
 German
 Hebrew
 Hindi
Hindi Italian
 Japanese
 Korean
 Malay
Malay Polish
 Portuguese
 Spanish
 Turkish
 Ukrainian
 Vietnamese
|
ENCYCLOPEDIA OF RADIO ELECTRONICS AND ELECTRICAL ENGINEERING Tester of small batteries. Encyclopedia of radio electronics and electrical engineering
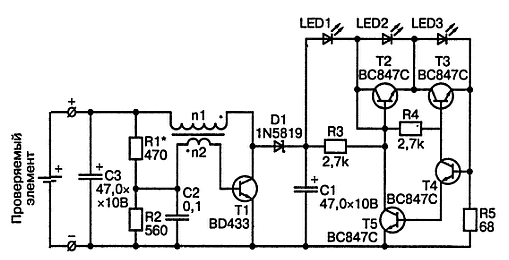
Encyclopedia of radio electronics and electrical engineering / Chargers, batteries, galvanic cells The proposed tester is designed for quick testing of small-sized batteries that are used in children's toys. With it, the child can independently determine the degree of battery discharge. The element under test is connected to the input of the transducer and is simultaneously used as a power source for the device. In this case, the tested battery or battery operates with a load current of approximately 200 mA. Such a connection scheme makes it possible to distinguish a new element from an old one, which, although it has a sufficient output voltage, has a large internal resistance. The maximum voltage applied to the input of the device can reach 3 V. At input voltage values less than 3 V, there is practically no possibility of the device failure due to an erroneous change in the polarity of the contacts of the element under test. The tester is designed to test conventional batteries, but it can also be used to test batteries. Particular attention should be paid to the fact that during the operation of NiCd and NiMH battery cells, their output voltage changes slightly, even with a very significant loss of capacity. In addition, given the lower voltage, it should not be surprising that when testing fully charged and healthy batteries, only LED2 will light up. Therefore, using this tester, you can only determine the fact of a complete discharge of the battery. To check the batteries, one could also use a pair of wires with an ordinary light bulb, but such a solution would hardly satisfy a self-respecting radio amateur. In this design, the state of the battery is determined by the number of luminous LED diodes. The proposed tester consists of two parts, namely: a voltage converter and a voltage level indicator. The schematic diagram of the device is shown in the figure.
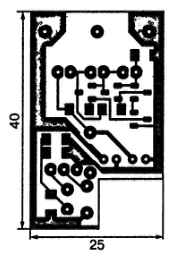
To fully power one LED, a voltage of approximately 2 V is required. At the same time, when a new, fully charged element under test is connected, the voltage at the input of the tester does not exceed 1,55 V. Therefore, a converter is used to generate the voltage necessary for the normal functioning of the indication circuits. . The functions of such a voltage converter in the proposed design are performed by the simplest self-excited generator, the voltage level of the output signal of which depends on the supply voltage. This dependence is deliberately increased by using a divider R1, R2 in the base circuit of the transistor T1. The critical element of the converter is the transistor T1, which must have a low saturation voltage. Otherwise, the effectiveness of the tester is drastically reduced. As a transformer, a conventional 09P type choke with an inductance of 330 μH is used, on which a secondary winding is wound, containing approximately 30 turns of PEL wire with a diameter of 0,2 mm. For the manufacture of this coil, any varnished wire with a diameter of 0,1 to 0,25 mm is suitable. After that, a piece of insulating material should be put on the inductor - and the transformer is ready. The second stage of the tester is a voltage level indicator. With a slight voltage at the input of the tester, transistors T2 and T3 are open by bias voltages, which are formed on resistors R3 and R4 by the current flowing through them, and transistors T4 and T5 are closed. When the voltage applied to the input of the tester is increased, the LED1 LED will first light up. A further change in the input voltage will increase the current flowing through the LED1 until the voltage drop across the resistor R5 causes the transistor T5 to turn on (at a current of about 16 mA). In this case, the transistor T2 will close, and the voltage on the LED2 will increase until it starts to glow. If the input voltage of the tester continues to increase, then at a current of about 20 mA, transistor T4 will also open. In this case, the transistor T3 will close, and the LED3 will start to glow. An increase in the voltage at the input of the tester above 1,5 V has practically no effect on the operation of the output stages, since it is compensated by the converter. In this case, the level of the output voltage of the converter, at which the LED3 LED will start to glow, can be adjusted by selecting the resistance of the resistor R1. For the manufacture of the tester, you can use almost any printed circuit board with dimensions corresponding to the selected case. The printed circuit board of the battery tester is shown in the figure.
To make the design small, SMD elements are used. For the same purpose, the transformer is located horizontally. In the proposed design, you can use ordinary green LEDs (LED1-LED3) for a voltage of 2 V and a current of 20 mA. Diode D1 is a BD433 Schottky diode. Capacitors C1 and C3 - for a rated voltage of at least 10 V. The location of the elements on the printed circuit board of the battery tester is shown in the figure.
To establish a tester, you will need an adjustable voltage source, as well as any universal measuring device, for example, a simple multimeter. The tester is connected to a power source, the output voltage of which must be gradually increased from 0 to 1,6 V. Assembled from serviceable parts and without errors, the tester does not need additional adjustment and can be used almost immediately to check the performance of small batteries. If problems arise, first of all it is recommended to check the quality of the soldering of the contacts of the p2 winding of the transformer. It is unlikely that it will be possible to immediately guess the correct polarity of connecting the transformer leads. Therefore, in the event that the generator will not be excited, but the tester will consume current, you should first swap the winding terminals p2 of the transformer. If this does not help, then it is recommended to carry out a step-by-step test of the device using an adjustable power supply and a conventional multimeter. The test should begin with a voltage level indicator. A power source is connected to the indicator input (capacitor C1 terminals). When the voltage increases to a value of about 3 V, LED1 should start to glow, at a voltage of about 5,5 V, LED2 will light up. A subsequent increase in voltage to 8 V should cause LED3 to light up. In this case, the current consumed by the indicator until the LED3 begins to glow should not exceed 20 mA. If the indicator does not work as indicated, then the malfunction should be sought in it. If the indicator is working, then you can start checking the voltage converter. Increasing the input voltage from 0 V to 1,6 V should lead to a gradual increase in the voltage across the capacitor C1 to a value of about 8 V. If the generator is not excited, first solder the leads of the L2 coil, and then check the transistor T1 and diode D1. It is possible that the generator is excited, but at an input voltage of 1,5 V, the converter does not ensure that all LEDs are turned on. In this case, you can try to slightly change the resistance value of the resistor R1. If this does not help, it is recommended to increase the resistance of the resistor R5. However, we should not forget that an excessive increase in the resistance of the resistor R5 leads to the inclusion of all LEDs, even at low current.
Machine for thinning flowers in gardens
02.05.2024 Advanced Infrared Microscope
02.05.2024 Air trap for insects
01.05.2024
▪ Integral four-channel ULF Toshiba TCB701FNG ▪ Hard disk DVD+R/+RW recorder ▪ Nvidia Tegra X1 Mobile Superchip ▪ High Efficiency Heat Resistant Solar Panel ▪ Social navigator for cyclists
▪ section of the site Dosimeters. Selection of articles ▪ article Smoke rocker. Popular expression ▪ article What makes your voice change? Detailed answer ▪ article Bar manager. Job description ▪ article Peak rectifier. Encyclopedia of radio electronics and electrical engineering
Home page | Library | Articles | Website map | Site Reviews
www.diagram.com.ua |


 Leave your comment on this article: