|
|


 Arabic
 Bengali
 Chinese
 English
 French
 German
 Hebrew
 Hindi
Hindi Italian
 Japanese
 Korean
 Malay
Malay Polish
 Portuguese
 Spanish
 Turkish
 Ukrainian
 Vietnamese
|
ENCYCLOPEDIA OF RADIO ELECTRONICS AND ELECTRICAL ENGINEERING Testing of industrial thyristor rectifiers. Encyclopedia of radio electronics and electrical engineering
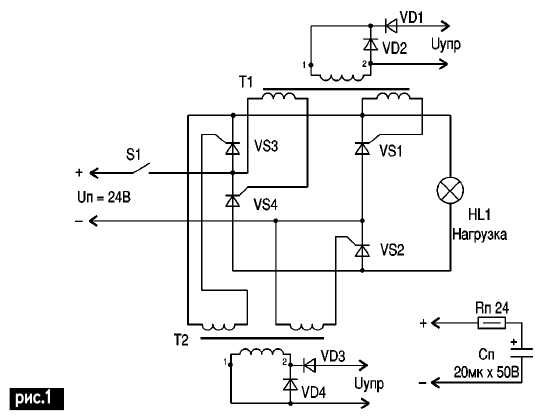
Encyclopedia of radio electronics and electrical engineering / Voltage converters, rectifiers, inverters I want to propose a method for testing the power section of industrial thyristor rectifiers with transformer or optocoupler galvanic isolation from the control circuit. The fact is that the simplest methods (checking the direct and reverse resistance of thyristors) recommended in the operating instructions are often ineffective in real conditions. Failures of the thyristors themselves such as "breakdown", "breakage of the control electrode" are really easily detected by them, but nothing can be said about failures of other types, including circuits for transmitting control pulses. Therefore, for a long time of operation and repair of thyristor rectifiers, I use a method that can be briefly formulated as opening the arms of a thyristor rectifier with pulses of a pre-charged capacitor and supplying the power unit with a reduced DC voltage. Consider, for example, a typical simplified diagram of the power part of the rectifier (Fig. 1).
As a rule, the control circuits of the thyristor rectifier arms are parallelized, and when the pre-charged capacitor is discharged through the primary winding of the control transformer (or LEDs - in the case of optocoupler thyristors), the thyristors of the corresponding arms open. Since instead of the working alternating voltage, a constant reduced voltage is applied, current flows through the load lamps until it is interrupted by the input switch S1. For example, if you discharge the capacitor Sp with a limiting resistor Rp to the winding 1-2 of the transformer T1, if the elements in the control circuit of the thyristors VS1 and VS4 are in good condition, they turn on and the HL1 indicator lamp lights up instead of the load. We turn off the S1 toggle switch, reverse the polarity of the input voltage, turn on S1 again, supplying the supply voltage in the desired polarity to the other leg of the rectifier - thyristors VS2, VS3, apply a control pulse from the newly charged capacitor to the winding 1-2 of the transformer T2, and if the control circuits thyristors are working - we observe the glow of the lamp HL1. Personally, I use a reduced voltage of 24 V for safety reasons, its widespread use in automation and alarm systems, and the convenience of charging the Sp capacitor with the same voltage. Let's consider this method on a specific example of the power part of the reversing thyristor rectifier BU3609, used to power the armature circuits of the electric motor and the excitation winding in systems of a reversing automated DC electric drive (Fig. 2).
To check, disconnect the power section from all conductors suitable for the input terminal block X1; remove the CP control system board from the drive basket; remove the fuse FU3 to prevent the flow of direct current through the winding of the transformer TV of the control system; determine with an ohmmeter or a dialer the serviceability of all thyristors by the resistance of the anode to the cathode (as indicated in all operating instructions - more than 100 kOhm in both directions). We apply a constant voltage of 1 V to terminals 2 and 1 of terminal block X24, for example, to pin 1 plus, to pin 2 minus. Instead of a load, we connect a 24 V incandescent lamp with a current consumption, more than the holding current of a particular type of thyristors [1]. I use three KM-24-90 switching lamps, connected in parallel, with a total current consumption of 270 mA (lighting 24 V 40 W is also possible). It is more convenient to start the power through any switch, for example, the TV1-2 toggle switch to turn off the thyristors. Since the thyristors are pre-tested, the bulbs should not light when voltage is applied. From the same supply voltage, we charge a capacitor with a capacity of 10-20 μF with a 24 Ohm resistor connected in series to limit the charge and discharge current of the capacitor to about 1 A, which (as the switching current of this type of thyristors) is quite acceptable [2], since the ratio of the number of turns in isolation transformers, as a rule, close to 1. During charging, it is necessary to mark the polarity of the capacitor charge, for example, with conductors of different colors, if it is a non-polar capacitor, and strictly observe it if it is electrolytic. Having connected the positive conductor from the capacitor to pin 6 (labeled 33) of connector X3, touch the conductor connected to the negative plate of the capacitor, pin 21 (labeled 36) of connector X2. Thus, a pulse of the discharge current of the capacitor is supplied to the primary winding of the control transformer T1. The thyristors V1, V4 are supplied with a supply voltage in direct polarity, they open (with good elements in the control electrode circuits), and the load lamps light up. We turn off the thyristors with the switch S1. We again supply power to the power part, charge the capacitor and, since power is supplied in direct polarity to thyristors V6, V7, we apply a switching pulse from the capacitor to the primary winding T4: we leave the positive capacitor plate connected to pin 6 of the X3 connector, and the conductor connected with a negative lining, touch pin 15 of connector X2. If the control circuits are good, the load lights are on again. Now, having changed the polarity of the input voltage to the opposite one (to pin 1 minus to pin 2 plus terminal block X1), in the same way we check the control circuits of thyristors V2, V3 and V5, V8, applying capacitor discharge pulses to the primary windings of transformers T2 and T3, respectively, in the required polarity. This method is convenient in that when powering the power unit with reduced voltage, the risk of occurrence and development of significant damage in the power unit in the event of various kinds of malfunctions is reduced; eliminates the possibility of electric shock to the operating personnel; with increasing load, thyristors can be tested during operation up to operating currents. I think that the method is also suitable for other types of rectifiers, it is only necessary to analyze in detail a specific circuit diagram and select the appropriate functional blocks suitable for such a test. References:
Author: A.V. stay
Machine for thinning flowers in gardens
02.05.2024 Advanced Infrared Microscope
02.05.2024 Air trap for insects
01.05.2024
▪ Biologists have grown a fly with dinosaur genes ▪ OLED display with a density of 1000 pixels per inch ▪ Video games can boost a child's intelligence
▪ section of the site Audio and video surveillance. Selection of articles ▪ article Electric razor. History of invention and production ▪ article What are musical instruments? Detailed answer ▪ article Charging dry cells. Encyclopedia of radio electronics and electrical engineering
Home page | Library | Articles | Website map | Site Reviews
www.diagram.com.ua |


 Leave your comment on this article: