|
|


 Arabic
 Bengali
 Chinese
 English
 French
 German
 Hebrew
 Hindi
Hindi Italian
 Japanese
 Korean
 Malay
Malay Polish
 Portuguese
 Spanish
 Turkish
 Ukrainian
 Vietnamese
|
ENCYCLOPEDIA OF RADIO ELECTRONICS AND ELECTRICAL ENGINEERING Automatic discharge-charger (ARZU) Ni-Cd batteries. Encyclopedia of radio electronics and electrical engineering
Encyclopedia of radio electronics and electrical engineering / Chargers, batteries, galvanic cells A large number of equipment with self-contained power supplies, which are in operation at the consumer, requires the latter to spend on battery power supplies. It is much more profitable to use Ni-Cd batteries, which, if used correctly, can withstand up to 1000 charge-discharge cycles. However, in addition to the battery power supply unit (ABP), it is necessary to additionally have both a charger and a tester to quickly determine the suitability of the batteries. Over the past decade, a considerable number of descriptions of automatic chargers have appeared in the popular radio technical literature. Using minimal material and time resources, the radio amateur develops and manufactures semi-automatic chargers. They do not correspond to the full technological cycle for servicing the UPS or its individual elements (hereinafter referred to as the product), approved by GOST [1], do not provide them with a full charge, as well as reliable and long-term operation, especially in cases where the charge ends with the voltage at the terminals products. And as you know, systematic undercharging leads to a decrease in the activity of the electrodes and a decrease in the capacity of the product. The specified GOST requires that the product be first discharged with a standard discharge current to a value at which the ABP element will have a voltage of 1 V, and then charged with a current equal to a tenth of its capacity for a certain time. These modes allow you to charge the UPS without the risk of excess charge accumulation, without the risk of undercharging, without the risk of overheating or explosion. The device described in [2] is closest in terms of its functions to the proposed device, but unlike it, it is made on an accessible elementary base and does not require tuning the timing circuit using a frequency meter. The author proposes a device for the D-0,55C element and a battery of 10 pcs. of these elements with a rated voltage of 12 V, thereby eliminating multi-position switches, reducing the dimensions and cost of ARZU. To work with any other Ni-Cd products, the described ARZU can be used by replacing several resistors that determine the discharge-charging currents and a measuring voltage divider installed at the input of the voltage comparison unit. ARZU provides the following modes:
Main parameters of ARZU type D-0,55S:
According to the technical specifications for the battery, the charge goes at a temperature of 20 ... 30 ° C. Schematic diagram of the ARZU is shown in Fig.1.
ARZU consists of the power part of the charge-discharge circuit, made on discrete elements, and the control circuit on microcircuits. The power part (in addition to the transformer T1 with a diode bridge VD1 ... VD4 and the filter capacitor C1) includes a transistor switch VT4 with discharge resistors R12, R15 and a current generator based on a transistor VT3. Transistors VT1 and VT2 control the operation of the discharge and charging circuits, respectively. Resistor R12 determines the discharge current of the UPS, and if the element is connected, the discharge current determines the resistor R15 when the switch SA2.1 is on. The charge of the product is possible with the open key VT2, the discharge - with the closed key VT1. Diode VD8 prohibits leakage of charge from the product after the end of the charging process, although a small current leakage (~ 1 mA) goes through resistors R19, R20. The voltage from the secondary winding of the transformer, rectified by the diode bridge and smoothed by the filter capacitor C1, is fed through the isolation diode VD10 to the parametric voltage regulator (resistor R26, zener diode VD14, transistor VT7). The voltage (8,5 V) is removed from the emitter of the latter to power the microcircuits. Two transistors with complementary symmetry are connected to the output of this stabilizer through resistor R27, forming a reference voltage source of 1,25 V, which is necessary for the operation of the voltage comparison circuit. The required value of this voltage is set to the input of the comparison circuit by potentiometer R23. The ABP discharge occurs through the transistor VT4, operating in the key mode, and the discharge resistor R12 to a voltage of 10 V, which, after the voltage divider of the ABP by 10 (i.e. up to 1 V) resistors R19, R20, is fed to the inverse input of the comparator DA1.2. A voltage of 1.2 V is supplied to the direct input DA1 from a reference source. On the voltage stabilizer power bus, through a diode OR circuit (diodes VD9 and VD10), voltages from two sources are logically summed up: the rectified and smoothed voltage of the secondary winding of the transformer and the voltage of the UPS, due to which, when If the mains voltage fails during the UPS charging cycle, the charging of the latter stops, but the discharge time elapsed until the mains voltage fails remains in the memory of the timer counters and the memory of control triggers, since they are powered by the UPS being charged through the VD9 diode. When the mains voltage appears, the charge automatically continues without pressing the START button, taking into account the previously accumulated charge time. The discharge-charging circuit control circuit includes a DA1.2 comparator, a trigger generator of counting pulses from the mains voltage - a VT5 transistor, a DA1.1 chip with resistors R17, R18 in the positive feedback circuit and two memory circuits - one on DD1.1 and DD1.2. 1.3, the second on DD1.4 and DDXNUMX. A sinusoidal mains voltage is supplied from the transformer winding to the input of the counting pulse generator, and normalized time pulses with steep fronts and recessions with a period of 20 ms are taken from its input. On recessions, a timer is triggered that sets the time to charge the product. The timer is made on two parallel-connected binary counters - chips on DD2 and DD3. Having counted a certain number of input pulses with a period of 20 ms for 15 hours, these microcircuits produce single logic levels on three outputs (VD11 ... VD13). The coincidence circuit on these diodes is triggered and, in turn, outputs a log "6" through the VD1 diode to the "reset" input of the memory circuit. This is a signal of the end of the charge of the product. Transistor VT6, controlled from the output of the counter, where the signal appears with a period of 0,64 s, sets a small backlight current to the "charge" LED HL3. In the process of charging the product with running counters, dim flashes are visible on it, thus, along with monitoring the charge current, you can visually monitor the operation of the timer or detect its malfunction. The purpose of memory triggers is as follows. The first trigger on DD1.1, DD1.2 (end-of-discharge trigger of the product) from the moment it is launched with the START button will store information about the discharge of the product, after the output of the comparator appears the signal log. "1". The second trigger DD1.3, DD1.4 (end of product charge trigger), from the moment it is launched with the START button, will store information about the end of the product charge, after the timer output signal log. "1". In general, the work of ARZU is as follows. A battery or cell is installed in the device. If a battery is installed, then it is necessary to ensure that the SA2 switch is in its original position (down). If an element is installed, then it is necessary to turn SA2 up. Then turn on the NETWORK switch. Control of the presence of mains voltage - according to the indicator HL1. In this case, the states of the control triggers are undefined and the situation is not ruled out when the voltages from their outputs will keep the transistor VT1 closed and the transistor VT2 open. This means that the discharge-charging transistors VT4 and VT3 will be opened at the same time. However, this mode is acceptable for a short time, it does not lead to an accident - the discharge current of the product decreases by the value of the charging current. After turning on the NETWORK switch, immediately press the START button - set the initial states of the triggers. Their states will become such that the transistors VT1 and VT2 will be closed, and at the output 10 of one of the flip-flops - the signal is log. "1". Submitted to the input RESET of counters, it blocks their operation; the counters will remain reset to zero during the discharge of the product. Transistor VT5 will be open, and the counting pulse will not be generated. Closed transistors VT1 and VT2 will ensure the opening of the bit key VT4 and the discharge of the product through resistors R12 or R15. When the voltage of the product being discharged by the normalized load current equals the reference voltage of 1 V, the signal log "0" will change to the signal log "1" at the output of the comparison circuit. This single signal will change the status of the outputs of the control triggers so that the trigger DD1.1, DD1.2 will open the transistor VT1, and the trigger DD1.3, DD1.4 will open the transistor VT2. From this moment, the charging current generator on the transistor VT3 will start and the bit key VT4 will close. The product will start charging. At the same time, at the output 10 of the second trigger, the log "1" signal will change to a log "0" signal, the timer counters and the counting pulse shaper are released from blocking, the charge time will begin. When, after a 15-hour period, the states of the outputs of the counter DD3 become log. "1", the second trigger through the diode VD6 will be returned to its original position, which it had after pressing the START button: the discharge-charging cycle has completed. This state of the circuit is stable, while all microcircuits and transistors do not switch and consume a minimum current. The end of the discharge-charging cycle is judged by the extinguishing of the CHARGE LED. Now turn off the POWER switch and remove the product from the device. It is possible that a highly charged product with a cell voltage of less than 1 V will be installed in the device. Then, at the output of the comparison circuit, immediately after the product is installed in the device and the NETWORK switch is turned on, a log. occurred earlier at the user) and the 1-hour charge of the product will begin, which corresponds to a normal shortened technological cycle. The end of the charge, as usual, will end with setting the second trigger to its original position and turning off the CHARGE LED. The HL4 LED and the SB2 button are installed to test the charging state of the product. Since such states of the product are not established by the standard, they can be conditionally divided into three groups. Products of the third group, the voltage of which at a rated load current is less than 2 V (10 V for UPS), "bad", discharged, differ in that immediately after the start of the ARZU they become charged (shortened cycle). Products of the second group, the voltage of which is more than 1 V (10 V), but less than 1,15 V (11,5 V), are "good", they are ready to work, i.e. be discharged and only after that they are transferred to the charge. Here the "discharge-charge" cycle is fully maintained. Products of the first group are "very good", their voltage is more than 1,15 V (11,5 V), they do not require charging. After testing, they can be disconnected from the device. With the product installed in the ARZU and the NETWORK switch turned on, after pressing the START button and loading the product with a normalized discharge current, press the TEST button. After that, the reference voltage at the direct input of the voltage comparison circuit changes from 1 to 1,15 V, and the HL4 CHARGE 80 ... 100% LED is connected to the output of the comparison circuit through the normally open contacts of the TEST button. If the voltage on the product when it is loaded with a normalized current is greater than the reference, the output of the comparison circuit will be a log. "0" signal, and the HL4 LED will light up. This product should not be discharged or charged. It can be disconnected from ARZU. If the product is not removed from the device, then after releasing the TEST button, press the START button again and leave the product for the discharge-charging cycle. The design used fuse holder DVP4-1 and fusible insert VP1-1 0,16 A, toggle switches SA1 (NETWORK) and S2 (UP / DOWN) - MT3, button SB1 (START) - KM1-1, button SB2 (TEST ) - KM2-1. P2K switches and buttons can be used instead of the indicated switches and buttons. In this case, the design of the device changes. To connect the product to the structure, small-sized double sockets MGK1-1 and the MSH-1 plug were used. You can use single sockets, for example, GI1,2, and ShTs1,2 plugs. Transformer - any small-sized power of 3...5 W with a voltage on the secondary winding of 22...23 V and a current of 65...100 mA. You can use a transformer from an electronic watch "Start", made on a magnetic circuit ShLM 10x20 or a transformer from the power supply unit BP2-3 of the calculator, by rewinding the secondary winding to the required voltage. The author used the transformer TS-4-1 aFO.470003TU, adding 100 turns of wire PEV-2 0,23 to the secondary winding. The cross section of the magnetic circuit is 10x15 mm2. All resistors type MLT. Trimmer resistors - SP3-38a. Capacitor C1 - K50-35 40V 220 uF; C2 - KM-6b-N90 0,1 uF; C3 - K73-17v 63V 0,22 uF. Non-polar capacitors of types KLS, KM, KD. Instead of the KD522B diodes indicated in the diagram, you can use KD522A, KD521A, V, G or KD103A, B. The KS191Zh zener diode can be replaced by KS210Zh or two KS147V, G zener diodes connected in series with a minimum stabilization current of 1 mA. Transistors KT3102BM with letters B, D, E (b> 200) or replace them with KT342A, B. Transistor KT3107BM with the letters G, E (b> 120 ... 220) or replace with KT352B. The KT817 transistor can be used with the letters A ... G or replaced with KT815A, B, C and instead of KT816 with the letters A, B, C, choose KT814A, B, C. All parts of the device, except for the installation electrical elements, controls and connection of the tested product, are mounted on three printed circuit boards made of one-sided foil fiberglass 1,5 mm thick. Boards can be made without "chemistry" - cut with a cutter. The display elements (LEDs and their resistors) are installed on the P1 board (Fig. 2).
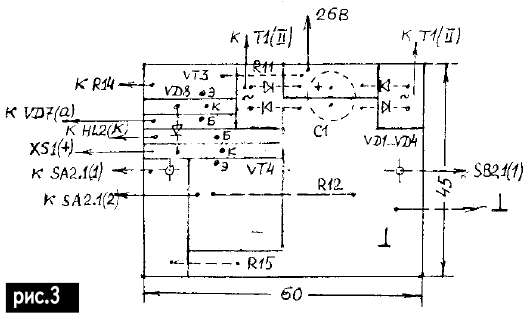
The board is attached to the front panel (PP) through the central hole with an M3 screw, a dielectric washer is placed under the nut, and the foil near the hole is cut (chamfered) so that the screw does not touch the foil. Power elements are placed on the P2 board (Fig. 3): a diode bridge VD1 ... VD4 with a filter capacitor C1 and parts of the discharge-charging circuit (resistors R11, R12, R15, transistors VT3, VT4 and diode VD8. A two-watt resistor R12 is installed with sides of the foil. The P2 board is installed with its plane perpendicular to the PCB plane and is reinforced with a single-core tinned wire to the SA2.1 (1) and SB2.1 (1) terminals (in parentheses is its own marking of parts). .2.1 and buttons SB2.1 according to the wiring diagram.
The rest of the details are placed on the P3 board (Fig. 4). The conductors are cut into strips. The microcircuits are located on the board with the pins up and fixed on it with pieces of tinned copper wire D0,5 mm, passed through the holes in the board and soldered to the power pins of the microcircuits and the corresponding buses "
The device is assembled in a housing made of any dielectric material. The enclosure can be made from polystyrene facing tiles used for interior wall cladding. Case dimensions 100x100x70 mm. All installation electrical elements, controls and connections of the product under test are installed on the top front panel. The marking of the software is given in Fig.5. The transformer is attached to the PCB with two screws through a dielectric pad that presses it over its own clip.
Figure 6 shows the placement of parts on the reverse side of the PCB, including boards P1 and P2. Four wooden racks with a section of 10x10 mm2, 65 mm long fasten the side walls of the case. The latter are glued to them with polystyrene glue (a solution of polystyrene shavings in toluene). The ends of the racks are used for attaching the PCB to them from above, and from the bottom - the bottom with self-tapping screws, and the corners of the racks from below are cut off to a depth of D5 mm. When assembling the structure, the P3 board is first installed, then a shock-absorbing substrate 10x10 mm is laid on the side of the board conductors, for example, from sponge rubber, foam plastic, then the bottom is installed and, finally, the "self-tapping screws" that fasten the bottom are screwed, and a metal washer is placed under the head of the screws and pharmacy rubber stopper - these are the legs for the case.
The power cord is soldered to terminals 2-2 of the SA1 toggle switch, stretched along the underside of the PCB and attached to it with Monolith glue. Accordingly, according to the diameter of this cord, a groove is made in the side wall of the case. A bundle of 12 wires connects the PCB and the P3 board. To dock the element with the device, a two-pole, two-wire transition-clamp is required, which with two poles compresses the element electrodes, and with the other two ends through the MSH-1 plugs it joins with the MGK-1-1 sockets installed on the PCB. A wide variety and aesthetics of commercially available plastic clips of the "clothespin" type allow you to select them with the necessary parameters, slightly modifying them, namely: on their "sponges", having drilled a hole, install a metal washer and an M3 screw with a mounting tab under the nut. The ends of the wires are soldered to the petal. The wires are twisted into a twisted pair. Mark "+" and "-". To prevent shorting of single MSH1 plugs, they are installed with an interference fit in a plastic clip with two holes D5,5 mm, cut, for example, from polystyrene or polyethylene 2 mm thick - a small-sized plug is made with a center distance of 8 mm. Setting up the device. After checking the correctness of the desoldering of the circuit elements on the P1 ... P3 boards and checking the correct desoldering of the harness connecting the PCB and the P3 board, you can turn on the device at idle (H.X.) - without connecting the product. The voltage is measured in separate nodes of the circuit: on the capacitor C1 of the filter UС1~26±1 V and all terminals of elements connected to the 26 V bus; at the output of the parametric voltage stabilizer Ucc=8,5 ± 0,5 V and all power supply pins of microcircuits and elements connected to this output; at the output of the reference voltage source Uet = 1,25 ± 0,05 V - at the output of the resistor R23. Set the voltage at the midpoint of this resistor Uon \u0,9d 1 V. On X.X. the output voltage of the comparison circuit is log. "8" (~ 1 V), and the setting of the triggers corresponds to the charge mode - log. "03" at pins 11 and 1 of the DD7 chip. In this mode, the current generator works - UVD3=3 V, but the HL1 "CHARGE" LED does not light - the load is not connected to the current generator. The shaper of the counting pulse and both counters also work in this mode. Check the operation of the "START" button: if you keep it pressed, you can briefly set both arms of the triggers to the zero state. Check the device for operation. Observing the polarity, connect a direct current source (IPT) with a nominal voltage of 12 V, adjustable "down" to 10 V, to the input of the device through the XS19 connector. .e. put the source into a two-terminal mode with two-way conduction, like an ABP. A DC milliammeter with a measurement limit of 100 mA is connected in series with the IPT. Set the toggle switch SA2 "DOWN". Turn on the IPT, and then the "NETWORK" switch. If a voltage of 12 V is set on the IPT, then the output of the comparison circuit will be log "0" (~ 0,8 V), and after pressing the "START" button, you can measure the discharge current. Without turning off the IPT, set its voltage to no more than 10 V. A log "1" (~ 8 V) will appear at the output of the comparison circuit, which sets the device into charge mode. Measure the charge current. Then make sure the timer works. After checking the device for operation, its precision adjustment is carried out. The adjustment consists in setting the reference level of operation of the voltage comparison circuit, at which the ARZU switches from the "DISCHARGE" mode to the "CHARGE" mode. As a voltage comparison node, an operational amplifier is used, designed to operate with a bipolar supply. When it is operated from a unipolar power source in the mode of comparing single-volt input voltages, the spread of the response voltages is quite large. For adjustment, a digital voltmeter of a class no worse than 0,5 is required. With the circuit assembled as described above, the IPT voltage is set more accurately (10 ± 0,2 V) and, by adjusting the resistor R19, the output of the voltage divider R19, R20 (node N) is set to 1 V ± 20 mV. A voltage of 23 V is set on the engine of the resistor R0,92, and at the output of the IPT U = 10,5 V. The output of the comparison circuit should be log. "0". Reduce the voltage of the IPT until the voltage at the output of the comparison circuit is equal to log. "1". In this case, the voltage of the IPT should be within 10 ± 0,2 V. If the voltage of the operation of the circuit is greater than the permissible value, then it is necessary to change the reference voltage on the engine of the resistor R23: reduce Uоn if the comparison circuit operates at UN> 1,02 V, and increase Uon if the circuit operates at UN<0,98 V. More promising for the author is the use in the comparison circuit of the amplifier UR1101UD01 (KR1040UD1) - dual, designed to work with a unipolar power supply. Adjustment of the comparison circuit will be faster and more accurate, and the work of the ARCU in terms of voltage comparisons will be more reliable. It is known that in the electrochemical systems of individual sealed Ni-Cd batteries, irreversible changes accumulate during operation, leading to a loss of capacity, an increase in internal resistance, swelling of individual elements and failure of the entire UPS. The failure of the entire battery may be due to the failure of one element. If the tested element after charging "does not hold" the voltage when it is loaded, then it turns into an additional load for others, reducing the capacity of the entire battery. It should be replaced with another, charged individually, and the ABP should not be allowed to be deeply discharged. If the cells inside the UPS are oxidized and the contact resistance is high, or there is not enough force to collect the cells into the battery, then the UPS behaves like an open circuit and the ARZU does not enter the mode, although at idle the UPS voltage measured by a voltmeter with a high input resistance may be normal. In this case, after starting, the ARZU simulates the charge mode - the timer is running, the current generator is working, but the "CHARGE" LED does not light up, since the current from the current generator does not flow to the product. The ABP must be opened twice a year and the plaque of released salt should be removed from the surface of the elements with a dielectric plate with a sharpened end, wiped with chalk and an alcohol solution. After charging, the element is put for testing with loading, and if the LED does not glow with the inscription CHARGE 80 ... 100%, the element is not installed in the UPS. ARZU can be equipped with a sound signaling device for the end of the charge, but this will increase its cost. To do this, for example, the output 10 of the charge trigger, made on DD1.3, DD1.4, must be connected through a switch to the input of a retarded sound generator with an output to a piezoelectric emitter. If at any time during the 15-hour charge of the product this switch is closed, then after the end of the charge, a log "10" signal will be set at the output 1 of the specified trigger, which will start the sound generator. References:
Machine for thinning flowers in gardens
02.05.2024 Advanced Infrared Microscope
02.05.2024 Air trap for insects
01.05.2024
▪ Bolt Wireless Protocol for Keyboards and Mice ▪ New series of tantalum capacitors ▪ Air taxi for intercity transportation ▪ ASUS Fonepad 7 (FE375CL) on Android 5.0 Lollipop ▪ You can try an apple with your hand
▪ section of the site for the Musician. Selection of articles ▪ article by Alfred Adler. Famous aphorisms ▪ article Is it true that the Colosseum had an elevator? Detailed answer ▪ article Digital Integrated Circuit. Radio - for beginners ▪ Article Perfume. Simple recipes and tips ▪ article Recreating a burned map. Focus secret
Home page | Library | Articles | Website map | Site Reviews
www.diagram.com.ua |


 " and "Ucc" on the board. Capacitor C3 is soldered between the power buses of the board. Electrical connections between the pins of the microcircuits and other elements can be made with any thin wire with a cross section of 0,1 ... 0,14 mm2, for example, MGTF or PEV D0,12. ..0,15 mm In Fig. 4, under the "P" icon, there are jumpers between the strips of conductors. There are 7 of them. the corresponding pins of the microcircuits.The wires connecting the pins of the microcircuits to the parts are passed through holes D0 mm drilled on the tires "
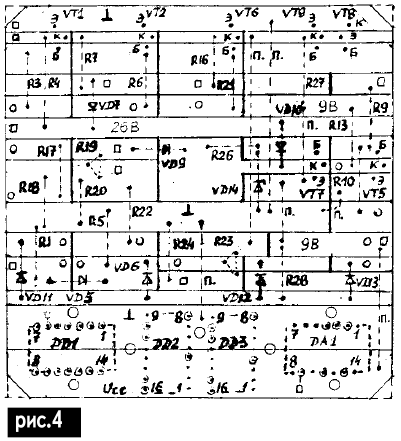


 Leave your comment on this article: