|
|


 Arabic
 Bengali
 Chinese
 English
 French
 German
 Hebrew
 Hindi
Hindi Italian
 Japanese
 Korean
 Malay
Malay Polish
 Portuguese
 Spanish
 Turkish
 Ukrainian
 Vietnamese
|
ENCYCLOPEDIA OF RADIO ELECTRONICS AND ELECTRICAL ENGINEERING Setting up a broadband power amplifier. Encyclopedia of radio electronics and electrical engineering
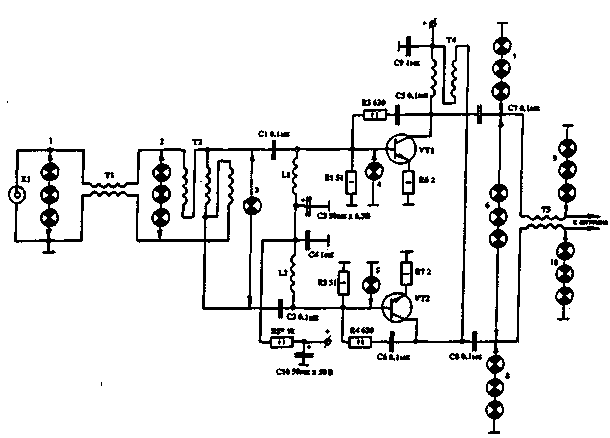
Encyclopedia of radio electronics and electrical engineering / RF power amplifiers In "RL" No. 7/91 and "RL No. 11/91, a diagram and a printed circuit board of the silo were published. When using suitable parts and properly assembling in accordance with the recommendations given there, the amplifier works immediately. But if low-quality parts were used, "broken "wire for transformers or if the silo burnt out from overloads, it becomes necessary to repair or adjust it. The following is a simple technique that does not require any instruments for this. It is suitable for setting up silos with a power of 10 to 200 W, but when setting up, you cannot turn on the amplifier at full power. In the presence of all supply voltages and the installation of transistor currents, a probe is connected directly to the input of the transformer (see figure), made up of three light bulbs 6,3 V x 0,3 A (resistance - about 75 Ohms).
Then such an excitation voltage is applied so that the bulbs burn no more than at full heat. After that, a probe is connected to point 2. The bulbs should burn almost without any special changes both at point 1 and at point 2. If at point 2 the bulbs burn noticeably weaker, then the balancing device T2 is disconnected from the transformer T1. If in this case the brightness does not change - T1 is faulty, most likely there is a short circuit in it, if the brightness increases - T2 is faulty. If this check is successful, i.e. the glow power at point 1 and 2 is approximately equal, a single 6,3 V x 0,3 A light bulb is connected at point 3. At this point, the high input impedance of the amplifier - 75 ohms is converted into a low input resistance of transistors - about 8 ohms in total. The burning of the bulb in full heat will indicate the serviceability of T2. If this is not the case, the VT1 and VT2 bases are disconnected. When brightness is restored - a malfunction in VT1 or VT2. If the brightness does not increase when the transistors are disconnected, T2 is faulty. After this testing, single bulbs are simultaneously connected to points 4 and 5. By their identical and bright glow, one can judge that T2 is working and the cascades on VT1 and VT2 are symmetrical in input. If the glow of these bulbs is not the same, use R6 and R7 to set them to the same glow. Then, a tester of three bulbs is turned on at point 6. By the glow of the bulbs in full heat and brighter, you can judge that the silo is working. In this case, the excitation power will have to be reduced. If you have a suspicion that the silo is not delivering full power, or one transistor is heating up much more than the other, connect the probes to points 7 and 8 at the same time. The bright and identical glow of the bulbs indicates that both transistors work symmetrically. If, however, a clear asymmetry is visible, with the help of C * and the installation of different quiescent currents through the transistors, they achieve the same glow. If this does not help, change the transistor. It should be remembered that sometimes even non-soldered RF transistors operate at RF and at DC in a completely different way, but soldered transistors, “acquired on the occasion”, often turn out to be “serviceable” at DC and completely inoperable at AC. After that check the work of T6. To do this, connect the light bulbs to points 9 and 10. The same glow indicates that the silo is operational. Typically, testing by this technique takes very little time and is highly effective. In difficult cases, you can turn on probes at 10 points at once. But even having completely rebuilt the silo according to the above methodology, one cannot stop there. Sometimes the silo does not match well with the output of a driver, which is usually assembled according to a "self-made" circuit and has an output impedance other than 50 - 75 ohms. To match the silo at the input, in this case, it is necessary to turn on a low-pass filter at its input, similar to the same filter at the output. Often, already one low-pass filter, switched on at the input and tuned to one of the high-frequency ranges, completely eliminates self-excitation. The only drawback of this method is the decrease in the efficiency of work on other ranges. For example, if you turn on the low-pass filter at 21 MHz at the input, the silo will work well on the ranges from 1,8 to 21 MHz and have a blockage at 24 - 28 MHz. In some cases, when operating the silo on the same range and matching it at the input and output, you can abandon the antiparasitic resistors R3, R4. The gain of the silo in this case will increase. In conclusion, it can be noted that when using high-frequency modern transistors, the silo works well in the MW range of 27 MHz. Author: I. Grigorov (UZ3ZK), Belgorod; Publication: N. Bolshakov, rf.atnn.ru
Artificial leather for touch emulation
15.04.2024 Petgugu Global cat litter
15.04.2024 The attractiveness of caring men
14.04.2024
▪ The mobile phone controls the computer ▪ Texas Instruments Wireless Ultrasonic Gas Leak Detector ▪ Quantum effects for fast battery charging ▪ Samurai brushing their teeth
▪ section of the website Electrotechnical materials. Article selection ▪ article Rocketplane S-4-D. Tips for a modeller ▪ article What is the secret of Antonio Stradivari? Detailed answer ▪ article Physician of ultrasound diagnostics. Job description ▪ article Clarification of linseed oil. Simple recipes and tips
Home page | Library | Articles | Website map | Site Reviews
www.diagram.com.ua |

 Leave your comment on this article: