|
|


 Arabic
 Bengali
 Chinese
 English
 French
 German
 Hebrew
 Hindi
Hindi Italian
 Japanese
 Korean
 Malay
Malay Polish
 Portuguese
 Spanish
 Turkish
 Ukrainian
 Vietnamese
|
ENCYCLOPEDIA OF RADIO ELECTRONICS AND ELECTRICAL ENGINEERING Light hedgehog. Encyclopedia of radio electronics and electrical engineering
Encyclopedia of radio electronics and electrical engineering / Musician
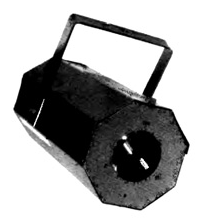
"Light hedgehog" consumes a little more than 220 W from a 100 V network and weighs approximately 3 kg. It is designed for lighting design of concert programs, shows and discos. The internal structure of the device is shown schematically in fig. 1. The incandescent lamp 5 is installed in the panel 10 and is equipped with an opaque screen 6, which eliminates the illumination of the room by the direct light of the lamp. Reflector 4 consists of a spherical metal base with a large number of mirror fragments glued to its inner surface facing lamp 5. The rays reflected by each individual fragment and focused by the lens 8 create a kind of "hedgehog" in space. The engine 3 rotates the reflector 4, and with it the beams, which look especially impressive in a smoky environment. In addition to the listed nodes, a printed circuit board of the control unit 12, a power transformer 11 and a fan 2 are installed inside the housing 1. Holes 7 for the passage of air cooling the lamp 5 inside the housing 12 are closed with an opaque screen 9.
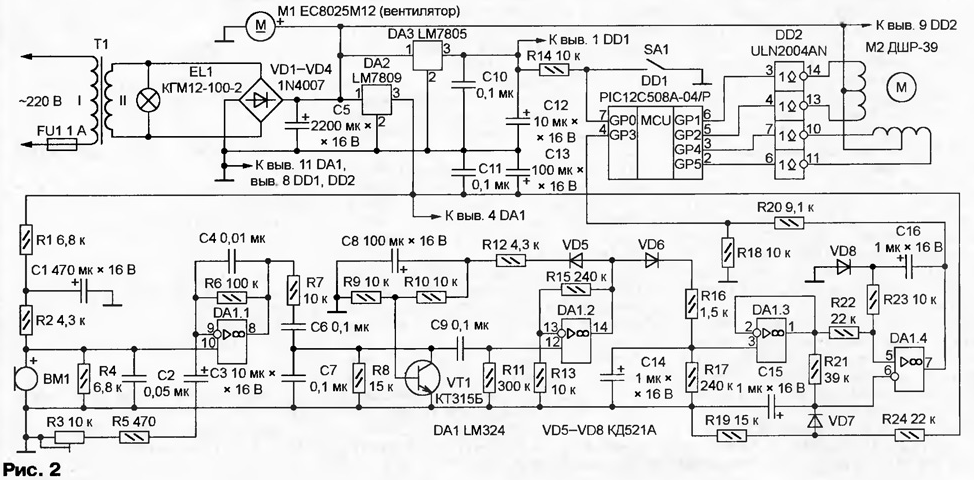
The scheme of "light hedgehog" is shown in fig. 2. The overall power of the transformer T1 (2, see Fig. 1) must be greater than the power of the lamp EL1 (5, see Fig. 1) by at least 15 ... 20 W. The voltage on the secondary (II) winding of the transformer with the lamp connected should be 10,5 ... 11,5 V. Since the current consumed by the lamp reaches 8 A, it should be connected to the transformer with a wire with a cross section of at least 2,5 mm2.
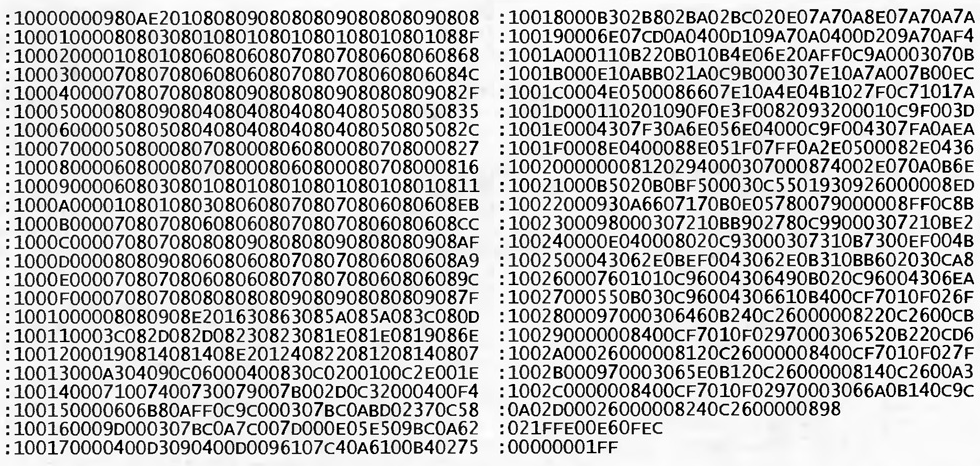
The basis of the control unit for the M2 stepper motor that rotates the reflector is the DD1 PIC12C508A-04 / P microcontroller, in the program memory of which the codes from the table should be written using the programmer. This microcontroller is programmable once, so this operation should be performed very carefully.
The signals generated by the microcontroller are fed to the windings of the M2 stepper motor through the transistor switches of the DD2 microcircuit. Each of its outputs is equipped with a protective diode, and the common cathode of the diodes is connected to terminal 9. Thus, the motor windings are shunted by diodes that suppress switching surges. The program provides five different speeds and two directions of rotation of the reflector. Various combinations of these parameters create lighting effects. If the contacts of the switch SA1 are closed, the change of speed/direction combinations occurs periodically according to the program. Otherwise (the switch is open), the change is synchronized by the pulses received at pin 4 of the DD1 chip. The pulse shaper to the beat with the rhythm of a piece of music is assembled on a DA1 LM324 chip. The cascade on the op-amp DA1.1 amplifies the sound signal of musical accompaniment received by the BM1 microphone. Resistor R3 - gain control. Then, through the R7C6R8C7 filter, the signal enters the input of the amplifier on the op-amp DA1.2, covered by AGC (automatic gain control), which maintains the signal amplitude at the DA1.2 output constant, regardless of the volume of the music. The AGC detector is assembled on a VD5 diode, the filter is R12C8, the actuator is a VT1 transistor. The amplitude detector on the VD6 diode with the R16R17C14 filter and the DA1.3 repeater highlight the envelope of the musical signal. The threshold device on the DA1.4 op amp with a retry delay unit converts the envelope into rectangular pulses input to the GP3 input of the DD1 microcontroller. The printed circuit board of the control node is shown in fig. 3. It is designed for the installation of fixed MLT resistors and ceramic capacitors KM, K10-17, KD-2. Oxide capacitors - K50-35 or similar imported ones. The PIC12C508A-04/R microcontroller can be replaced with the PIC12C509A-04/R Microphone BM1 - HMO1001A. Other electrets used in modern telephones are also suitable, for example, CZN-15E.
Imported integrated stabilizers can be replaced with domestic ones: LM7805 - KR142EN5A, LM7809 - KR142EN8A. An analogue of the ULN2004AN microcircuit is K1109KT23. As VT1, transistors of the KT315 or KT3102 series with arbitrary letter indices are suitable. Diodes VD1-VD4 - rectifier for a current of at least 1 A. Any low-power silicon diodes are suitable as VD5-VD8. Reflector diameter (4, see Fig. 1) - 100...150 mm. On a smaller one, it is difficult to place a sufficient number of mirror fragments, and an oversized M2 engine will not be able to rotate. An aluminum reflector from an old theater spotlight can serve as a blank for the base of the reflector. In extreme cases, you can make the base yourself from an aluminum sheet with a thickness of no more than 1,5 mm and dimensions of at least 100x100 mm. It is soft aluminum that is needed, and not duralumin that is difficult to deform. A cement mortar is poured into a wooden box of a suitable size, a rubber ball with a diameter of 20...30 mm is pressed into it to a depth of 200 ... 250 mm and the mortar is allowed to harden. After removing the ball and placing an aluminum plate in the recess, the workpiece is given a spherical shape by blows of a semicircular mallet. Don't be upset if it doesn't turn out perfect. This not only does not worsen, but even diversifies the lighting effects. In the center of the finished base, fix the sleeve to fit on the motor shaft. In order not to create unnecessary light reflections, coat the inner surface of the base with dark matte paint before sticking the mirror fragments. It is necessary to approach the preparation and sticker of mirror fragments creatively - the expressiveness of the created effects depends on this. To obtain rays of saturated colors, reflective dichroic filters are used as mirrors. Sometimes they can be found in stores selling stage equipment. If it was not possible to purchase suitable filters, you will have to limit yourself to single-color rays and use ordinary mirrors 1,5 ... 2 mm thick from "cosmetic bags" or powder packages. Thicker ones will not work - the reflector will turn out to be too heavy. Mirrors are cut into approximately square fragments with a side of 15...20 mm and glued to the inner surface of the base. In principle, any lighting lamp with a power of 1 ... 50 W is suitable as an EL100, however, in order to get bright and clear rays, its spiral must be flat and dense (turns - adjacent to each other). In addition to power, lamps are classified by color temperature, the lower it is, the "redder" the light. Conventional incandescent lamps are characterized by a relatively low color temperature, so the rays of colors lying in the blue region of the spectrum will seem dim. For halogen lamps, this figure is higher, but the service life is shorter. It is recommended to use a KGM12-100-2 100W halogen lamp. At a nominal voltage of 12 V, it lasts more than 350 hours. Possible replacements are lamps KGM 12-100 (service life 85 hours), KGM 12-50 (power 50 W) or FSR12-100 from General Electric. You can also use car fog lamps. The durability of the lamp and the device as a whole largely depends on the quality of the lamp panel. With poor contact with the sockets, the pin terminals of the lamps often burn out. A suitable panel can be found in the imported halogen lamp. If this was not possible, the lamp is fixed by clamping the flat part of its base between two fiberglass strips, and a single-core copper wire, cleaned of insulation, is tightly wound onto the pin terminals. Soldering is useless here, since the temperature of the terminals of a working lamp is above the melting point of the solder. Suitable screw terminals can also be used, for example from mains distribution blocks. In any case, parts made of non-heat-resistant plastic must be removed from the lamp at a considerable distance. When installing the lamp, it should be borne in mind that its spiral should be facing the reflector with the luminous surface of the largest area, and the center of this surface should be on the optical axis of the device, indicated in Fig. 1 dash-dotted line. The width of the protective screen is 5 mm larger than the diameter of the lamp bulb. Since the operating temperature of the bulb of the EL1 halogen lamp exceeds 250 ° C, without forced ventilation in the closed internal space of the hedgehog, the lamp can overheat until the bulb softens and deforms. Under the influence of high temperature, the lamp panel is often destroyed, the electronic components of the engine control unit fail. The EC8025M12 fan from the computer power supply is used to cool the device. The reflector is driven by a DShR-39 stepper motor. A possible replacement is PBMG-200, which was used in five-inch floppy disk drives for computers. Any other stepper motor with a winding resistance of 90 ... 110 ohms is also suitable. The lens-objective of the device is a double magnifier with a focal length of 192 mm. Another one with a diameter of at least 100 mm and with a focal length of 150 ... 300 mm is also suitable. The latter can be approximately determined by focusing the image of the solar disk on some non-combustible surface. The distance from the lens to the surface is the focal length. The body of the "light hedgehog" is made from any sheet metal. Plastic, plywood and other materials with poor thermal conductivity and heat resistance are not recommended. The shape and dimensions of the case do not really matter, but it should fit all the ones shown in Fig. 1 knots and details. The diameter of the hole for the lens is 5...10 mm less than its diameter. The lens is fixed around the perimeter with three or four clamps. Preliminary assembly of the device is carried out without a lens. At a distance of approximately 300 mm from the reflector, a white (for example, cardboard) screen is installed. A voltage of 1 ... 20% of the nominal voltage is applied to the EL30 lamp and, moving it along the optical axis, they find a position at which the most crowded group of light spots of the minimum size will be visible on the screen. Having fixed the lamp in this position, measure the distance A (see Fig. 1). Next, install the lens and direct the device to the wall at a distance of 5 ... 10 m. Without changing the relative position of the lamp and the reflector, select the distance between them and the lens in such a way as to get many clear images of the filament of the EL1 lamp on the wall. Measure distance B (see Fig. 1). When properly adjusted, the sum of A and B is approximately equal to the focal length of the lens. When finally assembling the device, the distances found must be exactly observed. The establishment of the control unit begins with checking the voltage at the outputs of the integral stabilizers DA2 (9 V) and DA3 (5 V). By closing the SA1 switch, using an oscilloscope, check for the presence of rectangular pulses of periodically changing frequency at pins 2, 3, 5 and 6 of the DD1 microcontroller. If they are not present, the microcontroller is faulty or incorrectly programmed. Similar pulses, but with an amplitude of approximately 12 V, should be at pins 14,13, 11,10 of the DD2 microcircuit. If there are no pulses on one of them, and the voltage is zero, the cause may be a break in the motor winding M2. Further, after making sure that the constant voltage between the outputs of the BM1 microphone is within 1 ... 3 V, they turn on rhythmic music with pronounced low-frequency components. On the screen of the oscilloscope connected to the output of the op amp DD1.1 (pin 8), the waveform of the musical signal should be visible, the amplitude of which is adjusted using the tuning resistor R3. When it changes tenfold, the amplitude of the signal at the output DD1.2 (pin 14) should remain approximately equal to 3 V. Otherwise, it is necessary to check the serviceability of the transistor VT1 and related elements, select the value of the resistor R12. A constant level of 2 ... 3 V at the output of DA1.3 (pin 1) during the sound of music should be accompanied by bursts to the beat of a strong beat of the piece. The voltage at pin 6 of DA1.4 - approximately 4 V - varies slightly depending on the nature of the music. It remains to check the presence of rectangular positive pulses at the output DA1.4 (pin 7). Their duration depends on the parameters of the C16R23 circuit and should be 100 ms. It is possible to eliminate gaps or untimely output of pulses by selecting the value of the resistor R19. Sometimes the control node is triggered by the noise generated by the fan. In this case, it is necessary to remove the BM1 microphone from the fan or even take it outside the device. The source code of the "light hedgehog" program. Literature
Author: A. Bogdanov, Krasnodar
Artificial leather for touch emulation
15.04.2024 Petgugu Global cat litter
15.04.2024 The attractiveness of caring men
14.04.2024
▪ Inflatable motorcyclist vest ▪ Gigabyte GSmart series of smartphones ▪ Philips Hue motion sensor controls lights ▪ The i beam tablet from NTT DoCoMo is controlled by sight
▪ section of the site Wonders of nature. Article selection ▪ article The oldest profession in the world. Popular expression ▪ article What is the source of stellar energy? Detailed answer ▪ article First aid for poisoning. Health care ▪ article Why did the computer burn out? Encyclopedia of radio electronics and electrical engineering ▪ article Rings and three swords. Focus secret
Home page | Library | Articles | Website map | Site Reviews
www.diagram.com.ua |

 Today it is difficult to imagine a stage, dance or concert hall without lighting equipment that illuminates them with numerous beams that constantly change brightness, color and spatial position. In the proposed article we will talk about one of the simplest lighting devices in this group. It creates several dozens of white or colored beams and, under the control of a microcontroller, rotates them to the beat of the music around a conditional axis.

 Leave your comment on this article: