|
|


 Arabic
 Bengali
 Chinese
 English
 French
 German
 Hebrew
 Hindi
Hindi Italian
 Japanese
 Korean
 Malay
Malay Polish
 Portuguese
 Spanish
 Turkish
 Ukrainian
 Vietnamese
|
ENCYCLOPEDIA OF RADIO ELECTRONICS AND ELECTRICAL ENGINEERING Convenient micro drill. Encyclopedia of radio electronics and electrical engineering
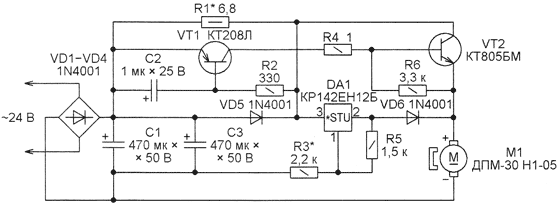
Encyclopedia of radio electronics and electrical engineering / Ham Radio Technologies Every radio amateur faces drilling holes in printed circuit boards. For this, a microdrill is usually used from a DC electric motor and a collet chuck, which are commercially available in a large assortment. Such drills are equipped, at best, with a power button and a simple power supply. They are used in two ways: the first - the drill is constantly rotating, in the intervals between drillings, the drill is not turned off; the second - having drilled one hole, the drill is turned off, the stopped drill is installed in the center of another future hole, then the power button is pressed. In the first case, it is difficult for a drill rotating at high speed to get into the center of the future hole, even if it is marked by punching. During prolonged continuous operation, the engine becomes very hot. In the second case, the time spent on work increases (you have to wait for a complete stop and then accelerate the drill), the resource of the button is quickly consumed, it becomes unreliable, the force applied to the drill when the button is pressed is often sufficient to move the drill away from "goals". Proposed microdrill motor control unitlargely frees it from the described shortcomings. Its design is simple, does not contain scarce parts and is available for repetition even by a novice radio amateur. In the initial state, after applying the supply voltage, the drill rotates at a low frequency of about 100 min-1. At such speeds, the engine practically does not heat up during prolonged operation, at the same time it is not difficult to get the drill exactly into the center of the hole marked on the board (and with some experience - on the drawing pasted on it). When pressing on the drill, the drill quickly increases the speed to the nominal speed, drilling begins. Upon its completion, when the resistance of the board material to the rotation of the drill drops sharply, the revolutions automatically decrease to "idle". The diagram of the control node is shown in fig. one.
It contains a rectifier on diodes VD1-VD4 with smoothing capacitors C1 and C3 and two channels for controlling the M1 drill motor. The first channel is made on an integrated voltage regulator DA1, the second - on transistors VT1, VT2. The purpose of the first channel is to maintain a voltage of about 1 V on the M2,5 engine operating without load. The motor current flows through the current sensor - resistor R1. The voltage drop across this resistor in the absence of a mechanical load on the engine is not enough to open the transistor VT1. With an increase in load (beginning of drilling), the motor current increases. As soon as the voltage across the resistor R1 reaches approximately 0,6 V, the transistor VT1 opens. Together with it, the transistor VT2 also opens, connecting the motor to the output of the rectifier. The isolation diode VD6 disconnects the output of the voltage regulator from the engine. To limit the voltage drop across the current sensor, a VD5 diode is connected in parallel to it in the forward direction. Capacitor C3 is needed for a slight delay in returning to idle mode after drilling is completed. The mechanical load on the drill required to switch modes depends on the value of the resistor R1. The device is assembled on a printed circuit board shown in Fig. 2.
It can be powered by either AC or DC power. In the latter case, with the guaranteed correct polarity of the supply voltage, the rectifier bridge VD1-VD4 can be abandoned. Stabilizer DA1 and transistor VT2 require a heat sink. If it is common to two appliances, one or both of them must be installed through heat-conducting insulating pads. Almost any transistors of the corresponding structure with a permissible collector-emitter voltage of at least 35 V and a maximum collector current of at least 100 mA (for VT1) can be used in the design. The maximum collector current of the transistor VT2, its power, as well as the direct current of the diodes VD1-VD5 must be at least the maximum current of the motor used. If necessary, the voltage on the motor without load can be changed by selecting the resistor R3. Its resistance can be calculated based on the equation: U=1,25(1+R3/R5)+0,0001•R3-UVD6,
Author: S. Saglaev, Moscow; Publication: cxem.net
Artificial leather for touch emulation
15.04.2024 Petgugu Global cat litter
15.04.2024 The attractiveness of caring men
14.04.2024
▪ Samsung Portable T7 Shield 4 TV SSD ▪ Smartphone with built-in thermal imager
▪ section of the site Fundamentals of safe life (OBZhD). Article selection ▪ article Our Mirabeau. Popular expression ▪ Muretia odorous article. Legends, cultivation, methods of application ▪ article Rules for the installation of electrical installations (PUE). Directory ▪ article Candle and flame. Focus secret
Home page | Library | Articles | Website map | Site Reviews
www.diagram.com.ua |


 Leave your comment on this article: