|
|


 Arabic
 Bengali
 Chinese
 English
 French
 German
 Hebrew
 Hindi
Hindi Italian
 Japanese
 Korean
 Malay
Malay Polish
 Portuguese
 Spanish
 Turkish
 Ukrainian
 Vietnamese
|
ENCYCLOPEDIA OF RADIO ELECTRONICS AND ELECTRICAL ENGINEERING Making a printed circuit board at home. Encyclopedia of radio electronics and electrical engineering
Encyclopedia of radio electronics and electrical engineering / Ham Radio Technologies Being in amateur radio for many years I made printed circuit boards in many ways. I painted with varnish (remember those times), with a cutter (simple boards), etc. Recently, the "Laser Printer and Iron" method has been popular for transferring a pattern onto foil fiberglass. According to various recommendations and articles on the Internet, I tested almost all the materials that were recommended. Thin glossy paper from magazines, photo paper, fax paper, backing paper from self-adhesive film, and even thermal transfer paper for fabric. I’m lying, I haven’t tested food aluminum foil. None of the methods satisfied me because the result was not stable (it could have happened the first time only from the third or fifth). The best results were obtained on photographic paper. Worse on fax and on sheets from magazines, and besides, after "rolling" with an iron, it had to be soaked. Strongly it does not bother in time, but still (10 minutes on average). On paper for thermal transfer to fabric, it turned out well, but to remove the substrate, isopropyl alcohol is required, and the temperature of the iron also had to be set very accurately. A little mistake - all marriage. On substrates from a self-adhesive film, the toner fell off the polished surface during printing (I don’t know what muck they are covered with). All with the introduction is over - let's get started ... Note: Everything that I will describe further may have been described somewhere before, but I have not seen it. Oddly enough, but let's get back to the substrates from the self-adhesive film (self-adhesive wallpaper). Basically, the technology is largely identical to that previously described in various sources. It's all about the material What we need: 1. Foil textolite (one-two-sided, as you need)
Let's take a closer look at point 7. We go to the bazaar or to a store where they sell wallpaper and look for cheap Chinese film. If you look at the substrate on which the film lies, you can see a mesh pattern with letters and numbers (each brand is different). So, we are interested in a film on the substrate of which there are large numbers 333.WE ARE INTERESTED IN SHE AND ONLY SHE. We have a roll of 10 meters 50 cm wide. It costs 100 rubles. There are also 777, 555, 556, etc. but we don't need it. Here is a picture of the background
More like always. We cut out (to whom it is more convenient and more convenient) a piece of textolite of the desired size with a margin of 1 cm from each edge. At these places, you can then drill holes to match the two layers (if you are making a double-sided board). We clean the board from dirt. I do not rub with a "null sandpaper", but I use Silit-Banks (see ads on TV). Pour a little Silite on the surface of the board and wait. If the surface is not very dirty and not strongly oxidized, then 1 minute is enough. The board becomes clean and pink before our eyes. If it is very dirty, then we wait longer or repeat the procedure several times. We wash the board with water and carry it to dry. Do not take the board where we will transfer the drawing with our fingers, but if you have taken it, then there is nothing terrible, just wipe it with a swab dipped in acetone before transferring. "Komet" is also good for cleaning (see ads on TV), but in powder. Here is the finished board
While the board is drying, we print the pattern. I draw and print on SprintLayout 4.0. Everyone has their own preferences. Use what you like best. We cut out a piece of the film (we do not tear off the film itself yet) of the desired size. Since the liner is very thin after peeling off the film, the printer will chew on it. Trust me - it will. Therefore, we paste it on a sheet of ordinary office paper. It is necessary to glue it so that after removing the film, a polished surface of the substrate remains on top. I use a few drops of Moment glue in the corners of the substrate and in the center of the long sides.
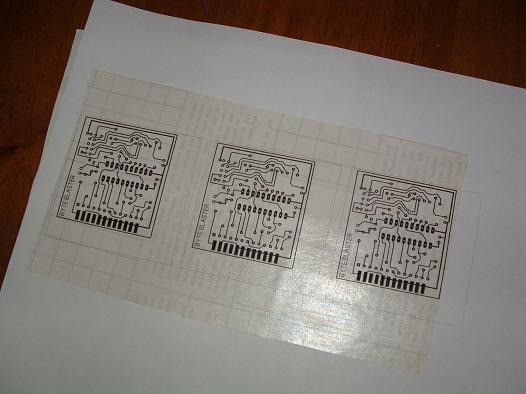
Everything is ready for printing. We tear off the film. We insert the "sandwich" into the printer and print. In the printer settings, do not forget to set the maximum toner.Do you understand what I'm talking about.
Printed? Let's see how it is with the drawing. It was on this type of film, or rather the 333 substrate, that the toner stopped falling off for me, it fell on others - dear mother ...
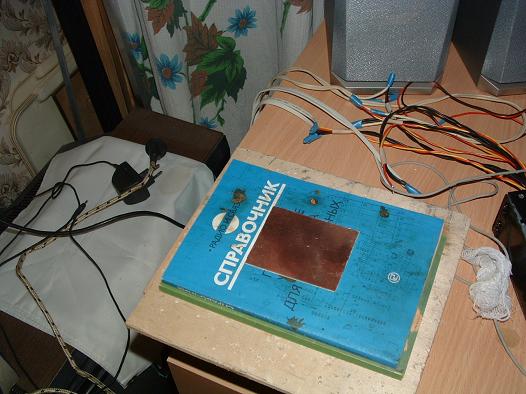
Turn on the iron (if you have not turned it on before) The temperature can be checked like this. We print on ordinary paper, put the toner up on an inverted iron and look. The toner is shiny - everything is fine, the temperature is enough to melt. I didn’t set it up at all, I just set it to the maximum and that’s it. We put plywood (10mm) on the table, then we don’t need a book or a magazine made of newsprint, (remember, there were such) on the book board with foil up
We make a tampon from a bandage or a thin clean rag. You can see it in the picture on the right. We DO NOT PUT a substrate with a pattern - how. We cover it with a sheet of A4 office paper and put the iron. If the board is larger than the surface of the sole of the iron, then iron the board 30-40 seconds are enough for the board to warm up
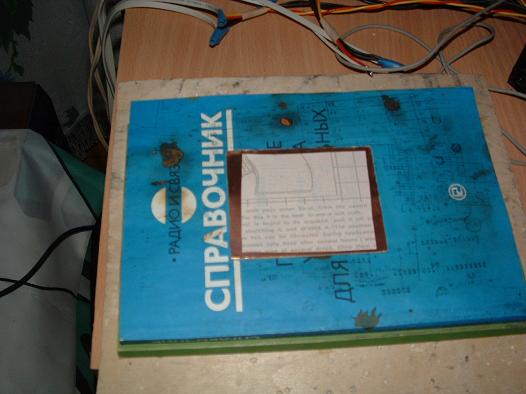
Next, remove a sheet of office paper and finally put the substrate with a pattern on the foil of the board, Spread it with a swab from a rag. The substrate will stick to the board right there (if the temperature was sufficient, see above)
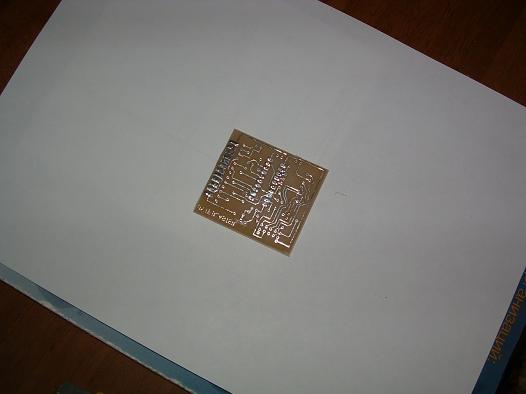
Again cover it with a sheet of A4 office paper and put the iron on and start ironing. There is practically no need to press, we just reheat the board (it has already cooled down a bit). Here already 15-20 seconds is enough, although I held more. We remove a sheet of office paper. Quickly, for 20-30 seconds, we spread the entire surface with a swab from a rag, especially along the edges of the board. We rub both along and across - the paths are not drawn in one direction. Here you need to press a little, as if rubbing over the surface. Note: who is afraid for their fingers can put on gloves of their cotton fabric - the board is hot. That's all, we wait until the board cools down, so that it can be safely picked up. We grab the tip of the substrate and gently tear it off the board. She practically leaves on her own. And here is the drawing translated
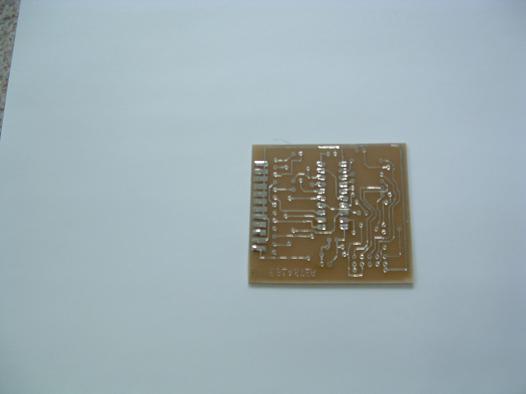
We look that everything is wonderful - we rejoice. The first time I squealed with delight.!!! Joke. I personally repeated it myself 20 times, and nothing has ever fallen off. 100% translation result. (okay persuaded 99%) Tracks 0.2 turned out to be flying. Here is the finished board without drilling - I'm already going to bed at night. Tomorrow we will drill
I apologize for the last picture, the camera is not mine and you can see how it shoots shiny surfaces. Believe me everything is OK. Then everything is as usual. We poison. Drilling. Ludim. Cut to desired size. We solder.
That's it. PS. I wrote the article on the day I tried it for the first time, the pictures are 2 days later, when I made the next Altera Byte Blastera board from the radiokot.ru website. And once again, everything turned out just super, and I wish you all the same. Questions, criticism, swearing, rave reviews are accepted at Andrew@dtrack.ru Author: Andrey Doinikov; Publication: radiokot.ru
Artificial leather for touch emulation
15.04.2024 Petgugu Global cat litter
15.04.2024 The attractiveness of caring men
14.04.2024
▪ Luxury version of Oura smart ring ▪ Viruses help the immune system ▪ BMW Electric Vehicle Wireless Charging
▪ section of the site Home workshop. Article selection ▪ article All is well, fair marquise. Popular expression ▪ Yagel article. Legends, cultivation, methods of application ▪ article Mysterious ball. Focus secret
Comments on the article: Alexander Thanks for your generosity. There are fewer and fewer people like you in our lives.
Home page | Library | Articles | Website map | Site Reviews
www.diagram.com.ua |


 Leave your comment on this article: