|
|


 Arabic
 Bengali
 Chinese
 English
 French
 German
 Hebrew
 Hindi
Hindi Italian
 Japanese
 Korean
 Malay
Malay Polish
 Portuguese
 Spanish
 Turkish
 Ukrainian
 Vietnamese
|
Small radio station on 1215-1300 MHz. Encyclopedia of radio electronics and electrical engineering
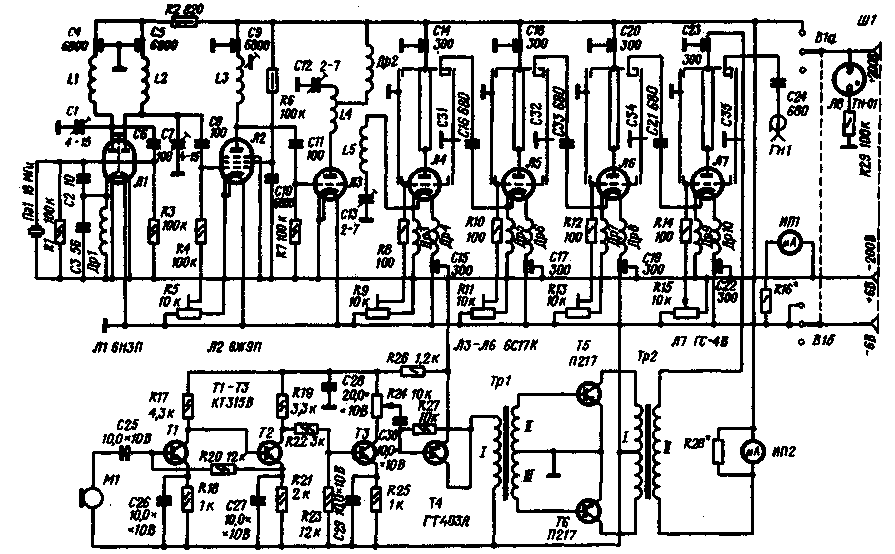
Encyclopedia of radio electronics and electrical engineering / Civil radio communications The radio station is intended for conducting experiments in the VHF amateur band 1215-1300 MHz. It includes a receiver, a transmitter and a parabolic transmitting antenna. Receiver The receiver is assembled according to the super-regenerator scheme (Fig. 1). It has a sensitivity of at least 50 microvolts. The power supply of the receiver is autonomous (accumulator D-0,06), the current consumption does not exceed 22 mA. Construction dimensions - 51x15,5x17,3 mm, weight with power supply and telephone - no more than 85 g.
The supergenerative detector is assembled on a D1 tunnel diode. The circuit of the detector consists of the inductance of the strip line L1 and the capacitance of the capacitor C1 and diode D1. The quenching pulse generator is also assembled on a tunnel diode (D2). The oscillator circuit consists of coil L3 and capacitor C4. The signal amplified and detected by a super-regenerative detector is taken from the load resistor R1 and fed to the input of a low-frequency amplifier assembled on transistors T1-T3. The load of the transistor T3 is the phone TF1 type TM-2. The design of the strip line is shown in fig. 2.
The plates of the capacitor C2 are the grounded part of the strip line and the foil of the board from which the receiver is assembled. A plate of mica is laid between them. Capacitor C1 consists of a continuation of the ungrounded end of the strip line and a movable grounded plate, the axis of which is displayed on the front panel. The loop of connection L2 with a length of 11 mm is located at a distance of 1,8 mm from the strip line. The socket Gn1 of the communication coil is fixed on the board with the help of a plate made of foil textolite, one side of which is soldered to the board. The L3 coil is wound with PEV-1 0,06 wire until the Jupiter receiver's IF circuit is filled on the frame, the tap is from 1/5 of the turns, counting from the grounded terminal. The variable resistor R2 is mounted directly on the board. The receiver has a separate antenna in the form of a detachable quarter-wave pin. When setting up the receiver, after making sure that the bass amplifier is operating normally, they check (using an oscilloscope) the presence of oscillations of the damping generator. In their absence, the resistance of the resistor R3 is selected, at which the generation will be stable when the power supply voltage drops to 1 V. By connecting instead of the GSS antenna through a capacitor with a capacitance of 1-1,5 pF to the connection loop L2, by adjusting the resistance of the resistor R2, such a bias is selected by diode D1. at which the receiver sensitivity is highest. Transmitter The technical data of the transmitter are as follows: output power - not less than 2,7 W; frequency stabilization - quartz: modulation - amplitude; modulation depth - adjustable within 20 dB; output power - adjustable within 15 dB; maximum power consumption from the power source - no more than 28 W; dimensions - 255x190x36 mm; weight - no more than 1,4 kg. The schematic diagram of the transmitter is shown in fig. 3. The transmitter is assembled according to the frequency multiplication circuit of a quartz oscillator. All of its cascades operate in light mode, this increased the reliability of the transmitter.
The master oscillator is made on the lamp L1. The frequency of the master oscillator is stabilized by Pe1 quartz. The anode circuit of the left half of the L1 lamp includes the L1C1 circuit, tuned to the fourth harmonic of quartz (72 MHz). The signal taken from the LIC1 circuit is fed to a frequency doubler. assembled on the right half of the lamp L1. A signal with a frequency of 144 MHz, isolated by the L2C7 circuit, is fed through the capacitor C8 to a power amplifier assembled on an L2 lamp. Then the amplified signal is fed to the frequency tripler on the L3 lamp, connected according to the common cathode circuit. A signal with a frequency of 432 MHz from the L5C13 circuit is fed to the second frequency tripler on the L4 lamp, assembled according to a grounded grid circuit. The signal (4 MHz) isolated in the anode circuit of the L1296 lamp by a coaxial resonator is fed to a three-stage power amplifier on L5-L7 lamps. All three stages are assembled according to the grounded grid scheme. The bias on the L4-L7 lamps is adjustable, from 0 to 6 V. The power output by the transmitter is regulated by the resistor R15. The supply voltage to the transmitter stages is supplied through feed-through capacitors. The transmitter modulator is assembled on transistors T1-T6. The secondary winding of the modulation transformer Tr2 is included in the anode circuit of the lamp of the output stage of the transmitter L7. The transmitter is assembled in a U-shaped case made of duralumin. Installation is made on a removable board made of foil-coated getinaks. The modulator and power circuits are mounted on the board using the printed wiring method. The joints of the screening partitions are carefully soldered. For better heat transfer, the lower removable cover is made in the form of a grid. A stop is installed on the cover to improve heat transfer and ease of work with the transmitter. On the front panel of the transmitter there is an indicator of the magnitude of the supply voltage IP1, an indicator of the anode current of the output stage IP2, switch B1, a modulation depth regulator R24, a regulator of the output power R15, an indicator light L8. An antenna connector Gn1 and a power connector for the transmitter Sh1 are installed on the rear panel. To increase reliability and simplify the design, the M1 microphone (from the hearing aid) is mounted in the transmitter housing on the front panel. In order to eliminate possible self-excitation of the modulator due to acoustic feedback, the microphone is mounted on an elastic rubber gasket, and on the mounting side it is pasted over with sound-absorbing material (elastic rubber or foam rubber). The data of the loop coils and chokes are given in the table. Table 1
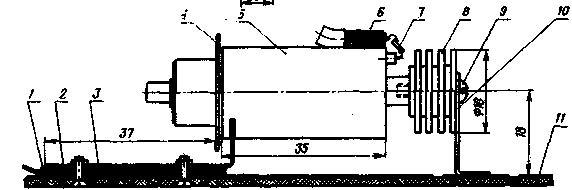
The coaxial resonators of the preliminary stages are used from 6S21D lamps (radio probes). You can also make resonators yourself - from sheet brass (bronze) with a thickness of 0,2-0,4 mm according to the drawings of fig. 4. The grid plunger 1 is soldered to the terminal of the 6S17K lamp at three points using a heat sink so as not to damage the lamp. The conclusions of the cathode and the glow of the lamp are connected using clamps 3.
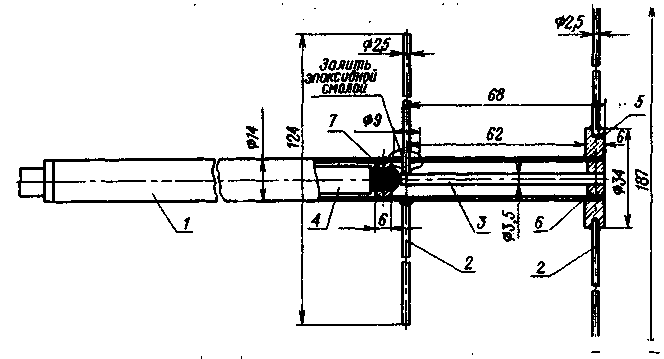
The design of the output stage assembly is shown in fig. 5 and 6. Its coaxial resonator has a similar design, only a heat sink 8 is installed on the continuation of the anode rod.
The establishment of the transmitter begins with a preliminary adjustment of the L1C1, L2C7 circuits and the circuit, which includes the L3 coil, using the GIR. If there is no GIR, you can also configure using the GSS. In this case, the isolation capacitor is first turned off, and a modulated signal is applied to the lamp grid. To break the grid leakage circuit of the next stage, after the transition capacitor, a resistor with a resistance of 10-30 kOhm is connected and, in parallel with it, a low-frequency oscilloscope. By rotating the tuned capacitor in the anode circuit circuit (or the brass core of the L3 coil), the moment the circuit is tuned to resonance is determined by the maximum RF signal envelope on the oscilloscope screen. This method of tuning with high accuracy allows you to minimize the influence of measuring instruments on the circuit, which is especially important for microwaves. After preliminary tuning, modes are selected and the transmitter is tuned as a whole. In this case, special attention should be paid to the optimal interstage matching. especially in the power amplifier. The modulator setting has no special features. parabolic antenna The antenna is designed to work as part of a radio station in field and stationary conditions. It is possible to use the antenna (when changing the irradiator) and for operation in the range of 430-440 MHz. The antenna is easy to manufacture, does not contain scarce materials. has a slight windage, low weight and requires virtually no adjustment. The technical data of the antenna are as follows: antenna gain in the range of 430-440 MHz - not less than 70. in the range of 1215-1300 MHz - not less than 600: the width of the main lobe of the radiation pattern in the range of 430-440 MHz-22 °, in the range of 1215-1300 MHz -6-7°; weight - no more than 6 kg: input impedance - 75 Ohm. The design of the antenna is shown in fig. 7. It is made in the form of a parabolic mirror, in the focus of which the irradiator is installed (Fig. 8).
The parabolic mirror is reinforced with a rotating base, which allows you to fix the antenna in the desired position. The irradiator is a half-wave split vibrator with a reflector. Power is supplied to the irradiator by a coaxial cable with a characteristic impedance of 75 ohms. The irradiator is mounted on a parabolic mirror at two points with the help of clamps 4 and rods 5 (polyethylene gymnastic sticks 1 m long), at the ends of which M4 screws 25-30 mm long are installed. This mount gives the mirror the necessary rigidity. The frame of the parabolic mirror is made of duralumin wire (AMG-6) with a diameter of 6-8 mm. In the central part of the frame of the parabolic mirror there is a disk 6 with a diameter of 200 mm made of sheet duralumin, to which is attached a feed, a rotary device and the radial parts of the mirror frame. The assembly of the antenna begins with the manufacture of a full-size parabola template. The template is made from a cardboard sheet 1,5-3 mm thick and 2500x600 mm in size. A parabola is drawn on cardboard at points, the coordinates of which are calculated by the formula:
where F=0,7*Rо=0,7*1200=840 mm - focal length, R - antenna opening radius. The radial parts of the frame of the parabolic mirror are bent according to the prepared template. According to the circles drawn on the plane with a diameter of 2400, 1700, 1000 mm, frame circles are bent, the ends of which are riveted and connected with M3 screws or rivets. The assembly of the frame of the parabolic mirror of the antenna begins with the fastening of the radial parts of the frame to the central disk with M3 screws, after which, using clamps 7, circles with a diameter of 2400, 1700 and 1000 mm are attached to the radial parts of the frame in the specified sequence. Reflective wires 2 (antenna mirror) are pulled onto the assembled frame from the side of the convex part of the mirror so that they are in the parabola section parallel to its axis, and the distance between the wires does not exceed 25 mm. The wires are fixed on the frame with aluminum wire with a diameter of 1-1,5 mm. The correctness of the geometric dimensions of the parabolic mirror must be constantly monitored according to the template. After assembling the mirror, it is painted with nitro enamel, which will protect the antenna from corrosion and fix the wires on the frame. Authors: A. Bondarenko (RA3TBI) N. Bondarenko (RA3TBH); Publication: N. Bolshakov, rf.atnn.ru
Machine for thinning flowers in gardens
02.05.2024 Advanced Infrared Microscope
02.05.2024 Air trap for insects
01.05.2024
▪ Teclast X2 Pro Hybrid Tablet ▪ Children's shoes with a GPS tracker ▪ Virtium 4GB DDR64 VLP RDIMMs
▪ section of the site Alternative energy sources. Article selection ▪ article Smoking incense. Popular expression ▪ article How does the brain help you see? Detailed answer ▪ article Sedge parvskaya. Legends, cultivation, methods of application
Home page | Library | Articles | Website map | Site Reviews
www.diagram.com.ua |


 Leave your comment on this article: