|
|


 Arabic
 Bengali
 Chinese
 English
 French
 German
 Hebrew
 Hindi
Hindi Italian
 Japanese
 Korean
 Malay
Malay Polish
 Portuguese
 Spanish
 Turkish
 Ukrainian
 Vietnamese
|
ENCYCLOPEDIA OF RADIO ELECTRONICS AND ELECTRICAL ENGINEERING Voltage and current meter. Encyclopedia of radio electronics and electrical engineering
Encyclopedia of radio electronics and electrical engineering / Measuring technology One of the main instruments in the amateur radio laboratory is a regulated power supply. To increase the efficiency and convenience of work, it is useful to supplement it with a built-in meter of the output voltage and load current. Descriptions of such meters are quite common on the Internet and in amateur radio magazines. But it happens that the description found is not suitable for creating a meter suitable for embedding in a specific power source. After all, many factors have to be taken into account, for example, the available place for its installation, the availability of the necessary parts. This article presents a variant of the meter, which can be useful both for those who develop a laboratory power supply from scratch, and for those who intend to build it into an already finished power supply. The device measures direct voltage from 0 to 51,1 V with a resolution of 0,1 V and direct current from 0 to 5,11 A with a resolution of 0,01 A. Its prototype was the meter described in [1], which is quite simple in design and with good parameters. The main idea implemented in it to use an inexpensive microcontroller deserves attention. However, the need to use an op amp capable of operating with a unipolar supply at an output voltage close to zero, as well as the presence of an additional power source, impose some restrictions on its use. In addition, the indicators on the prototype board are located inconveniently, it is better to install them in a row horizontally and reduce the dimensions of the front panel of the meter, bringing them closer to the dimensions of the indicators used. Schematic diagram of the meter is shown in fig. 1. Since it was not possible to find the 1HC74N microcircuits used in [595] (shift registers with a storage register), 74HC164N microcircuits were used, in which there is no storage register. Also, indicators were used that have a much higher brightness at low current, which made it possible to reduce the current consumed by the meter to 20 mA and to abandon the additional +5 V voltage regulator.
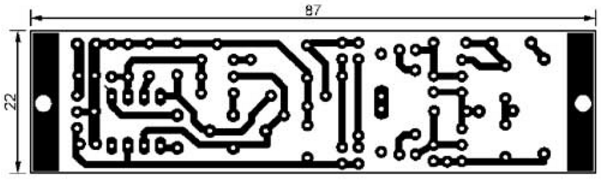
Unfortunately, the use of 74HC164N has a drawback - a parasitic glow of the indicator elements at the time of updating their state. But since the average brightness of such a glow is insignificant and it is further weakened by light filters that usually cover indicators, this cannot be considered a serious drawback. In addition, one of the outputs of the microcontroller is released, which can be used, for example, to connect a temperature sensor. In this case, however, it is necessary to make changes to the microcontroller program. The measured voltage is fed to the input GP0 of the microcontroller DD1 through a divider of resistors R7 and R9. Capacitor C6 improves the stability of the voltmeter readings [1]. The signal from the current sensor (resistor R1) is fed to the input GP1 of the microcontroller through an inverting amplifier on the op-amp DA1. In contrast to [1], here a bipolar +/-8 V op-amp is used, since not all op-amps have the "rail to rail" property and work correctly with a unipolar supply and almost zero output voltage. Bipolar power supply makes it easy to solve this problem, allows the use of very many types of op-amps. Since the voltage at the output of the op-amp can be in the range from -8 to +8 V, a restrictive circuit R10VD9 is used to protect the input of the microcontroller from overload. The trimmer resistor R8 adjusts the gain, and the trimmer resistor R11 sets zero voltage at the output of the op-amp. Diodes VD1 and VD2 protect the input of the op-amp from overload in the event of a break in the current sensor. Due to the relatively low resistance of the current sensor, the deviation of the voltage measurement result when the load current changes from zero to maximum (5,11 A) does not exceed 0,06 V. If the meter is built into a negative polarity voltage source, the current sensor can be connected in front of the output voltage divider of its stabilizer . In this case, the voltage drop across the current sensor will be compensated by the stabilizer feedback circuit. Since the divider current is usually small, it will have almost no effect on the readings of the ammeter, moreover, this effect can be compensated by the trimmer resistor R11. The meter is fed with the output voltage of the power supply rectifier through a converter on transistors VT1 and VT2. This is somewhat more complicated than in [1], since it requires the manufacture of a pulse transformer, but there are no problems with obtaining all the required voltage ratings. The voltage converter is the simplest push-pull oscillator, the circuit of which is borrowed from [2]. The conversion frequency is about 80 kHz. Due to the galvanic isolation between the input and output of the converter, the meter can be built into a voltage stabilizer of any polarity. With the transistors indicated in the diagram, it is operable at an input voltage of 30 to 44 V, while the output voltages vary from approximately 8 to 12 V. Due to the fact that the resistances of the resistors R5 and R6 are chosen quite large, the converter is not afraid of output short circuits. In such cases, the generation simply breaks down. The voltage of 5 V for powering the digital part of the meter was obtained using an integral stabilizer DA2. It is not required to stabilize the supply voltage of the op amp, since it itself is sufficiently resistant to its changes. The ripple voltage with the conversion frequency is suppressed by RC filters at the inputs of the microcontroller DD1. If the ripples with a frequency of 100 Hz are too high, it is recommended to use the method of their reduction described in [3]. Here it is worth saying a few words about the instability of the least significant digit of the measurement result inherent in all digital meters. It always randomly changes by one around the true value. These fluctuations are not due to a malfunction of the instrument, but they cannot be completely eliminated, they can only be reduced by averaging the results of a large number of measurements. The meter parts are mounted on three printed circuit boards made of insulating material foiled on one side. They are designed for the installation of microcircuits in DIP packages. Indicators are mounted on one board (Fig. 2), digital microcircuits and a microcontroller are mounted on the second (Fig. 3). The converter, microcontroller supply voltage stabilizer and current sensor signal amplifier are installed on the third board (Fig. 4).
The placement of parts on the boards and board-to-board connections are shown in fig. 5. Red numbers on it indicate the numbers of the outputs of the pulse transformer T1 at the places of their connection to the board. The transformer itself is fixed on it with clamps from an insulated mounting wire. Blocking capacitors C13 and C14 are soldered directly to the power pins of the DD2 and DD3 microcircuits. As practice has shown, the meter works normally without these capacitors.
The boards of the microcontroller and indicators are connected by brackets made of galvanized steel 0,5 mm thick. The converter and amplifier board is fixed with two M2 screws. The distance between the boards is about 11 mm. This version of the device design (Fig. 6) takes up less space on the front panel of the power supply, in which this device must be built.
Instead of the OU KR140UD708, for example, KR140UD1408 and many other types of op amps can be used. It should be noted that they may require other correction circuits than KR140UD708. This should be taken into account when designing a printed circuit board. Instead of shift registers 74HC164, you can use 74HC4015, but you will have to change the topology of the printed circuit conductors of the board. Diodes KD522B can be replaced by KD510A. Trimmer resistors R8 and R11 - SP3-19, R9 - imported. Permanent capacitors are also imported. Resistor R1 (current sensor) can be made from nichrome wire or ready-made, as done in [1]. I made it from a piece of nichrome tape with a cross section of 2,5x0,8 mm and a length (including tinned ends) of about 25 mm, removed from the thermal relay of the TRN. Transformer T1 is wound on a ferrite ring of size 10x6x3mm, removed from a faulty CFL. All windings are wound with PEV-2 wire with a diameter of 0,18 mm. Winding 2-3 contains 83 turns, windings 1-2 and 4-5 - 13 turns each, and winding 6-7-8 - 80 turns with a tap from the middle. If the output voltage of the rectifier is less than 30 V, the number of turns of winding 2-3 will have to be reduced to approximately 4 turns per volt. Windings 1-2-3 and 4-5 are insulated between each other with one layer of capacitor paper 0,1 mm thick, and from winding 6-7-8 - with two layers of such paper. After checking the performance, the transformer is impregnated with XB-784 varnish. The microcontroller program was written in the MPLAB IDE v8.92 environment in the MPASM assembly language. Two options are offered. The files of the first option are located in the "Common cathode" folder and are intended for a device with LED indicators with common discharge cathodes, including those indicated in the diagram in fig. 1. Files of the second option from the "Common anode" folder should be used when installing LED indicators with common discharge anodes into the device. However, this version of the program has not been tested in practice. The programming of the microcontroller was performed using the IC-prog program and a simple device described in [4]. Establishing the meter consists in setting the trimmer resistor R11 to zero at the output of the op-amp DA1 in the absence of current in the measured circuit. Then, a current close to the measurement limit, but less than it, is supplied to this circuit. By controlling the current with an exemplary ammeter, a trimming resistor R8 achieves equality in the readings of the exemplary and adjusted devices. Having applied and controlled the measured voltage with an exemplary voltmeter, set the corresponding readings on the indicator of the device with a tuning resistor R9. More details about adjustment are written in [1]. Both versions of the microcontroller program can be downloaded from ftp://ftp.radio.ru/pub/2016/05/av-meter.zip. Literature
Author: E. Gerasimov
Machine for thinning flowers in gardens
02.05.2024 Advanced Infrared Microscope
02.05.2024 Air trap for insects
01.05.2024
▪ Criteria for selecting tourists for space flight ▪ Video capsule with remote control as an alternative to the endoscope ▪ Smart pen with spell checker ▪ Aspirin is the culprit of death
▪ site section Preamplifiers. Article selection ▪ article by Aphra Ben. Famous aphorisms ▪ article What is an Ice Age? Detailed answer ▪ article A simple VHF FM receiver. Encyclopedia of radio electronics and electrical engineering
Home page | Library | Articles | Website map | Site Reviews
www.diagram.com.ua |


 Leave your comment on this article: