|
|


 Arabic
 Bengali
 Chinese
 English
 French
 German
 Hebrew
 Hindi
Hindi Italian
 Japanese
 Korean
 Malay
Malay Polish
 Portuguese
 Spanish
 Turkish
 Ukrainian
 Vietnamese
|
ENCYCLOPEDIA OF RADIO ELECTRONICS AND ELECTRICAL ENGINEERING Tone pulse generator in the control stand. Encyclopedia of radio electronics and electrical engineering
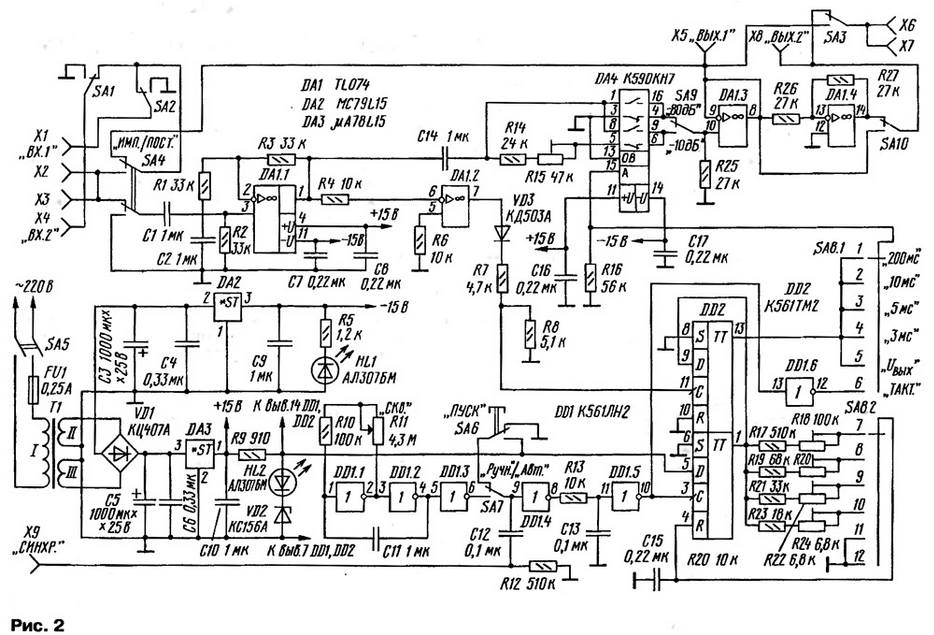
Encyclopedia of radio electronics and electrical engineering / Measuring technology Tone pulses can be used to check the dynamic performance of meters and levelers, as well as noise suppression devices. A stand with a tone pulse generator will also be useful in the study of amplifying and acoustic equipment. The linearity of the frequency response and the accuracy of readings of level meters are easy to check using a conventional audio signal generator, but to check their dynamic parameters, a tone pulse generator (TPG) is needed. Such generators offered by radio amateurs often do not comply with the standards, where the frequency of the sinusoidal signal in pulses is taken to be 5 kHz for checking level meters (DUT), and the beginning and end of the pulses coincide with the signal transitions through "zero". Similar problems arise when adjusting audio signal level autoregulators. The release time of 0,3...2 s is easy to see on the oscilloscope screen, but the response time of the limiter (limiter) or compressor can be less than 1 ms. To measure and observe transients in audio equipment, it is convenient to use the GTI. In this case, it is desirable to change the pulse filling frequency using an external tunable generator. For example, at a duty cycle of 10 kHz, the duration of one period is 0,1 ms, and when observing the operation process, determining the operation time is not difficult. Sound pulses from the GTI output should have a level difference of 10 dB. In foreign literature, it is usually proposed to measure the response time with an abrupt increase in the signal level by 6 dB above the normalized value, but real signals have a significantly larger level difference. The use of such a technique often explains the "clicking" of imported automatic level controls. In addition, in almost any sound generator, you can jump the level by 10 dB, using such a level difference is convenient for observation. Therefore, in domestic practice, it is customary to measure the dynamic parameters of autoregulators when the levels change by 10 dB. Unfortunately, the signal level switches of many generators at the moment of switching give a short-term voltage surge, and it is not possible to use them to measure the response time, since the autoregulator "shuts up". In this case, the GTI can be very useful. Most radio amateurs rarely have to make such measurements, and it is advisable to include such a device in a measuring stand with more features. Its front panel contains switching elements, which are very convenient for connecting measuring instruments and customizable equipment. On fig. 1 shows the approximate location of connectors (terminals or sockets) and switches.
The bench diagram (Fig. 2) shows these switching circuits.
Input sockets Х1 ("ВХ.1") and Х2 ("ВХ.2") are intended for connection of inputs of adjustable equipment. Toggle switches SA1 and SA2 allow you to connect the inputs to connectors X2 and X3 or close them to a common wire when measuring the level of integrated noise. Compared to buttons, toggle switches provide a more visual representation of how inputs are connected. An audio frequency generator and a voltmeter are connected to the central sockets X2 and X3 to control the input voltage. Connectors X5 and X8 are designed to connect outputs of adjustable equipment. One of the outputs can be connected with the SA3 toggle switch to connectors X6 and X7 for measuring instruments. When setting up audio equipment, it is convenient to use a non-linear distortion meter and an oscilloscope. For switching circuits, no power sources are needed, therefore, with such switching it is very convenient to check various equipment. If the dual toggle switch SA4 (Fig. 1) is in the "POST" position, the signal with a constant level supplied to X2, X1, is supplied, depending on the position of the toggle switches SA2 or SA1, to the connectors X4, X4 to the inputs of the equipment under test. If you move SA1 to the upper position, then the signal from the generator will go to inputs 2 and 220 through the GTI circuits. In this case, the stand must be connected to a XNUMX V AC mains. The power switch SA5 is located on the rear panel, and only the LEDs HL1, HL2 (indication "+" and "-") are displayed on the front panel, signaling the presence of a bipolar supply voltage of ±15 V. An electronic switch DA4 is used to form tone pulses. At pins 16 and 4, the signal voltage value changes from the normalized value to zero, and at pins 6, 9, the level difference during adjustment is set by a variable resistor R15. The mode is selected using the SA9 toggle switch. The pulse filling tone signal comes from the generator to the electronic switch through the buffer op-amp DA1.1. The second op-amp DA1.2 is used as a comparator, issuing a synchronization signal for the beginning of the pulse when the filling signal passes through "zero". The pulses from the comparator are fed to the clock input of the D-flip-flop DD2. Input D (pin 9) receives a pulse from a single vibrator assembled on the second trigger DD2. The pulse duration is changed using the SA8.2 switch, which changes the resistance in the C15 charging circuit connected to the R input (pin 4) of the one-shot. To set the pulse duration, a conventional oscilloscope is sufficient. The single vibrator is started by signals coming from a rectangular pulse generator on inverters DD1.1 - DD1.3, or in manual mode with the SA6 "START" button. If the SA7 toggle switch is set to the "AUTO" position, the duty cycle (period) of the pulses is set using the variable resistor R11 "SLE". It is very difficult to observe transient processes on the oscilloscope screen with a tone pulse duration of 3 ms and a large duty cycle. The task is simplified for oscilloscopes that have an external trigger on a standby sweep. For their synchronization on the rear panel of the stand, the socket X9 "SYNCHR." is displayed. The trigger pulse is applied to the electronic key with some delay relative to the synchronizing pulse, determined by the choice of parameters R13, C13. The high level at which the DA4 electronic switch passes the tone signal appears with a positive voltage drop from the comparator after the appearance of a pulse from the one-shot and ends after the end of this pulse (with the next signal drop from the comparator). Thus, the beginning of the tone pulse coincides with the transition of the filling signal through "zero" and the requirement for generating an integer number of periods is satisfied. When the switch SA8 is set to "Uout", the voltage at the control input DA4 is zero and the generator output voltage can be set to correspond to the nominal input level. In the switch position SA8 "STROKE." the DA4 chip is controlled by voltage coming directly from the clock generator. Its switching frequency is set by a variable resistor R11. After the electronic switch, through the DA1.3 repeater and the SA1 and SA2 toggle switches, the tonal pulses are fed to the inputs of the tunable equipment. The device also has an inverter DA1.4 and a switch SA10, which can be used to change the phase of the signal on one of the inputs in relation to the other. Such an inverter is needed, for example, when checking the common-mode signals in stereo systems, in speakers, but it may be more useful instead to assemble a built-in tone generator on this op-amp according to the circuit shown in Fig. 3. In such a generator, it is easy to obtain Kg less than 0,2%, and for many tests it is possible to dispense with the use of an external generator for the bench.
To test the level meters, you need to connect the inputs of two channels (for stereo meters) to the corresponding input connectors. Then, in the "UByx" position of switch SA8, set the normalized value of the signal level with F = 5 kHz at the generator output and check the readings of both channels of the meter. For example, in a level meter [1], the LEDs corresponding to the value "0,3 dB" should light up simultaneously, and the scale error here should not exceed 9 dB. The SA80 toggle switch is set to "-8 dB". Then the switch SA10 is switched in turn to the positions "5 ms", "3 ms" and "200 ms" and check the compliance with the readings of the DUT. The "8 ms" setting of SAXNUMX is used to test average level meters, which unfortunately predominate in household equipment. In order to accurately control the return time value, the variable resistor R11 ("RMS") sets the frequency of the rectangular pulse generator signals, at which, immediately after the LED extinguishing, corresponding to the value of -20 dB on the DUT scale, the next pulse would follow. Then it is not difficult to determine the period of the signals using an oscilloscope. The extinction of the LEDs in both channels must occur synchronously. When checking the dynamic parameters of the autoregulators of the signal level, the position "-10 dB" of the SA9 switch is used. The inputs and outputs are connected to the appropriate connectors. The channel outputs are monitored in turn, although with a two-channel oscilloscope, nothing prevents both outputs from being monitored simultaneously. At the output of the audio frequency generator, when the SA8 switch is in the "UByx" position, a signal is set with a level 10 dB higher than the normalized value. Then switch SA8 to pulses of any duration, and switch SA7 to the "MANUAL" position. The key remains off and allows you to control the voltage at connectors X1 and X2, which must correspond to the normalized value. Then, using switch SA7, the GTI is switched to automatic mode of operation and, having selected the desired pulse duration and duty cycle, transient processes are observed at the output of the autoregulator. If the oscilloscope is running in clock-triggered sleep mode, it is easy to determine the trip time and the presence of trip noise or overshoot. The GTI uses four chips and the current consumption is very low. This allows instead of integrated stabilizers to use simple parametric voltage stabilizers on zener diodes. On the other hand, by installing more powerful integrated stabilizers DA2, DA3 of the DA7815 and DA7915 series, they can be used to power custom device breadboards by placing an additional connector on the rear panel (not shown in the diagram). The microcircuits provide protection against short circuits, which are not uncommon during experiments. The front panel of the stand has dimensions of 195x65 mm. The body of the stand is made of steel. To connect the equipment under test, socket-terminals of the ZMP type are convenient. In addition to them, depending on the equipment being tested, it is possible to install connectors of the appropriate design on the test bench panel, for example, tulip, jack, ONTS-VG or other sockets. Double toggle switch SA4 - PT8-7, P2T-1-1 or similar. Switch SA2 - galetny PG2-8-6P2NTK. Button SA6 "START" can be of any type without fixing, for example, KM1-1. Chip DA2 K590KN7 [2] can be replaced by a similar functional purpose. As DA1, you can use a chip with four op-amps of types LF444, TL084, TL074 [3] or K1401UD4. Mounting the device board - printed or hinged on a breadboard. The stand with GTI can be used for testing compander noise reduction systems, dynamic filters and other sound equipment. Literature
Author: E.Kuznetsov, Moscow
Artificial leather for touch emulation
15.04.2024 Petgugu Global cat litter
15.04.2024 The attractiveness of caring men
14.04.2024
▪ Data can be stored in the dust ▪ New Toshiba Low Voltage MOSFETs
▪ section of the site Protection of electrical equipment. Article selection ▪ article Yes, there were people in our time. Popular expression ▪ article Are there seas on the moon? Detailed answer ▪ article Gobi Desert. Nature miracle ▪ article Antenna tuner. Encyclopedia of radio electronics and electrical engineering
Home page | Library | Articles | Website map | Site Reviews
www.diagram.com.ua |


 Leave your comment on this article: