|
|


 Arabic
 Bengali
 Chinese
 English
 French
 German
 Hebrew
 Hindi
Hindi Italian
 Japanese
 Korean
 Malay
Malay Polish
 Portuguese
 Spanish
 Turkish
 Ukrainian
 Vietnamese
|
ENCYCLOPEDIA OF RADIO ELECTRONICS AND ELECTRICAL ENGINEERING Radio controlled outlet. Encyclopedia of radio electronics and electrical engineering
Encyclopedia of radio electronics and electrical engineering / Clocks, timers, relays, load switches A simple device is described that allows you to remotely turn on and off the voltage in a power outlet. The control takes place over a radio channel, and specialized microcircuits for the encoder and decoder of commands are used, which made it possible to do without microcontrollers. A simple radio control system using ready-made radio modules was described in [1]. The encoding and decoding of commands in it was performed by microcontrollers. Meanwhile, to solve this problem, there are inexpensive specialized chipsets. In particular, encoder PT2262 [2] and decoder PT2272 [3] or their analogues from another manufacturer - SC2262 [4] and SC2272 [5]. To transmit a command, an encoder of this type generates a code word, shown in Fig. 1 . It contains 12 information bits and ends with a synchronization bit. Each of the information bits can have the value of not only the usual zero and one, but also the third "floating", corresponding to an unconnected output of the microcircuit.
The decoder used in the proposed device considers the first eight bits of the code (A0-A7) to be addressable and accepts the command transmitted by the bits D0-D3 only if the received address matches its own, given connection of the corresponding pins of the microcircuit. For transmission over a radio channel, the values of the bits of the word are encoded in accordance with Fig. 2. The duration of the transmission of each bit is 32T, where T is the pulse repetition period of the internal clock generator of the microcircuit. It is usually set to 50...100 µs. A discharge with a value of zero is a twice repeated sequence of a pulse with a duration of 4T and a pause with a duration of 12T. When transmitting a unit, the sequence is reversed - pulses with a duration of 12T are separated by pauses with a duration of 4T. The "floating" state corresponds to the sequence: pulse 4T, pause 12T, pulse 12T, pause 4T. The transmission of the codeword ends with a 4T clock pulse followed by a pause of at least 124T.
The reliability of reception is achieved by the fact that the transmission of the same code word is repeated several times, and the receiver considers the information reliable, having received the same thing several times in a row (usually at least three). The address inputs of the encoder (in the transmitter) and the decoder (in the receiver) must be connected in the same way. They can have three states. Those that correspond to zero in the code word are connected to a common wire, to which a unit corresponds - with a plus of power, the rest (floating) are left free. The oscillation period of the internal clock generator depends on the resistance of the resistor connected between pins 15 and 16 of the encoder chip. In the same way, this period is set in the decoder. But for the encoder and decoder, this period is the same (which is necessary for proper operation) with resistors of different resistances. On fig. 3 shows a diagram of a remote control system encoder on a PT2262 chip (DD1). When you press any of the SB1-SB4 buttons, the supply voltage is supplied to this microcircuit through the opened diode from among VD1-VD4. It generates at its output DOUT a code word of the format discussed above, in which bits A0-A7 have the values specified by connecting the inputs of the microcircuit of the same name. The value of one of the bits D0-D3, which is connected to the pressed button, is equal to one, and the rest - to zero.
The signal from the DOUT output controls the transmitter. A high level on this output turns the transmitter on, and a low level turns it off. This is the so-called amplitude keying (English OOK - on / off keying). In the sets of radio control equipment sold, the transmitter is usually made in the form of a small-sized remote control, to which, for example, a keychain with keys can be attached (Fig. 4). On fig. 5, eight contact pads for setting the address are visible on the transmitter board.
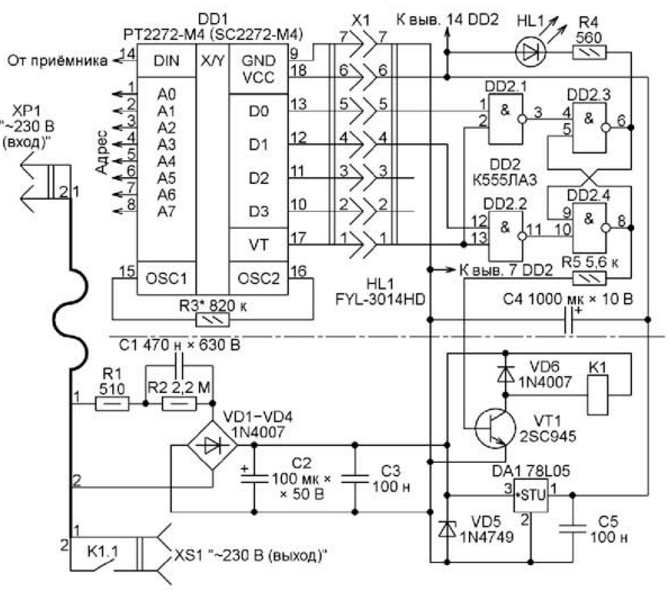
A schematic diagram of the decoder of the radio control system with the control unit of the actuator (socket) is shown in fig. 6. Here, a ready-made receiver module XD-YK04-M4-315MHz (Fig. 7) from the purchased kit is used. It has a decoder chip SC2272-M4 (a complete analogue of PT2272-M4). Of the elements available in the module, the diagram shows only this microcircuit (DD1) and connector X1, with which the module is connected to external circuits. The address inputs of the decoder must be wired similarly to the address inputs of the encoder in the control panel, only in this case the decoder will be able to recognize the command sent to it. The reliability of the received command confirms the high logic level at the output of the VT decoder.
The index M4 in the name of the microcircuit means that it interprets the values of the four most significant digits of the received 12-bit code as a command and does not remember them, outputting them to the outputs D0-D3 only for a short time. Upon completion of the reception of the code message, the levels at these outputs become zero. Such microcircuits are the most common, but there are also microcircuits with the letter L in the suffix. They store the received code on the outputs until the next command is received. To get the same effect with a microcircuit with the index M, a latch on the DD2 microcircuit had to be added to the described device. Pressing the SB2 button on the remote control (see Fig. 3) sets a high level at the D1 output of the DD1 decoder, which is later confirmed by the same level at the VT output. As a result, a low level at the output of element DD2.2 switches the trigger on elements DD2.3 and DD2.4 to a state with a low level at the output of element DD2.3 and high at the output of DD2.4. This opens the transistor VT1. Relay K1 is energized by supplying ~230 V to socket XS1. The trigger and the entire device remain in this state even after the command completes. When you press the SB1 button on the remote control, a high level will appear at the output D0 of the DD1 decoder. The trigger on the elements DD2.3 and DD2.4 will be transferred by this to a low level state at the output of the element DD2.4, which will close the transistor VT1. Open contacts K1.1 will turn off the voltage from the socket XS1. An indicator of this state is the off LED HL1. The power supply unit of the receiver and the actuator from the ~230 V network is made according to a transformerless circuit with a capacitor C1 that dampens excess voltage. The zener diode VD5 limits the voltage at the output of the bridge rectifier on diodes VD24-VD1 to 4 V. Resistor R1 reduces the charging current of capacitor C1 at the moment of power-up. Resistor R2 is needed to discharge this capacitor after the device is disconnected from the mains. The relay installed on the used board is SHD-24VDC-FA. The receiving part of the radio control device is assembled in an electrical box with dimensions of 100x100x50 mm, on the cover of which a conventional network socket for open wiring XS1 is installed. There are three boards inside the box. The pin part of the X1 connector located on the board of the receiver module is inserted into its socket part, installed on the breadboard with a trigger on the DD2 chip. The board with transistor VT1, relay K1 and power unit - from a faulty motion sensor DD-009, on which the originally installed integrated stabilizer 78L09 was replaced by 78L05. In the diagram (see Fig. 6), the parts on this board are located below the dashed line. The appearance of the structure is shown in Fig. 8.
Practice has shown that the reason for the unstable operation of the device may be the insufficient capacitance of the quenching capacitor C1. For example, when the capacitance of this capacitor is 0,33 μF (such a capacitor was installed in the motion sensor) and the relay K1 is activated, the voltage on the zener diode VD5 drops below 5 V, and it should not be less than 7 ... 8 V. Therefore, the capacitor must be replaced with another , larger capacity. The current consumed by the device does not exceed 20 mA. To reduce it, you can replace the K555LA3 chip with a more economical 74HC00. You can refuse to use the HL1 LED. If it is not possible to purchase ready-made modules, then the parts used in the design can be found in the wireless doorbell. The receiver does not have any controls. The high frequency nodes are already configured by the kit manufacturer. It is only necessary to set the same addresses on the pins of the encoder chips in the control panel and the decoder chips in the receiver module. The remaining unused two buttons on the remote can control other devices. For example, by adding a second trigger to the receiver, similar to the one assembled on the DD2 chip, and another actuating unit with its own socket. The radio control system will become two-channel. Literature
Author: A. Pakhomov
Machine for thinning flowers in gardens
02.05.2024 Advanced Infrared Microscope
02.05.2024 Air trap for insects
01.05.2024
▪ Acer Halo Swing smart speaker ▪ Asia will be the first to suffer from global warming ▪ Sun dimming to combat warming
▪ section of the site Encyclopedia of radio electronics and electrical engineering. Article selection ▪ article Systemic circulation. History and essence of scientific discovery ▪ article Injuries of the spine. Health care ▪ article Quartz filter matching. Encyclopedia of radio electronics and electrical engineering
Home page | Library | Articles | Website map | Site Reviews
www.diagram.com.ua |


 Leave your comment on this article: