|
|


 Arabic
 Bengali
 Chinese
 English
 French
 German
 Hebrew
 Hindi
Hindi Italian
 Japanese
 Korean
 Malay
Malay Polish
 Portuguese
 Spanish
 Turkish
 Ukrainian
 Vietnamese
|
ENCYCLOPEDIA OF RADIO ELECTRONICS AND ELECTRICAL ENGINEERING Speaker repair - a guide in pictures. Encyclopedia of radio electronics and electrical engineering
Encyclopedia of radio electronics and electrical engineering / Speakers Today, the number of lovers of good sound who simply throw out a wheezing speaker does not decrease! At the same time, the cost of an analogue can amount to a tangible amount. I think that the following will help fix the speaker for anyone who has hands that grow from the right place ;) Let's go!  Available - a miracle of design thought, once the former column S-30 (10AC-222), now performing the functions of one of the autosubs. A week later, after the mutation, the patient began to show signs of the disease - he emitted extraneous overtones when practicing bass parts, and snored a little. The decision was made to perform an autopsy.  After an autopsy into the light of God, a diseased organ was removed from the patient's body - a woofer speaker 25GDN-1-4, 86 years old. The organ obviously needed an operation - when gently pressing the diffuser, an extraneous overtone was heard (very similar to a quiet click), and when ringing with different tones (produced by the nchtoner program, ussrhi-fi.ru/files/tnsetup.exe), a clearly audible scratching-crackling was heard with a large diffuser stroke and when applying ultra-low (5-15 Hz) frequencies. It was decided to trepan this organ 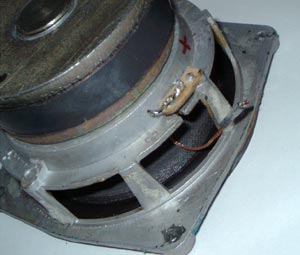 First, the patient's flexible lead wires were soldered off (from the side of the contact pads) 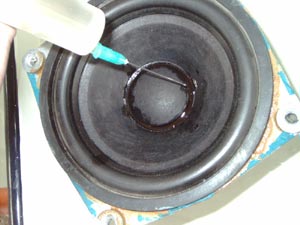 Then, with a solvent (646 or any other capable of dissolving glue, such as "Moment"), using a syringe with a needle, the place where the dust cap and diffuser were glued together (along the perimeter) was wetted ... 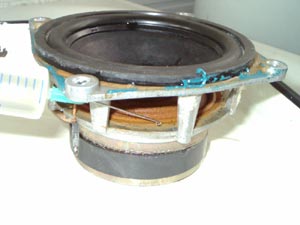 ...where the centering washer is attached to the diffuser (along the perimeter)... 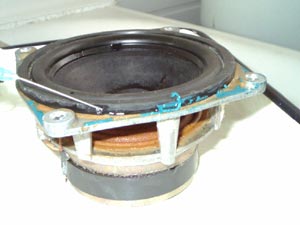 ... and the place of gluing the diffuser itself to the diffuser holder basket (again, along the perimeter)  In this state, the speaker was left for 15 minutes with periodic repetition of the previous three points (as the solvent was absorbed / evaporated) Attention! When working with a solvent, safety measures should be observed - avoid contact with the skin (work with rubber gloves!) And mucous membranes! Do not eat or smoke! Work in a well ventilated area! When wetting - use a small amount of solvent, avoiding getting it on the place of gluing the coil and centering washer! 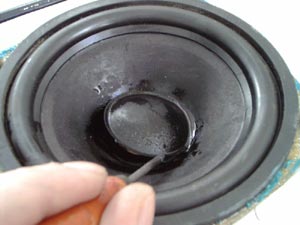 Depending on the type of solvent and air temperature, after 10-15 minutes of the above operations, using a sharp object, you can carefully pry off the dust cap and remove it. The cap should either come off very easily or show very little resistance. If you need to make a significant effort - repeat the operation with wetting its edges with a solvent and waiting!  After peeling off the cap, carefully pour out the remaining solvent from the recess near the coil mandrel (by turning the patient over). 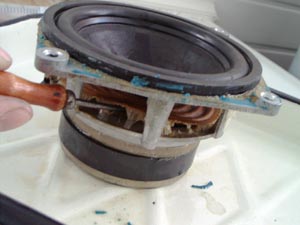 By this time, the centering washer has time to peel off. Carefully, without any effort, separate it from the diffuser holder basket. if necessary - re-wet the place of gluing with a solvent. 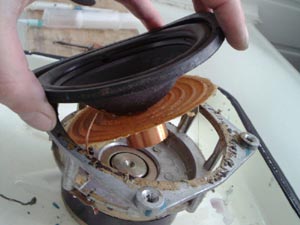 Wet the place where the diffuser is glued to the diffuser holder. We are waiting ... We wet it again and again we are waiting ... After 10 minutes, you can try to peel off the diffuser. Ideally, it should effortlessly separate from the diffuser holder (together with the coil and centering washer). But sometimes it needs a little help (the main thing is accuracy! Do not damage the rubber suspension !!!) 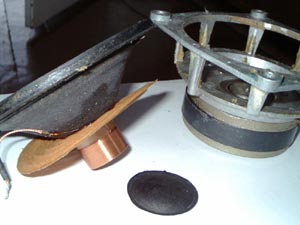 We clean the gluing places from the old glue and dry the disassembled speaker. 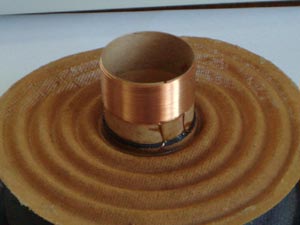 We examine the disassembled patient in order to find a malfunction. Let's look at the coil. In the absence of wear and tear on it and unstuck turns - leave it alone. When peeling off the coil, glue it back with a thin layer of BF-2 glue.  We carefully examine the place where the lead wires are attached to the diffuser. So it is - the patient has the most common malfunction in old speakers with a large diffuser stroke. Lead wire frayed/broken at attachment point. What kind of contact can we talk about when everything hangs on a thread passed to the center of the wiring!  Carefully bend the copper "antennae" ... 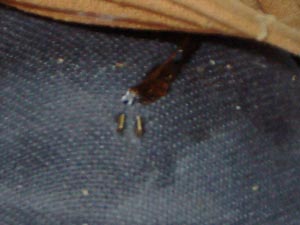 ...and solder the lead wire. We repeat the operation for the second wiring (even if he is still alive - the disease is easier to prevent!)  We cut the supply wires at the break point ...  ... and tin the resulting tips (of course - first we use rosin). This is where caution is needed! Use a small amount of low-melting solder - the solder soaks into the wiring like a sponge!  Carefully solder the wires in place, bend the copper "antennae" and glue (Moment, BF-2) the place where the wires fit to the diffuser. We remember - it is impossible to solder wires to the mounting "antennae"! Otherwise, how can the wiring be changed again in ten years? ;),  We collect the speaker. We put the diffuser with all the "economy" in the diffuser holder, orienting the wires to the places of their attachment. Then we check the correct polarity - when you connect a 1,5V AA battery to the terminals, when you connect the "+" battery to the "+" of the speaker, the diffuser will "jump" out of the basket. We put the diffuser so that its "+" lead wire is at the "+" designation on the speaker basket.  Solder the lead wires to the pads. Please note that the length of the wires has decreased by almost half a centimeter. Therefore, we solder them not as it was at the factory - to the hole in the plate, but with a minimum margin, to maintain the length.  We center the diffuser in its basket with the help of photographic film (or thick paper), which we place in the gap between the core and the coil. The main rule - we place the centering evenly around the perimeter, to maintain the same gap. The amount (or thickness) of the centering should be such that if the diffuser protrudes slightly outward, it freely rests on it and does not fall inward. For the 25GDN-1-4 speaker, 4 pieces of photographic film are enough for this, placed in pairs in front of each other. The length of the film should be such that it would not interfere if you put the speaker on the diffuser. For what - read below. Attach diffuser. We use the indication for the glue used (I recommend "Moment", the main selection criterion, so that the glue can later be dissolved with a solvent). I usually stick the diffuser 1-1,5 cm up so that the centering washer does not touch the diffuser holder basket, then I apply a thin layer of glue on it and the basket with a brush, wait and firmly stick the diffuser inside, additionally press the washer to the basket along the perimeter with my fingers . Then I glue the diffuser (in the retracted state, avoiding distortion).
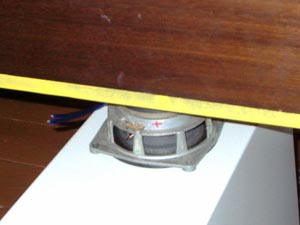
Then we check the speaker for the correctness of the assembly. We take out the centering and carefully check the course of the diffuser with our fingers. He should walk easily, without making overtones (there should be no touch of the coil and core!). We connect the speaker to the amplifier and apply low-frequency tones of low volume to it. Extraneous overtones should be absent. In case of incorrect gluing (skewed, etc.) - the speaker must be glued (see above) and reassembled, being careful! With a quality assembly, in 99% we will get a fully working speaker.  We glue the edge of the dust cap with glue, wait and carefully glue it to the diffuser. Accuracy and accuracy are needed here - a crookedly glued cap does not affect the sound quality, but it really spoils the appearance of the speaker. when gluing, do not press on the center of the cap !!! It can bend from this and you will have to peel it off, straighten it, coat it with a thin layer of epoxy from the inside for strength and glue it back.  We wait until all parts are completely glued (about a day) and put the finished speaker in its place. We enjoy sound that is no worse than a new factory similar speaker. That's it, now you see that fixing the speaker is an easy task. The main thing is slowness and accuracy! So in an hour, slowly, you can repair almost any woofer or midrange speaker of domestic or imported production (for sticking imported speakers, a more powerful solvent is often required, such as acetone or toluene, be careful - they are poisonous !!!) having a similar defect. Yes, after the operation, the former patient got a second wind and cheerful yellow subs continue to do their hard bass work:
Publication: cxem.net
Artificial leather for touch emulation
15.04.2024 Petgugu Global cat litter
15.04.2024 The attractiveness of caring men
14.04.2024
▪ Animals sense the magnetic field thanks to bacteria ▪ The principle of the camera device - the eye of an insect ▪ Single-chip batch processor for signal conversion ▪ Scholars love short headlines
▪ section of the site Data transfer. Article selection ▪ article Don't think down the seconds. Popular expression ▪ Why does lightning flash and thunder rumble in bad weather? Detailed answer ▪ article Battery chargers. Directory ▪ Mouse Lighting article. Encyclopedia of radio electronics and electrical engineering ▪ article Quarter-wave electric welding. Encyclopedia of radio electronics and electrical engineering
Home page | Library | Articles | Website map | Site Reviews
www.diagram.com.ua |


 Leave your comment on this article: