|
|


 Arabic
 Bengali
 Chinese
 English
 French
 German
 Hebrew
 Hindi
Hindi Italian
 Japanese
 Korean
 Malay
Malay Polish
 Portuguese
 Spanish
 Turkish
 Ukrainian
 Vietnamese
|
ENCYCLOPEDIA OF RADIO ELECTRONICS AND ELECTRICAL ENGINEERING Theory and practice of using the 555 timer. Part one. Theoretical. Encyclopedia of radio electronics and electrical engineering
Encyclopedia of radio electronics and electrical engineering / Beginner radio amateur [an error occurred while processing this directive] Probably there is no such radio amateur (Meow, and his cat! - Hereinafter, the note of the Cat), who would not use this wonderful microcircuit in his practice. Well, everyone has heard of her. Its history began in 1971, when Signetics Corporation released the SE555 / NE555 chip called "Integral Timer" (The IC Time Machine). At that time it was the only "timer" chip available to the mass consumer. Immediately after going on sale, the microcircuit gained wild popularity among both amateurs and professionals. There was a bunch of articles, descriptions, diagrams using this device. Over the past 35 years, almost every self-respecting semiconductor manufacturer considered it their duty to release their own version of this microcircuit, including using more modern technical processes. For example, Motorola releases a CMOS version of the MC1455. But with all this, there are no differences in the functionality and location of the conclusions for all these versions. All of them are complete analogues of each other. Our domestic manufacturers also did not stand aside and produce this chip called KR1006VI1. And here is a list of overseas manufacturers that produce the 555 timer and their commercial designations:
In some cases, two names are given. This means that two versions of the microcircuit are produced - civilian, for commercial use and military. The military version is more accurate, has a wide operating temperature range, and is available in a metal or ceramic case. Well, more expensive, of course. Let's start with the body and pins.
The microcircuit is available in two types of packages - plastic DIP and round metal. True, it was still produced in a metal case - now only DIP cases remain. But in case you suddenly get such happiness, I give both drawings of the case. The pin assignments are the same in both cases. In addition to the standard ones, two more types of microcircuits are produced - 556 and 558. 556 is a dual version of the timer, 558 is a quad version.
The function diagram of the timer is shown in the figure right above this sentence. The microcircuit contains about 20 transistors, 15 resistors, 2 diodes. The composition and quantity of components may vary slightly depending on the manufacturer. The output current can reach 200 mA, the consumed current is 3-6 mA more. The supply voltage can vary from 4,5 to 18 volts. At the same time, the accuracy of the timer practically does not depend on the change in the supply voltage and is 1% of the calculated one. The drift is 0,1%/volt and the temperature drift is 0,005%/C. Now we will look at the circuit diagram of the timer and wash its bones, or rather legs - what conclusion is needed for what and what it all means.
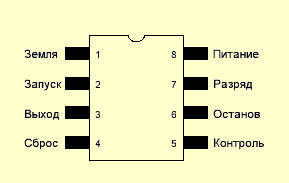
So, conclusions (Meow! It's about legs...): 1. Land. There is nothing special to comment on here - the output, which is connected to the minus of the power supply and to the common wire of the circuit. 2. Launch. Comparator input #2. When a low-level pulse (no more than 1/3 Vpit) is applied to this input, the timer starts and a high-level voltage is set at the output for a time that is determined by the external resistance R (Ra + Rb, see the functional diagram) and the capacitor C - this is the so-called monostable multivibrator mode. The input pulse can be either rectangular or sinusoidal. The main thing is that it should be shorter in duration than the charge time of capacitor C. If the input pulse still exceeds this time in duration, then the output of the microcircuit will remain in a high level state until a high level is set again at the input. The current consumed by the input does not exceed 500nA. 3. Exit. The output voltage changes along with the supply voltage and is equal to Vpit-1,7V (high level at the output). At a low level, the output voltage is approximately 0,25V (with a supply voltage of + 5V). Switching between low-high states occurs in approximately 100 ns. 4. Reset. When a low level voltage (no more than 0,7V) is applied to this output, the output is reset to a low level state, regardless of what mode the timer is currently in and what it is doing. Reset, you know, it's also reset in Africa. The input voltage is independent of the supply voltage - it is a TTL compatible input. To prevent accidental resets, it is strongly recommended to connect this pin to the power plus until it is needed. 5. Control. This pin allows you to access the reference voltage of comparator #1, which is 2/3Vp.m. Usually, this output is not used. However, its use can significantly expand the possibilities of timer control. The thing is that by applying voltage to this pin, you can control the duration of the output pulses of the timer and thus drive a timing chain onto the RC. The voltage applied to this input in monostable multivibrator mode can be from 45% to 90% of the supply voltage. And in the multivibrator mode from 1,7V to the supply voltage. In this case, we get an FM (FM) modulated signal at the output. If this output is still not used, then it is recommended to connect it to the common wire through a 0,01 μF (10nF) capacitor to reduce the level of interference and all sorts of other troubles. 6. Stop. This pin is one of the inputs of comparator #1. It is used as a kind of antipode for pin 2. That is, it is used to stop the timer and bring the output to a (Meow! Quiet panic?!) low level state. When a high level pulse is applied (at least 2/3 of the supply voltage), the timer stops and the output is reset to a low level state. As well as on pin 2, both rectangular pulses and sinusoidal pulses can be applied to this pin. 7. Discharge. This pin is connected to the collector of transistor T6, the emitter of which is connected to ground. Thus, when the transistor is open, capacitor C discharges through the collector-emitter junction and remains in a discharged state until the transistor closes. The transistor is open when the output of the microcircuit is low and closed when the output is active, that is, it is high. This pin can also be used as an auxiliary output. Its load capacity is approximately the same as that of a conventional timer output. 8. Plus nutrition. As in the case of conclusion 1, there is nothing special to say. The timer supply voltage can be in the range of 4,5-16 volts. For military versions of the microcircuit, the upper range is at the level of 18 volts. Absorbed? Let's go further. Most timers require a timing circuit, usually consisting of a resistor and a capacitor. Timer 555 is no exception. Let's look at the diagram of the microcircuit.
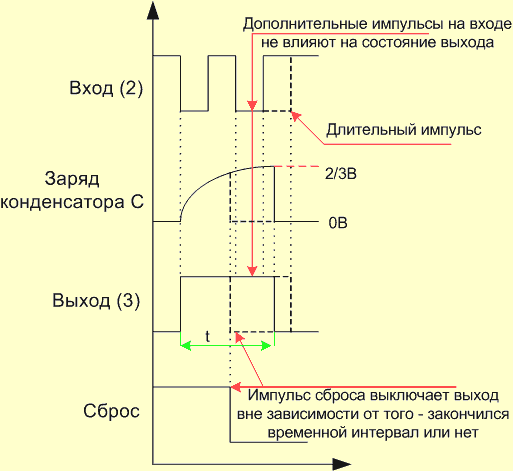
So, let's assume that we have applied power to the chip. The input is in a high level state, the output is low, the capacitor C is discharged. Everyone is calm, everyone is sleeping. And then BOOM - we apply a series of rectangular pulses to the input of the timer. What's happening? The first low-level pulse switches the timer output to a high-level state. Transistor T6 closes and the capacitor starts charging through resistor R. All the while the capacitor is charging, the timer output remains on - it maintains a high voltage level. As soon as the capacitor is charged to 2/3 of the supply voltage, the output of the microcircuit turns off and a low level appears on it. Transistor T6 opens and capacitor C discharges. However, there are two nuances that are shown on the graph by dotted lines. The first - if after the end of the charge of the capacitor, a low voltage level remains at the input - in this case, the output remains active - it maintains a high level until a high level appears at the input. The second one is if we activate the Reset Low Voltage input. In this case, the output will turn off immediately, even though the capacitor is still charging. So, the lyrical part is finished - let's move on to harsh numbers and calculations. How can we determine the time for which the timer will turn on and the RC chain values \u63,2b\u2bnecessary to set this time? The time during which the capacitor charges up to 3% (XNUMX/XNUMX) of the supply voltage is called the time constant, denoted by the letter t. This time is calculated by a formula that is amazing in its complexity. Here she is: t = R*C, where R is the resistance of the resistor in MegaOhm-s, C is the capacitance of the capacitor in microFarads. Time is obtained in seconds. We will return to the formula when we consider in detail the modes of operation of the timer. For now, let's look at a simple tester for this microcircuit, which will easily tell you whether your copy of the timer is working or not.
If after turning on the power both LEDs flash, then everything is fine and the microcircuit is in full working order. If at least one of the diodes is not on, or vice versa, it is constantly on, then such a microcircuit can be flushed down the toilet with a clear conscience or returned back to the seller if you just bought it. Supply voltage - 9 volts. For example, from the Krona battery. Now consider the operating modes of this microcircuit. As a matter of fact, it has two modes. The first is a monostable multivibrator. Monostable - because such a multivibrator has one stable state - off. And we temporarily switch it to the on state by applying some signal to the timer input. As noted above, the time for which the multivibrator goes into the active state is determined by the RC chain. These properties can be used in a wide variety of schemes. To start something for a certain time, or vice versa - to form a pause for a given time. The second mode is the pulse generator. The microcircuit can produce a sequence of rectangular pulses, the parameters of which are determined by the same RC chain. (Meow! I want a chain. On the tail. Well, or a bracelet. Antistatic.) Still, our cat is a bore. Let's start from the beginning, that is, from the first mode.
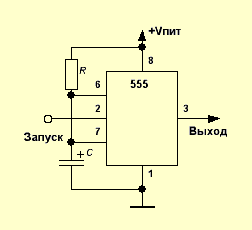
The circuit for switching on the microcircuit is shown in the figure. The RC circuit is connected between the plus and minus of the power supply. Pin 6 - Stop is connected to the connection of the resistor and the capacitor. This is the input of comparator #1. Pin 7 - Discharge is also connected here. The input pulse is applied to pin 2 - Start. This is the input of comparator #2. A completely simple circuit - one resistor and one capacitor - much easier? To improve noise immunity, you can connect pin 5 to a common wire through a 10nF capacitor. So, in the initial state, the output of the timer is low - about zero volts, the capacitor is discharged and does not want to be charged, since the T6 transistor is open. This state is stable and can continue indefinitely. When a low-level pulse is received at the input, comparator No. 2 is activated and switches the internal trigger of the timer. As a result, a high voltage level is set at the output. Transistor T6 closes and capacitor C begins to charge through resistor R. All the while it is charging, the output of the timer remains high. The timer does not respond to any external stimuli, if they arrive at pin 2. That is, after the timer is triggered from the first pulse, further pulses have no effect on the state of the timer - this is very important. So what's going on with us? Yes, the capacitor is charging. When it is charged to a voltage of 2 / 3V supply, comparator No. 1 will work and, in turn, switch the internal trigger. As a result, the output will be set to a low voltage level, and the circuit will return to its original, stable state. Transistor T6 will open and discharge capacitor C. The time for which the timer, so to speak, "loses its temper" can be from one millisecond to hundreds of seconds. It is considered like this: T = 1.1 * R * C Theoretically, there are no limits on the duration of the pulses - both in terms of the minimum duration and the maximum. However, there are some practical limitations that you can get around, but first you should think about whether it is necessary to do this and whether it is easier to choose another circuit solution. So, the minimum values set in a practical way for R is 10kΩ, and for C - 95pF. Is it possible to do less? I guess, yes. But at the same time, if you further reduce the resistance of the resistor, the circuit will start to crack too much electricity. If you reduce the capacitance C, then all sorts of parasitic capacitances and interference can significantly affect the operation of the circuit. On the other hand, the maximum value of the resistor is approximately 15MΩ. Here, the limit is imposed by the current drawn by the Stop input (about 120nA) and the leakage current of capacitor C. Thus, with too large a resistor value, the timer will simply never turn off if the sum of the capacitor leakage currents and the input current exceeds 120nA. Well, as for the maximum capacitance of the capacitor, the point is not so much in the capacitance itself, but in the leakage current. It is clear that the larger the capacitance, the greater the leakage current and the worse the accuracy of the timer will be. Therefore, if the timer will be used for long time intervals, then it is better to use capacitors with low leakage currents - for example, tantalum. Let's move on to the second mode.
Another resistor has been added to this circuit. The inputs of both comparators are connected and connected to the connection of the resistor R2 and the capacitor. Pin 7 is connected between the resistors. The capacitor is charged through resistors R1 and R2. Now let's see what happens when we apply power to the circuit. In the initial state, the capacitor is discharged and the inputs of both comparators have a low voltage level close to zero. Comparator #2 toggles the internal trigger and sets the timer output high. Transistor T6 closes and the capacitor begins to charge through resistors R1 and R2.
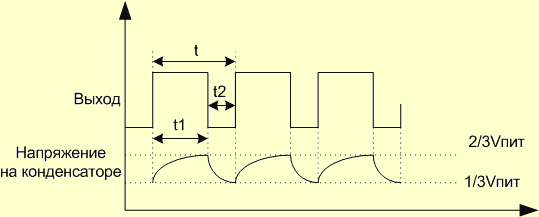
When the voltage on the capacitor reaches 2/3 of the supply voltage, comparator #1 in turn switches the trigger and turns off the timer output - the output voltage becomes close to zero. Transistor T6 opens and the capacitor starts to discharge through resistor R2. As soon as the voltage on the capacitor drops to 1/3 of the supply voltage, comparator No. 2 will switch the trigger again and a high level will appear at the output of the microcircuit again. Transistor T6 will close and the capacitor will start charging again ... fuuu, even my head is spinning already. In short, as a result of all this shamanism, at the output we get a sequence of rectangular pulses. The pulse frequency, as you probably already guessed, depends on the values of C, R1 and R2. It is determined by the formula:
The values of R1 and R2 are substituted in Ohms, C - in farads, the frequency is obtained in Hertz. The time between the beginning of each next pulse is called the period and is denoted by the letter t. It consists of the duration of the pulse itself - t1 and the interval between pulses - t2. t = t1+t2. Frequency and period are concepts inverse to each other and the relationship between them is as follows: f = 1/t. t1 and t2, of course, can and should also be calculated. Like this: t1 = 0.693(R1+R2)C; t2 = 0.693R2C Well, the theoretical part seems to be finished. In the next part, we will consider specific examples of turning on the 555 timer in various schemes and for a wide variety of uses. Publication: radiokot.ru
Machine for thinning flowers in gardens
02.05.2024 Advanced Infrared Microscope
02.05.2024 Air trap for insects
01.05.2024
▪ Robots will take care of parking ▪ Transcend TS128GMTS810 Solid State Drive ▪ All-in-one computer Shuttle X50V5 ▪ The robot copies a one-year-old child
▪ section of the site Protection of electrical equipment. Article selection ▪ article Rescue of the drowning is the work of the drowning themselves. Popular expression ▪ article How many cases are there in Russian? Detailed answer ▪ Chistets article. Legends, cultivation, methods of application ▪ article 144 MHz band power amplifier. Encyclopedia of radio electronics and electrical engineering
Home page | Library | Articles | Website map | Site Reviews
www.diagram.com.ua |


 Leave your comment on this article: