|
|


 Arabic
 Bengali
 Chinese
 English
 French
 German
 Hebrew
 Hindi
Hindi Italian
 Japanese
 Korean
 Malay
Malay Polish
 Portuguese
 Spanish
 Turkish
 Ukrainian
 Vietnamese
|
ENCYCLOPEDIA OF RADIO ELECTRONICS AND ELECTRICAL ENGINEERING Battery discharge / charge indicator. Encyclopedia of radio electronics and electrical engineering
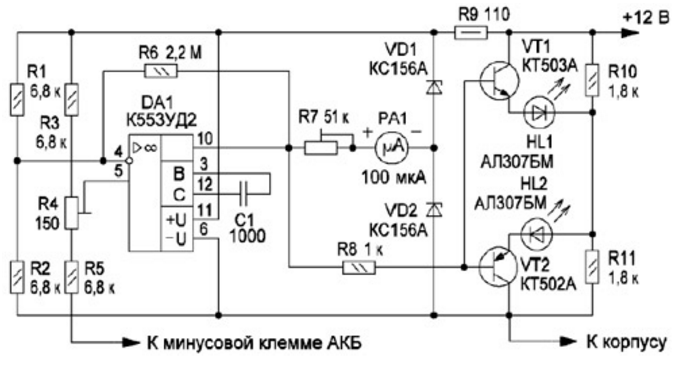
Encyclopedia of radio electronics and electrical engineering / Automobile. Batteries, chargers The proposed device makes it possible to constantly monitor the charging and discharging current of the vehicle battery and does not require any changes to the standard electrical circuit of the vehicle. Previously, a pointer device (ammeter) was placed on the dashboard in cars, with which it was possible to constantly monitor the process of charging or discharging the battery (battery). Modern cars are equipped with a lot of additional equipment, such as sound and video playback devices, all kinds of heating and heating, air conditioning, etc., which leads to an additional load on the generator and battery. Yes, and the newly introduced rule to drive with daytime running lights or dipped beam headlights constantly on also creates additional loads on the generator-battery system. To control the current of the generator and the battery, I assembled an electronic ammeter, the circuit of which is shown in fig. 1.
The operation of the ammeter is based on determining the direction and value of the current in the wire connecting the negative terminal of the battery to the "mass" of the car. The control is carried out by a pointer microammeter RA1 with zero in the middle of the scale by the deviation of its arrow and by the glow of the red LED HL1 (discharging the battery) and green HL2 (charging the battery). The device can be simplified by eliminating the RA1 pointer device with a trimming resistor R7 or LEDs HL1, HL2, transistors VT1, UT2 and resistors R8, R10, R11. The direction and value of the current is determined by the node assembled on the op-amp DA1 (KR553UD2), which is balanced in voltage by resistive dividers R1, R2 and R3-R5. The high-current wire connecting the negative terminal of the battery to the body ("ground") of the car serves as a resistive current sensor. To the output of the wire fixed to the negative terminal of the battery, the lower output of the resistor R5 of the balancing circuit of the divider R3-R5 is connected according to the diagram. Depending on the current in the sensor and its direction, the voltage drop and its sign on it will change. Accordingly, the output voltage of the op-amp DA1 will change in proportion to the current in one direction or another relative to half the supply voltage. Zener diodes VD1 and VD2 stabilize the supply voltage of the device and create an artificial midpoint for the operation of the dial indicator RA1, and resistors R10, R11 - the midpoint for the LEDs HL1, HL2. To reduce the load on the op-amp DA1, the LEDs are connected to its output through current amplifiers (emitter followers) assembled on transistors VT1, VT2. The device is assembled on a single-sided printed circuit board (Fig. 2) with dimensions of 70x40 mm. Transistors VT1, VT2 - any low-power corresponding structure. The current indicator is a microammeter for 50 ... 100 μA with zero in the center of the scale. Of the LEDs, any low-power corresponding glow colors are suitable. We can replace the K553UD2 operational amplifier with any of the 140, 153, 544 series or other general-purpose ones with a supply voltage of at least 12 V, but the printed circuit board design for the op-amp may need to be changed.
A properly assembled device must be adjusted. First, it is connected to a voltage source of 12 ... 14 V, having previously closed the lower output of the resistor R5 according to the circuit to the negative power line. The trimming resistor R4 sets the zero readings of the pointer device RA1. Further adjustment is carried out by mounting the device in the car. During installation, it is necessary to connect the wire coming from the resistor R5 directly to the negative terminal of the battery, and the wire going to the car body - to the attachment point of the negative battery wire with the car's ground. The +12 V wire is connected to any positive wire, where the voltage is turned on by the ignition switch. At the maximum load current, for example, starting the engine (turning on the starter), the resistor R7 slider sets the maximum deviation of the microammeter needle. The appearance of the mounted printed circuit board and the indicator assembled in a plastic case are shown in fig. 3 and fig. 4.
Author: N. Kamenev
Artificial leather for touch emulation
15.04.2024 Petgugu Global cat litter
15.04.2024 The attractiveness of caring men
14.04.2024
▪ Combat robot controlled via satellite ▪ Magnetic GPS in salmon noses
▪ section of the site Visual illusions. Article selection ▪ article Wedge - with a guarantee. Tips for the home master ▪ article What is the largest flying bird? Detailed answer ▪ article Tire work. Standard instruction on labor protection ▪ article Guessing the general meaning of cards. Focus Secret
Comments on the article: Sergei Well done! Necessary thing.
Home page | Library | Articles | Website map | Site Reviews
www.diagram.com.ua |


 Leave your comment on this article: