|
|


 Arabic
 Bengali
 Chinese
 English
 French
 German
 Hebrew
 Hindi
Hindi Italian
 Japanese
 Korean
 Malay
Malay Polish
 Portuguese
 Spanish
 Turkish
 Ukrainian
 Vietnamese
|
ENCYCLOPEDIA OF RADIO ELECTRONICS AND ELECTRICAL ENGINEERING Frequency synthesizer for broadcasting FM-FM receiver based on LM7001J and PIC16F84A chips. Encyclopedia of radio electronics and electrical engineering
Encyclopedia of radio electronics and electrical engineering / Audio equipment We were inspired to create this device by the lack of a simple, inexpensive and, most importantly, affordable frequency synthesizer on the Internet. All components were purchased at the Chip and Dip store in Voronezh without any problems. The search, for example, for an LCD indicator with an HT1613 controller took more than a year in various companies in the city with no visible results. Commonly used synthesizer microcircuits are inaccessible and expensive, microcontroller firmware is often missing, for example [1], you say, guys, solder, and if you please pay for the firmware. Nowadays, this is understandable, but radio amateurs have always been a disinterested people - I did it myself, share with a friend a diagram, a detail and just a good idea. The device is based on an inexpensive (38 rubles) SANYO LM7001J frequency synthesizer, which is often used in foreign household radio equipment. MT-10T7-7T (75 rubles) by MELT was used as an LCD indicator, which has a lot of advantages over the frequently used HT1613: the presence of decimal points, ease of pairing with PIC16F84A in terms of signal levels, a wider viewing angle and most importantly - availability. The idea to use the LM7001J was taken from [2], for which many thanks to him!
The circuit diagram is based on Datasheet LM7001JM(Sanyo).pdf, mt-10t7-7t.pdf, downloaded from the Internet. The scheme is drawn in the sPlan 5.0 Rus editor - if there is no sPlan 5.0 Rus.
To clock the microcontroller, a frequency of 400 kHz was used from the internal divider LM7001J (SYC signal), thus saving 4 MHz quartz and two capacitors. The circuit was tested on a receiver model based on K174PS1 and TDA1083. To decouple the VCO circuit and amplify the signal, a buffer amplifier based on a BFR93A transistor was used. Of course, you can use another VCO on a chip or on discrete elements. The KV132AT varicap is used as a control element included in the VCO circuit. These varicaps are sold in bags of 3. matched according to the parameters, so the remaining 2 can be used to rebuild the UHF contours.
To cover the frequency range of 65.8 - 108 MHz, the low-pass filter power had to be increased from 5 to 9 volts, for this a separate stabilizer 78L09 was used, and the capacitors of the VCO circuit were removed, so that the only capacitance of the VCO circuit was a varicap. For reference, the control voltage at a frequency of 69.4 MHz is -2.8 V, and at a frequency of 107.6 MHz -6.12 V. Naturally, these voltages can be shifted to one side or the other by stretching (compressing) the turns of the VCO coil. The outputs of the LM7001J B01, B02, B03 change state when switching from 74 MHz to 88 MHz, so they can be used for any purpose, for example, to switch VCOs if there is a need for separate VCOs for each band, or to indicate the included range with LEDs. These outputs are open drain, so external resistors are required.
Resistor R13 to adjust the contrast is selected for a specific instance of the indicator. Details and design. There are no special requirements for details, it is only desirable that C1 and C2 be with a small TKE. Resistors MLT -0.125 W, R5 - chip 1206, capacitors - imported analogue K10-17B, C3 - chip 0805. Quartz in the HC-49U case or "boat". The connector on the board is PLS 8 R, angled single-row, pitch 2.54 mm, the counterpart is a PBS 8 socket, buttons TS-A6PS-130. The field effect transistor can be used with the letters A, B, I. The indicator can be used MT-10T7-3T. Printed circuit boards are routed using the Sprint Layout 4.0 Rus program, for LM7001J cases: SO-20 in 1 version and DIP16 in 2 versions, and are located in the files plata1.lay, plata2.lay, plata3.lay.
The board is made using the iron-on method using an HP LaserJet 1010 laser printer from one-sided fiberglass 1.5 mm thick. A DIP16 socket is installed under the PIC84F18A. Buttons with 13mm long pushers, which can be fitted with caps of a larger diameter or use buttons with a shorter pusher length, but install the buttons on a separate small board that can be placed in a convenient place. Quartz is fixed in the "lying" position, the field effect transistor as low as possible. The indicator is attached to the board by means of threaded posts with an M3 thread 10 mm high and is connected to the main board with a MGTF 0.14 wire. The connector is separated in such a way that when inserted into the mating part, the end of the synthesizer board comes into contact with the backplane on which the receiver board and the AC power supply are installed. Board 3 is wired so that the connector is soldered into the backplane. Additionally, the synthesizer board is attached to the cross-board using 2 duralumin corners and screws with M3 nuts for which holes are provided. Photos of the finished synthesizer are attached.
The selection of low-pass filter elements was not required, but it may be necessary to select a field-effect transistor, so that the output of the low-pass filter has a constant voltage of 5.5 -6.5 volts.
Synthesizer control The PIC16F84A microcontroller memorizes and stores tuning frequencies (channels) in non-volatile memory, switches channels and configures them, determines the default channel to which the receiver is tuned when the receiver is turned on, displays the number of the current channel and the corresponding reception frequency on the liquid crystal indicator. The "edge to edge" tuning time is about 30 seconds, the transition from 74 MHz to 88 MHz and back is implemented in software. The receiver is controlled using four buttons: "Increase" - (UP), "Decrease" - (DOWN), "Setting" - (F), "Work" - (C). After turning on the receiver, it is in the "Operation" mode and is tuned to the default channel.
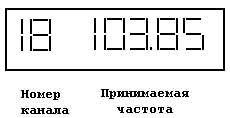
The view of the LCD display in the "Operation" mode is shown in Fig.8. In this mode, the "Increase" and "Decrease" buttons select the channel previously tuned to the desired frequency. The "Setting" button switches to the frequency setting mode of the channel, the number of which is displayed on the LCD. In the "Setting" mode, the display looks like shown in Fig.9.
The "Increase" and "Decrease" buttons set the frequency, which is stored in the EEPROM when the "Operation" button is pressed, and when these buttons are pressed once, the frequency changes by one step, and when the button is held down, the synthesizer is accelerated. Pressing the "Run" button again makes the current channel the default channel. You can download the firmware of the microcircuit, as well as the wiring files of the circuit here. Literature
Author: Khlopovskikh S.V., Voronezh, Russia; Publication: radioradar.net
Machine for thinning flowers in gardens
02.05.2024 Advanced Infrared Microscope
02.05.2024 Air trap for insects
01.05.2024
▪ New application for the hydrogen engine ▪ Walking is good for the brain ▪ Ultrasonic gesture control of gadgets ▪ Kingston SDHC/SDXC UHS-I Speed Class 3 (U3) Memory Cards ▪ Restoration of hair growth on damaged skin
▪ section of the site Biographies of great scientists. Article selection ▪ article And I, for songs and for a dream, do not need a million. Popular expression ▪ article Who are anteaters? Detailed answer ▪ article Nymphaeum shield-leaved. Legends, cultivation, methods of application ▪ Antenna Beverage article. Encyclopedia of radio electronics and electrical engineering
Home page | Library | Articles | Website map | Site Reviews
www.diagram.com.ua | |||||||||||||||


 Leave your comment on this article: