|
|


 Arabic
 Bengali
 Chinese
 English
 French
 German
 Hebrew
 Hindi
Hindi Italian
 Japanese
 Korean
 Malay
Malay Polish
 Portuguese
 Spanish
 Turkish
 Ukrainian
 Vietnamese
|
CHILDREN'S SCIENTIFIC LABORATORY
Periscope for all-round visibility. Children's Science Lab
Directory / Children's Science Lab Before proceeding with the construction of such an "all-seeing" periscope, let's recall the device of a conventional periscope using the example of its elementary model (Fig. 1).
By the way, we note that a real periscope used in military equipment is, of course, not very simple. It contains mirror prisms, an eyepiece and a lens system. And all this in double quantity - for each eye. Nevertheless, the simplest design of the periscope will allow interesting observations. To build it, you will need two identical rectangular mirrors, for example, pocket ones from a haberdashery store, approximately 30x40 mm in size. The body of the periscope is made of cardboard. Internal section of a pipe and elbows - 30x30 mm. Pipe length - 250 ... 500 mm (excessive length will not only make the structure heavier, but also narrow the field of view), knee - 70 ... 80 mm. Having glued the pipe pattern, strengthen its joint with a glued strip of thick paper (for example, whatman paper). From the side of the knees in the pipe, two windows measuring 30x30 mm are cut out, in which mirrors are fixed with PVA glue, fixing them with four (two at the top and bottom) matches, cleaned of sulfur. Install the mirrors at an angle of 45 degrees (the lumen of the upper window should be visible in the viewing window). In the knees, they also make a window with dimensions of 30x30 mm. However, part of the cut material - a strip 1 cm wide - is not removed, but is used to attach the elbow to the pipe. To exclude parasitic glare (flare), the inner surface of the pipe and elbows is blackened, for example, with ink, and then coated with a colorless nitro-varnish of the NTs brand. Outside, it is desirable to cover the periscope with any varnish, preferably with a bright nitro varnish. This will give it elegance, as well as strength and resistance to moisture.
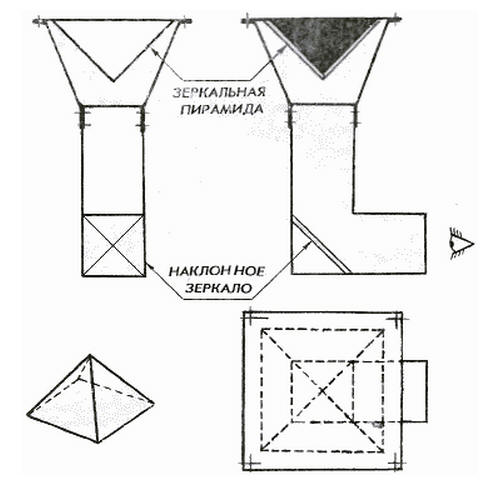
And now let's consider the device of a "comprehensive" periscope, the diagram of which is shown in Figure 2. A mirror is installed below, as in the simplest periscope. But in the upper part there is no longer a mirror, but a mirror pyramid, reminiscent of an inverted Egyptian one. It is fixed on a square sheet cut out of plywood or hardboard and suspended on four posts made of a steel tube with a diameter of 5 ... 6 mm with ends flattened by a hammer. Thin racks are needed in order not to greatly obscure the image visible in the lower mirror. Otherwise, all-round visibility will deteriorate due to the so-called "dead zones" that are closed to observation. The pyramid must be raised sufficiently high above the upper edge of the pipe. This makes it possible, if necessary, to see through the viewing hole the entire mirror face of the pyramid, looking into it a little from the side.
What will we see in such a periscope? It turns out that the image will be "split" into four quarters, more precisely, quadrants (Fig. 3). The left one will be the left view, the top one will be the front view, the right one will be the right view, and the bottom one will be the rear view. Images of a stylized man show how the environment will be transformed in this curious periscope. After passing through the system of mirrors, the reflections of the lower parts of the observed objects will be in the middle of the resulting picture, and the upper ones - along its perimeter.
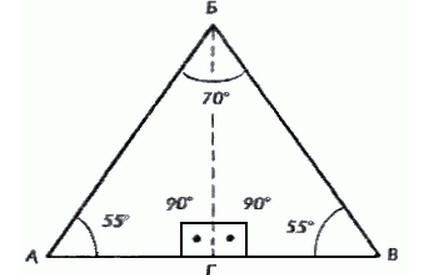
How to cut out the mirrors of the pyramid in order to correctly compose it? Since they are all the same, consider one of them. It is an isosceles triangle ABV (Fig. 4). When the periscope is vertical, the mirrors (faces of the pyramid) should be tilted at a 45 degree angle to the horizon. Mathematical calculations show that the ratio of the sides of the triangle ABV will be as follows: AB=BV=0,5ABv3=0,866AB. For reference: the height of the BG can be found from the ratio AG=0,5ABv2=0,7071 AB. Angles A and B are 54,736 degrees, and angle B is 70,528 degrees. Naturally, in practice, such accuracy is not needed, so we will take 55 and 70 degrees, respectively. You can also make a pyramid from equilateral triangles. As you know, they have all angles equal to 60 degrees, which greatly simplifies the marking and cutting of the mirror (with a diamond or glass cutter), as well as the assembly of the pyramid. But in this case, Andrey's periscope will "look" not strictly horizontally, but slightly down (at an angle of approximately 10 degrees to the horizon). However, this does not matter much, especially if the area being monitored is limited in range.
Thus, Andrei's periscope, like Pushkin's golden cockerel, "looks" at the four cardinal points - north, east, south and west. And what if we add intermediate points to them: northwest, northeast, southeast and southwest? It is clear that then the panorama of the area will be presented more clearly - in the form of eight sectors (Fig. 5). The aspect ratios of these triangles are as follows: AB=BV=1,78AB, -BG=1,71AB. Angle B is 33, and angles A and C are 73,5 degrees each. The upper knees of the periscope and in this case do not need to be done. Vertical tube of octagonal or round section. The top sheet, to which the mirror pyramid is attached, is also octagonal or round. To connect it to the pipe, you will need four or eight racks.
The shape of the lower mirror for an octahedral pipe is shown in Figure 6. The markup begins with the choice of size X, which corresponds to the width of the inner face of the pipe. If it is round, the mirror is cut out in the shape of an ellipse. Its geometric parameters are found from the following approximate ratios: the major axis is 1,5d, the minor axis is d, the interfocal distance is 1,8d, where d is the inner diameter of the pipe and elbow. How to build an ellipse can be found in the reference book on higher mathematics. First, an ellipse is built on hard cardboard, cut out and made sure that it fits well with the pipe - it freely stands there at the right angle. Then this template is applied to a mirror surface and circled with a Polycolor pencil, a glass cutter or a ballpoint pen. Cut out an oval with ordinary, but always sharp scissors, immersing them, a mirror and hands in a bucket of water and taking precautions. Glass, including mirror glass, in water, as a rule, is cut without problems. If, as a result, the edges of the ellipse turn out to be too uneven, they are ground (mainly from cracking) with a whetstone or whetstone. The end face and the edge of the back of the resulting workpiece are varnished so that the mirror substrate does not peel off. Pyramid mirrors should be placed on a plywood or hardboard base, which is knocked down with small carnations or joined with carpentry, casein and the like glue on a frame of wooden planks and attached to the top sheet. To install mirrors, use the same glue or grades 88N, 88NP, BF-2, or better "Moment". Authors: A.Virshiev, V.Vladimirov
▪ Scales on the Archimedean spiral
Artificial leather for touch emulation
15.04.2024 Petgugu Global cat litter
15.04.2024 The attractiveness of caring men
14.04.2024
▪ Sony camera puts the image right in your eyes ▪ World's deepest fish discovered ▪ Lethal dose of chocolate calculated ▪ The phone recognizes the owner in person
▪ section of the site Protection of electrical equipment. Article selection ▪ article The boy is frisky, curly, in love. Popular expression ▪ article How does the automatic control valve for space heating work? Detailed answer ▪ article Amphora knot. Travel Tips ▪ article A simple speech signal limiter. Encyclopedia of radio electronics and electrical engineering
Home page | Library | Articles | Website map | Site Reviews
www.diagram.com.ua |


 See other articles Section