|
|


 Arabic
 Bengali
 Chinese
 English
 French
 German
 Hebrew
 Hindi
Hindi Italian
 Japanese
 Korean
 Malay
Malay Polish
 Portuguese
 Spanish
 Turkish
 Ukrainian
 Vietnamese
|
ENCYCLOPEDIA OF RADIO ELECTRONICS AND ELECTRICAL ENGINEERING Cell phone battery diagnostics. Encyclopedia of radio electronics and electrical engineering
Encyclopedia of radio electronics and electrical engineering / Chargers, batteries, galvanic cells With long-term storage and non-compliance with the charge-discharge modes of operation, cell phone battery packs become unusable. An attempt to restore the battery capacity by a long charge or special charging modes does not always lead to the desired result. Nickel-cadmium and nickel-metal hydride batteries have a “memory effect” compared to lithium-ion batteries, do not allow long connection to the charger and need training cycles. Lithium polymer batteries are resistant to overcharging, but are subject to aging. It is impossible to diagnose a cell phone battery by simply loading it on a discharge resistor, since there is a protection circuit inside the battery pack that limits the current and voltage during charging and discharging. The protection node, for example, of lithium batteries consists of two microcircuits: one operates in comparator mode, the second contains two field-effect transistors with diodes connected in the opposite direction. The node performs the following functions:
The battery can be discharged with a current not exceeding the current of the standby transmission mode (150 ... 200 mA). At a higher current, the protection circuit will disconnect the battery from the load 10.20 ms after connection, and the discharge current will drop to almost zero. When opening and re-closing the discharge circuit, the discharge current reappears. Thus, in order to determine the technical condition of a cell phone battery, it must be loaded with a pulsed discharge current with a certain pulse repetition rate. This method is also applicable to the diagnosis of alkaline and acid batteries of any capacity. It all depends on the power of the batteries and discharge circuits. The shape of the discharge pulse of the device for diagnosing cell phone batteries should repeat the shape of the load current of the battery in the digital signal transmission mode in the GSM standard: pulse current - 1,5 A, pulse duration - 567 μs, repetition rate - 4,61 ms. Current consumption in pauses - 200 mA. The scheme of the device for diagnosing cell phone batteries (Fig. 1) consists of:
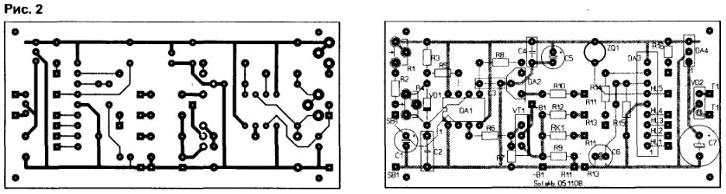
The circuit is powered from a mains source through an integrated voltage regulator DA4. In the initial state, at the output 3 of the DA1 timer, the voltage level is close to zero, since when the power is turned on at the input of the lower comparator DA1, the voltage level is higher than 1/3 Un. The circuit can be in this state for an arbitrarily long time. When you press the SB1 "Start" button, a low voltage level appears at input 2 of DA1, the lower timer comparator is activated, and the internal trigger switches. Capacitor C2 is charged through resistors R3 and R4, and at this time, a high voltage level is maintained at the output (pin 3) of DA1. When C2 reaches a voltage of 2/3 Un, the upper comparator fires and resets the trigger, and the internal transistor discharges capacitor C2 through resistor R5. When the voltage on C2 drops to 1/3 Un, the timer stops working. The duration of a single pulse at output 3 DA1 can be determined by the formula t=1,1C2(R3+R4). This duration is smoothly changed by a variable resistor R4. Pin 5 of DA1 is connected internally to the divider point, which is the reference for the upper comparator (with a voltage level of 2/3Un). Using this pin allows you to change the timer operation mode. In this device, this output is used to stabilize the measurement mode and temperature correction. Changing the voltage at pin 5 DA1 is performed using the DA2 microcircuit - an adjustable parallel voltage regulator (adjustable zener diode). The stabilizer chip has its own overload and overvoltage protection devices. Thermistor RK1 allows you to take into account changes in the state of the battery when the temperature rises or falls. With an increase in the voltage across the resistor R9 in the emitter circuit of the transistor VT1, the parallel stabilizer DA2 opens at control input 1, its cathode-anode resistance decreases, and the voltage at pin 5 of DA1 drops. Due to this, the frequency at the output of the timer DA1 decreases, which leads to a decrease in the voltage at the load R9. Transistor VT1 connects the load (discharge resistor R9) to the battery GB1 The collector circuit of the transistor includes the battery under test, and in the emitter circuit, in addition to the load, the voltage and temperature control circuits (RK1-R11-R10) and battery capacity (R12-R13-R14). The voltage drop across R9 when the transistor VT1 is opened by the next pulse of the generator is the greater, the larger the battery capacity and the lower its internal resistance. From the variable resistor R13 through the resistor R14, the control voltage is supplied to the input amplifier of the five-channel switch DA3. LEDs HL1 .HL5 are connected to the terminals of the keys of the comparators K1.K5. The voltage from input 8 DA3 after amplification is supplied to the internal voltage divider. The keys at the inputs of the comparators open when this voltage exceeds the reference level. The larger the signal, the more keys are open. When the voltage at the input 8 DA3 0,25 V, all LEDs are lit. For ease of use of the device, it is recommended to distribute the LEDs by color in the following order: HL1 - red (full discharge), HL2 - orange (minimum charge), HL3 and HL4 - green (the battery is 50% charged), HL75 - blue (5% charger). When the GB100 is fully charged, an audible signal is activated (the ZQ1 sounder is triggered). All radio components of the device are small-sized and are placed on a printed circuit board, the drawing of which is shown in Fig. 1.
LEDs are mounted in holes on the front panel of the housing. The network transformer has a secondary voltage of 2x9 V. It is mounted in the housing next to the printed circuit board. In a portable version, the device can be powered by a 9 V Krona battery. The adjustment of the device begins with checking the operation of the generator on the timer DA1. If there is no oscilloscope, the presence of pulses at output 3 of the DA1 timer can be determined with a voltmeter or LED (with a 300 ... 500 Ohm resistor connected in series) by the appearance of a high level when the SB1 button is pressed. By connecting a freshly charged battery in the correct polarity, resistor R13 sets the signal level at the DA3 input so that the HL5 LED lights up. When diagnosing batteries with a battery life of more than 6 months, the number of LEDs on will decrease. The battery under test is connected to the diagnostic device with sharp tips of control cords (for example, from a tester). The measurement time is set by resistor R1, the pulse repetition rate (within 400 ... 1000 Hz) - by resistor R4. Author: V.Knovalov, Irkutsk
Machine for thinning flowers in gardens
02.05.2024 Advanced Infrared Microscope
02.05.2024 Air trap for insects
01.05.2024
▪ Solar panels on indium phosphide ▪ Kamchatka deer were microchipped ▪ Micron P400m Solid State Drives for Servers and Storage
▪ site section Welding equipment. Article selection ▪ article Music plays, standard jumps. Popular expression ▪ article Why do watches need stones? Detailed answer ▪ article Sealed batteries. Directory ▪ article Hourly alarm in hours. Encyclopedia of radio electronics and electrical engineering
Home page | Library | Articles | Website map | Site Reviews
www.diagram.com.ua |


 Leave your comment on this article: