|
|


 Arabic
 Bengali
 Chinese
 English
 French
 German
 Hebrew
 Hindi
Hindi Italian
 Japanese
 Korean
 Malay
Malay Polish
 Portuguese
 Spanish
 Turkish
 Ukrainian
 Vietnamese
|
ENCYCLOPEDIA OF RADIO ELECTRONICS AND ELECTRICAL ENGINEERING Frequency counter up to 1250 MHz. Encyclopedia of radio electronics and electrical engineering
Encyclopedia of radio electronics and electrical engineering / Measuring technology This device has not only a large upper limit of the measured frequency, but also a number of additional functions. It measures the frequency deviation from the initial value, the duration of the pulses and pauses between them, and counts the number of pulses. It can also be used as a frequency divider of the input signal with a dividing ratio that can be set over a wide range. The proposed frequency meter contains six microcircuits - the AD8611ARZ voltage comparator [1], the LMX2316TM frequency synthesizer [2], the 74HC74D D-trigger [3], the 74HC151D multiplexer selector [4], the PIC16F873A-1/SP microcontroller [5] and the integrated voltage regulator TL7805 . It displays the measurement results on a WH1602B character LCD [6]. Main Specifications
When the device is turned off, the microcontroller remembers the set modes of its operation in its EEPROM and restores it when it is turned on. The frequency meter circuit is shown in fig. 1. The clock generator of the microcontroller DD3 is stabilized by a quartz resonator ZQ1. The trimmer capacitor C13 allows you to set the clock frequency to exactly 4 MHz. The +5 V voltage regulator is assembled on a DA2 chip. Trimmer resistor R23 adjust the brightness of the backlight of the LCD screen HG1. The optimal contrast of the image on it is set by a tuning resistor R21.
Buttons SB1-SB3 control the device. The SB1 button is used to select the measured parameter. The SB2 button selects the connector to which the measured signal is applied. Depending on the frequency and shape of the input signal, this can be XW1 (logic level pulses with a frequency of 0,1 Hz ... 80 MHz), XW2 (analogue arbitrary waveforms with a frequency of 1 Hz ... 80 MHz) or XW3 (signals with a frequency of 20. ..1250 MHz). The SB3 button starts and stops the measurement in the pulse counter and frequency offset measurement modes. Long (more than 1 s) pressing this button switches from the frequency measurement mode to the frequency division mode and outputs the result to the XW1 connector. When the buttons are not pressed, the inputs of the microcontroller to which they are connected, the resistors R12-R14 maintain high levels. Resistors R4 and R6 create a constant offset of about 100 mV at the non-inverting input of comparator DA1. Resistors R5 and R7 are the positive feedback circuit required to obtain hysteresis in the comparator's switching characteristic. Diodes VD1 and VD2, together with resistor R2, form a two-way input voltage limiter at the inverting input of the comparator. The DD1 microcircuit, the main purpose of which is to work in frequency synthesizers in the 1,2 GHz range, contains two frequency dividers with a variable division ratio, which are used in the described device to divide the frequency of the input signals supplied to the XW2 and XW3 connectors by a specified number of times. The microcontroller sets the division ratios and the operating mode of this microcircuit by issuing commands via its serial interface (Clock, Data, LE inputs). Depending on the set mode, the Fo/LD output receives the result of one of these dividers. Resistor R19 and capacitor C19 form a power filter for the DD1 microcircuit, and diodes VD3 and VD4 protect the input of one of its frequency dividers, directly connected to the XW3 connector, from overload. A single vibrator is assembled on the DD4.1 trigger, which forms pulses with a duration of 0,5 μs from the output signals of the frequency dividers. Its timing circuit is resistor R17 and capacitor C10. The shaper of the pulses supplied to the XW1 connector is assembled on a transistor VT1 with a collector load - resistor R8. It works when the RC5 output of the microcontroller is set to a high logic level. Otherwise, the driver is turned off and does not affect the external signals supplied to the XW1 connector. Therefore, the XW1 connector can be used both as an input when measuring the frequency and duration of logic signals, as well as when counting pulses, and as an output in frequency division modes. Resistor R11 is used to protect the input 0 of the selector-multiplexer DD2 from randomly applied to the connector XW1 high-amplitude signals. At the commands of the microcontroller, the selector-multiplexer supplies to its inputs intended for measuring the frequency and duration of pulses either TTL level pulses from the XW1 connector, or signals received at the XW2 connector and converted into such pulses by the DA1 comparator, or signals received at the XW3 connector and passed through frequency divider chip DD1. The microcontroller performs the basic operations of measuring the frequency, duration and counting of pulses. It also displays the measurement results on the HG1 LCD and controls the operation of the entire device. The micro-controller program is written in MASM assembly language, which is part of the MPLAB IDEv7.5 program development environment. In the frequency measurement modes, the microcontroller counts the pulses received at the T0CKI input during the measurement interval selected by the user (0,01, 0,1, 1 or 10 s). When measuring the frequency of the signal applied to the XW3 connector, its frequency is preliminarily divided by 1000 by one of the dividers of the DD1 chip. When measuring the duration of pulses of a high logic level, the microcontroller starts counting pulses with a frequency of 1 MHz, obtained by dividing its clock frequency, based on the rising edge of the measured pulse at the INT input. It stops this account by the falling edge of the measured pulse. In the case of measuring the duration of a low-level pulse, the counting starts with its falling edge, and ends with an increasing one. As soon as the frequency drift measurement mode is enabled, the microcontroller makes the first measurement of the frequency of the input signal, then periodically repeats these measurements. The program subtracts the result of the first measurement from each subsequent one and displays the current difference on the indicator. After stopping this mode, the LCD displays the maximum recorded during the measurement of the frequency deviation down and up from the initial one. To measure the repetition rate of logical pulses with TTL levels, use the SB2 button to select the XW1 input connector. The microcontroller generates code 0 at the outputs RC2-RC000, thereby transferring the selector DD2 to a state in which the signal from the XW1 connector is fed to the TOSK1 input of the microcontroller for measuring the frequency and to its own INT input for measuring the pulse duration. The program displays the measurement results on the HG1 LCD (Fig. 2), and the durations of the high (H) and low (L) level pulses alternate on the screen. The code on the right side of the upper line means the set counting time: "10" - 10 s, "1" - 1 s, ".1" - 0,1 s and ".01" - 0,01 s. In the right part of the bottom line, the symbol of the selected input connector is displayed: TTL - XW1, VHF - XW2, UHF - XW3.
By measuring the frequency of analog signals (up to 80 MHz), the SB2 button selects the XW2 input. At the outputs RC0-RC2, the microcontroller generates code 001, switching the DD2 multiplexer to a position in which the signal from the XW2 connector, converted into rectangular pulses by the DA1 comparator, is fed to the TOCKI input of the microcontroller. The program measures the frequency of the signal and displays the result on the LCD (Fig. 3).
To measure RF signals up to 1250 MHz, use the SB2 button to select the XW3 input connector. From it, the signal arrives at the input fIN available in the chip DD1 frequency divider. The division ratio is set by the microcontroller to be 1000. The signal from the output of the frequency divider, converted into pulses with a duration of about 0,5 μs by a single vibrator on a DD4.1 trigger, is fed through the DD2 multiplexer to the TOCKI input of the microcontroller. The multiplexer is set to the required state by code 010 at the outputs RC0-RC2 of the microcontroller. The microcontroller program measures the frequency and, taking into account the division factor, displays the result on the LCD (Fig. 4).
The pulses to be counted are applied to the input connector XW1 or XW2. The SB2 button selects one of these inputs, and the SB1 button selects the COUNTER mode (Fig. 5). The account is started by pressing the SB3 button, which is accompanied by the replacement of the label OFF (off) on the screen with the label ON (on). To stop counting, the SB3 button is pressed again, while the ON label is replaced by the OFF label. The program displays the number of pulses accumulated during the time from start to stop on the LCD.
To measure the frequency offset, the signal (depending on its shape and frequency) is fed to one of the XW1-XW3 input connectors, this connector is selected with the SB2 button, and the "+/-FREQUENCV" function (its name is accompanied by the OFF label) is selected with the SB1 button. Measurement start by pressing the SB3 button, while the OFF label is replaced by the ON label.The device measures the frequency drift and displays its current value on the LCD (Fig. 6).After pressing the SB3 button again, which stops the measurement, the maximum values recorded during the measurement appear on the LCD frequency drift up and down from the original (Fig. 7).
To divide the frequency of an analog signal with a frequency of up to 80 MHz, use the SB2 button to select the XW2 input connector and apply a signal to it, the frequency of which is to be divided. From the output of the comparator DA1, it enters the OSCIN input of the frequency divider R_Counter of the DD1 chip. The microcontroller sets the required division ratio of this divider via the serial interface and connects its output to the Fo / LD output of the microcircuit. By pressing the SB1 button, the division ratio is reduced, and by pressing the SB2 button, it is increased. The longer the button is held down, the faster the coefficient changes. At the output of RC5, the microcontroller sets a high level, switching the XW1 connector to the output mode. At its outputs RC0-RC2, the microcontroller generates code 000, so the signal output to the connector is also fed to the T0SKI input of the microcontroller to measure the frequency. Pulse duration is not measured in this mode.
On fig. Figure 8 shows the result of dividing the 19,706 MHz signal applied to the XW2 connector by 100. In this case, the XW1 output at a frequency of 197,06 kHz is followed by high logic level pulses with a duration of 0,5 μs. Signals with a frequency of 50 to 1200 MHz are fed for division to the XW3 connector. They are processed similarly, the only difference is that the operation involves a higher frequency divider N-Counter chip DD1. On fig. 9 shows the result of dividing the frequency of 200,26 MHz by 2000. The output frequency is 100,13 kHz.
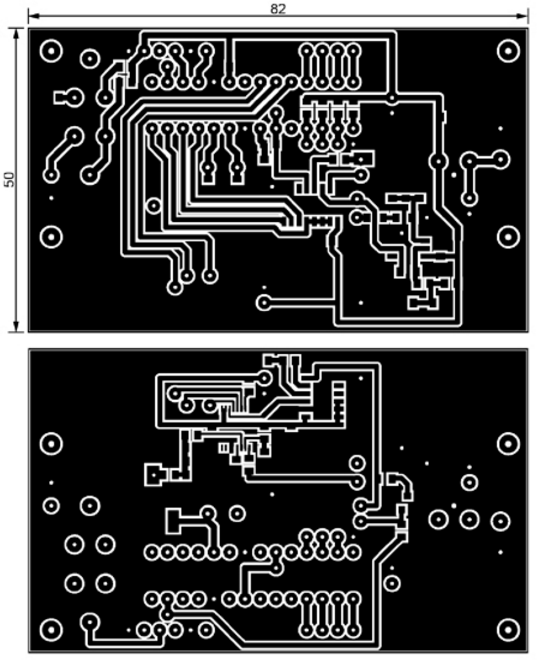
The frequency meter is mounted on a printed circuit board made of fiberglass laminated on both sides with a thickness of 1 mm. Its drawing is shown in Fig. 10, and the placement of elements - in fig. 11. Fixed resistors and most capacitors are size 0805 surface mount. Trimmer resistors R21 and R23 - SH-655MCL, trimmer capacitor C13 - TZC3P300A110R00. Oxide capacitors C4 and C6 are aluminum with wire leads.
Connectors XW1-XW3 - 24_BNC-50-2-20/133_N [7]. They are connected to the board by pieces of a coaxial cable with a wave impedance of 50 ohms, about 100 mm long. Buttons SB1-SB3 - TS-A3PG-130. The HG1 indicator is mounted above the board on stands 10 mm high with M3 screws. The device is assembled in a plastic housing Z-28 [8]. On its front panel, a rectangular hole 70x25 mm in size was cut out for the LCD screen and three holes 3 mm in diameter were drilled for the buttons. The buttons themselves are mounted on a fiberglass board measuring 100x12x1,5 mm, attached to the front panel from the back with M3 screws. The power socket is located on the left side of the case, and its switch is on the right side. The input bayonet connectors are located on the rear wall of the housing. Setting up a frequency counter is as follows: - set the trimming resistor R21 to the optimal contrast of the image on the LCD screen; - set the required brightness of the LCD backlight with the trimming resistor R23; - set the trimmer capacitor C13 to the clock frequency of the microcontroller exactly equal to 4 MHz. To do this, connect a digital frequency meter (Ch1-3 or any other) to the XW63 connector, turn on the device to be adjusted while pressing the SB3 button (in this case, the inscription "TEST" should appear on the LCD) and, rotating the rotor of the trimmer capacitor C13, achieve the readings of the external frequency meter, maximum close to 100000 Hz. Do not forget that the error in setting this frequency directly affects the error of the device being adjusted. The PCB drawing in Sprint Layout 5.0 format and the microcontroller program can be downloaded from ftp://ftp.radio.ru/pub/2016/02/f_metr.zip. Literature
Author: V. Turchaninov
Machine for thinning flowers in gardens
02.05.2024 Advanced Infrared Microscope
02.05.2024 Air trap for insects
01.05.2024
▪ Graphene airgel is lighter than air ▪ Gaming OLED TV LG OLED 48CX TV ▪ Service for shared rides on self-driving vehicles ▪ Wired video intercom Logitech Circle View Doorbell
▪ site section Voltage converters, rectifiers, inverters. Article selection ▪ article Kovalevskaya Sofia Vasilievna. Famous aphorisms ▪ article How is whiskey made? Detailed answer ▪ Heliostat article. Encyclopedia of radio electronics and electrical engineering ▪ article Detector radio receiver. Encyclopedia of radio electronics and electrical engineering
Home page | Library | Articles | Website map | Site Reviews
www.diagram.com.ua |


 Leave your comment on this article: