|
|


 Arabic
 Bengali
 Chinese
 English
 French
 German
 Hebrew
 Hindi
Hindi Italian
 Japanese
 Korean
 Malay
Malay Polish
 Portuguese
 Spanish
 Turkish
 Ukrainian
 Vietnamese
|
ENCYCLOPEDIA OF RADIO ELECTRONICS AND ELECTRICAL ENGINEERING Microalarm GSM security system. Encyclopedia of radio electronics and electrical engineering
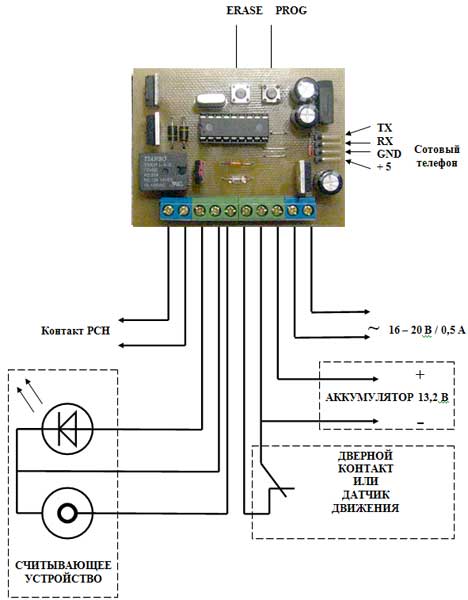
Encyclopedia of radio electronics and electrical engineering / Security devices and object signaling The security system is designed to protect apartments, cottages, garages, etc. The basis of the OS is the 16F628A PIC controller. Arming and disarming is carried out using Dallas Semiconductor DS1990 electronic keys. The device operation algorithm is as follows: when the registered key touches the reader, and if the door sensor contacts are closed, the system becomes armed. This is signaled by the LED on the reader - it lights up. When the contacts open, if the security mode was not disarmed by touching the registered key again, the power load relay (PCH) is activated and the LED flashes. The PCH allows you to control any load up to 120 VAC. At the same time, an SMS is sent to the programmed number about the violation of the security zone. After 75 seconds of operation, the PCH turns off and, if the loop is in a closed state, an SMS is sent that the device is armed again. If the security zone is not restored (the loop is open), then an SMS is sent stating that the device is not armed and the PCN starts working in a pulse mode: closed - 2 seconds, open - 4 seconds. If at this time the loop returns to the closed state, the device will again become armed and send a corresponding SMS about this. The LED, after re-setting to the armed mode, will continue to blink at a frequency two times less than during the alarm. When the reader is touched with an unregistered key, a short (1 second) sound signal is emitted and the device remains in its original state. In total, the memory of the microcontroller can be written from one to fifteen keys. It is possible to delete all keys and add new keys. The button is used to delete all keys. ERASE, for recording - button PROG. It must be remembered that the registration of the 16th key will delete the first one, the 17th - the second key, and so on. The device has a backup battery in case of power failure and emergency operation. The OS can also be used offline, without a cell phone. In this case, only RCH will work. The following messages must be recorded and saved on the SIM card: 1 cell SIM - "VIOLATION OF THE SAFETY ZONE"
Attention! The given sequence of cell NUMBERS is obligatory! SMS must be saved only on the SIM card, not in the phone's memory! The text, of course, can be different, the main thing is that its essence is clear. Your OS already has a power transformer installed and connected. All other connections must be made strictly in accordance with the wiring diagram! The connecting cable with a cell phone must be connected to the OS in such a way that the arrow (triangle) on it is on top.
Relay K1 must be shunted with a VD7 diode - a seat is provided on the printed circuit board for it. Diode type FR157 Connecting to a Siemens C35, M35, etc. phone signal lines TX and RX:
Programming Write messages to SIM card 1. Insert an activated SIM card into your phone. Delete ALL messages if they are on this card - ie. before recording informational SMS, it must be completely cleared. 2. Enter the first message - "VIOLATION OF THE GUARD ZONE" and the number to which you want this message to be sent in case of OS triggering. Save this SMS on the SIM card - it must be stored in a cell № 1. 3. Enter the second message - "OS ARMED" and store it in the same way in the cell № 2 4. Enter the third message - "OS is NOT SET in armed mode" and save it in the cell № 3 5. After that, the phone can be used in conjunction with the security system. Attention! The given sequence of cell NUMBERS is obligatory! SMS must be stored only on the SIM card, and not in the phone's MEMORY! The text, of course, can be different, the main thing is that its essence is clear. You can record messages on any other phone, and then insert the card into the cell phone of the security system. Order of writing IBUTTON keys 1. First, the memory of the microcontroller is cleared. To do this, press the ERASE button. In this case, the PCN will work for a short time, the LED will light up and the OS will automatically switch to the key recording mode. 2. Briefly (lasting no more than 1 second) sequentially touch the reader with the keys (maximum - 15 keys). 3. Confirmation of successful registration will be a single flash of the LED of the reader and a short operation of the PCH. 4. Approximately 50 seconds after the registration of the last key, the device will exit the recording mode, about which the message appears on the display: "Key recording completed", while the PCH will briefly work and the LED will go out. Please note that a maximum of 15 keys can be registered. Registering the 16th key will delete the first key, the 17th the second, and so on. When registering, the duration of touching the reader must be no more than 1 second, otherwise there will be a double registration of the same key. 5. To write new keys, press the PROG button and repeat the steps from step 2. Wiring diagram
Firmware HEX, files in LAY format you can download here (40 kb) Author: Michael (alarm.gsm [dog] gmail.com); Publication: cxem.net
Artificial leather for touch emulation
15.04.2024 Petgugu Global cat litter
15.04.2024 The attractiveness of caring men
14.04.2024
▪ Sea water biodegradable plastic ▪ Thermoelectric generator using human heat ▪ The earth is moving further and further away from the sun
▪ section of the site Art video. Article selection ▪ article by Theodor Adorno. Famous aphorisms ▪ article Who and when sold the Eiffel Tower for scrap? Detailed answer ▪ article Climbing pandanus. Legends, cultivation, methods of application ▪ article Five-band equalizer. Encyclopedia of radio electronics and electrical engineering
Home page | Library | Articles | Website map | Site Reviews
www.diagram.com.ua |


 Leave your comment on this article: