|
|


 Arabic
 Bengali
 Chinese
 English
 French
 German
 Hebrew
 Hindi
Hindi Italian
 Japanese
 Korean
 Malay
Malay Polish
 Portuguese
 Spanish
 Turkish
 Ukrainian
 Vietnamese
|
ENCYCLOPEDIA OF RADIO ELECTRONICS AND ELECTRICAL ENGINEERING Copper multi-band VHF antenna Cactus. Encyclopedia of radio electronics and electrical engineering
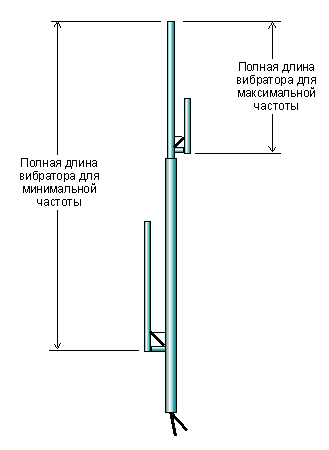
Encyclopedia of radio electronics and electrical engineering / VHF antennas We hope that you are already familiar with the design standard J-antennaso we won't go into unnecessary details. The proposed antenna is a type of J-antenna and can be used with great success on one, two, three or more bands. This antenna can be powered both from separate cables for each range, and from one cable, although the first option is most preferable. There is no trick to antenna design, just remember that the overall length of the antenna is determined by the lowest operating frequency. In other words, if you use an antenna on 144, 430 and 900 MHz, then the total length of the radiator will correspond to the length of the 2-meter antenna, i.e. about 150 cm.
Coaxial cables are passed inside the center pin to the corresponding elements. T-junctions are used between antenna elements. The problem with antenna design is that the more bands you use, the more difficult it is to ensure that the SWR is uniform across all bands. Antenna size chart for some bands
For best results, first make the highest frequency vibrator, for example for the 435 MHz band. The vibrator is made of a copper tube with a diameter of 9 mm, the matching line is made of a copper tube of 6 mm. Of course, the final product will be in the shape of a "J". Now let's make the elements of the next band, for example on 223.5 MHz, by adding a tube on the T-connector, which is the base mount of the 435 MHz antenna. We used 12mm tubing for the vertical driver and 12mm for the flex for this section. Now make a 146 MHz antenna, remember that the total length of the antenna is the lowest frequency you will use. We use 18mm tube for the vertical driver and 12mm for the cable. The plume must be parallel to the vertical radiator, but it can be located on any side relative to the vertical axis. We prefer to place them on opposite pairs of sides, but you can do them all on one side if you like. The final look of this antenna resembles a cactus, hence its name. One last note: If you are using 12mm tubing for the entire assembly, add 2mm to the length on the 6m stub to allow for adjustment. The manufactured antenna, after tuning, has a SWR of at least 1.2-1 on all bands, provided that a separate power cable is used for each band. Solder all the elements before installing the coaxial cable. To install the cables, drill 6 mm holes in the top of the horizontal element of the T-connector closer to the vertical part (in the corner) and feed the cables through them. Enjoy the result! And one more thing: at first, until you have mastered the manufacture of such an antenna, do not make more than three ranges on one vibrator. Using a Single Cable to Power a Multi-Band Antenna (Unfortunately, in English). Single Coax Feed to Multi-Band Copper Cactus Antenna. There are three connection possibilities to feed the multi-bandcopper cactus antenna with a single feedline or coax. However, it isimperative that you use the proper coax for the highest band ofoperation, RG58 just won't cut it and even RG8 in lengths longer than25 feet is marginal in 440 operation. For all single coax feeding methods, the antenna will require-tuning to obtain the lowest SWR for each band. This is accomplishedby installing in the pipe cap of the tuning stub on each band ofoperation a brass machine screw of at least 2 inches in lengthvertical out of the cap. The first and simplest connection method, albeit the hardest totune, requires that you place a shorting wire on all but the lowestband of operation. If you are building your antenna from the N0ZOI(now KG0ZP) plans for "The Copper Cactus Antenna" and for examplebuilding a tri-bander for the frequencies of 144, 220 & 440 MHz, theshorting wires should be placed between the normal connect points forthe shield and center conductor of each band. The 440 band shortingwire should be placed exactly 1 inch above the top of the horizontalpipe of the 440 tuning stub, the 220 band shorting wire should be placed exactly 1-1/2 inches above the horizontal pipe of the 220tuning stub and your coax suitable for 440 operation should beconnected exactly 2-1/4 inches above the horizontal pipe of the 144tuning stub with the center of the coax going to the main vertical andthe shield to the tuning stub (this is just the reverse of theconnections shown on the plans and in the methods below), keeping thecenter conductor length as short as possible. For best results, tunethe antenna from the highest band to the lowest, however, using theshorting method does create quite a bit of interaction. The second method is easier to tune than the first method, but doesrequire placing 1/4 or 1/2 wavelength matching sections for all thebands of operation. If you are building a dual band antenna, the useof a T-Connector simplifies the project. Please bear in mind that youcannot use a 1/4 wavelength matching section on one band and a 1/2wavelength matching section on another band, plus each band ofoperation requires the use of a matching section, including yourlowest band of operation. Unfortunately, the connections will beinside the vertical section, a feat not easy to accomplish, but it does tune-up much faster and easier than the shorting strapmethod shown above. The center connector of the coax matching sectionsis affixed to the tuning stub and the shield to the vertical section,keeping the center conductor length lead as short as possible. The third method requires no antenna re-tuning from the specifications given on the plans and random length pieces of coax maybe used. However, a relay switching assembly must be constructedinside a weathertight enclosure or the use of a duplexer for dual-bandoperation or tri-plexer for tri-band operation can be utilized. Asabove, the center conductor of the coax goes to the tuning stub and the shield to the vertical. I will note that I have used random lengthcoax, without *-plexers or relay assemblies, however, this methodworked on only three of five duplicate antennas using the same randomlength pieces of coax on each. Each band showed an SWR of less than1.025 to 1 until connected together, then two of the antennas showedan SWR of over 3 to 1 and three antennas were less than 1.8 to 1across all bands without re-tuning. A little re-tuning brought the SWRdown to below 1.2 to 1 on two of the antennas, but we could notacheive anything lower than the original 1.8 to 1 on the third. So if you use random length coax and no relays or *-plexers, good luck. NOTE: The connect distance above the horizontal member on each bandis selected for an impedance of around 50 ohms, moving the connectpoint up or down from this set point can and will increase the impedance as high as 650 ohms within a distance of 1/2 inch eitherside of the established proper connect point. Author: Gary, KG0ZP; Publication: N. Bolshakov, rf.atnn.ru
A New Way to Control and Manipulate Optical Signals
05.05.2024 Primium Seneca keyboard
05.05.2024 The world's tallest astronomical observatory opened
04.05.2024
▪ Apple moves computers to its own processors
▪ section of the site Instructions for use. Article selection ▪ article Rest from deeds (works). Popular expression ▪ article What is neon? Detailed answer ▪ Tsunami article. Children's Science Lab
Home page | Library | Articles | Website map | Site Reviews
www.diagram.com.ua |

 Leave your comment on this article: